Installation#
Installing Critical Manufacturing MES is a streamlined process carried out directly through the Critical Manufacturing DevOps Center, available from the Critical Manufacturing Customer Portal ⧉. This environment provides a centralized, guided experience designed to help you deploy, configure, and maintain your MES landscape with confidence.
In the section below, you'll find step-by-step guides of how to perform a full installation of the core MES platform, one using DevOps Center and an alternative guide using the provided ISO file. Additional details on optional modules and complementary components are also provided, allowing you to tailor your installation to the needs of your operation.
Info
If you're looking for broader information on prerequisites, architecture, or infrastructure-related topics, be sure to explore the comprehensive DevOps Center documentation ⧉, which offers deeper insights into setup, best practices, and system administration.
Container-based Installation#
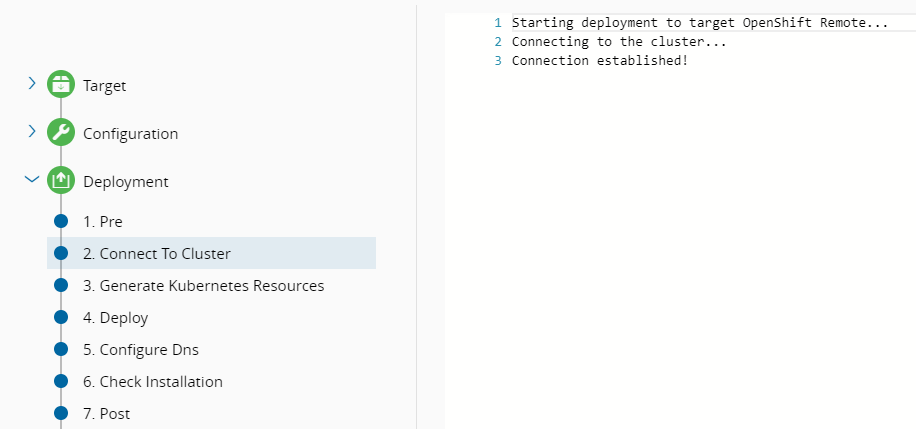
In this step, you are going to create an MES Customer Environment in an existing Customer Infrastructure with an Infrastructure Agent already deployed and connected to the DevOps Center. The Infrastructure Agent should be in version 10.2.0 as well. This example is configured for an OpenShift v4.18 cluster.
-
Load the Environments section in the main page of the Customer Infrastructure and select Create. This opens a transaction wizard.
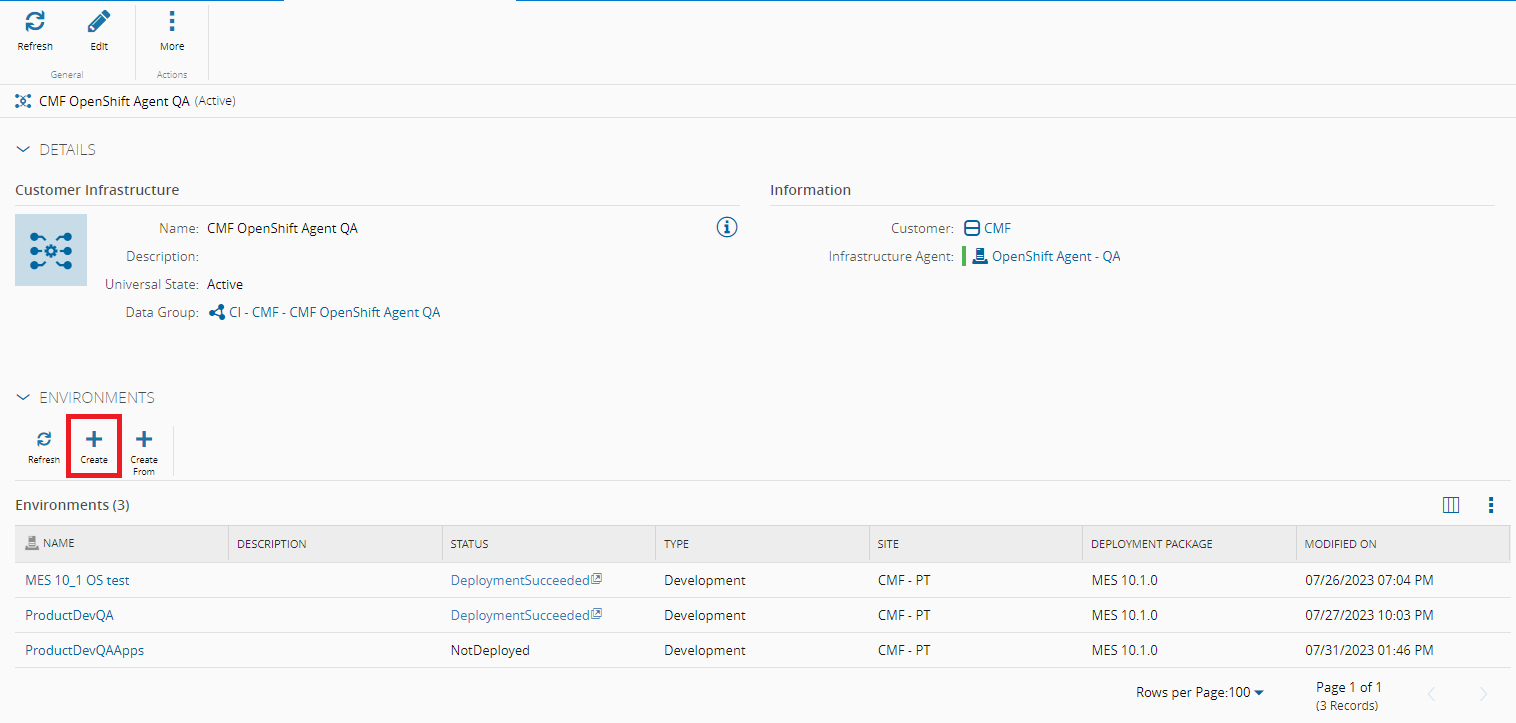
-
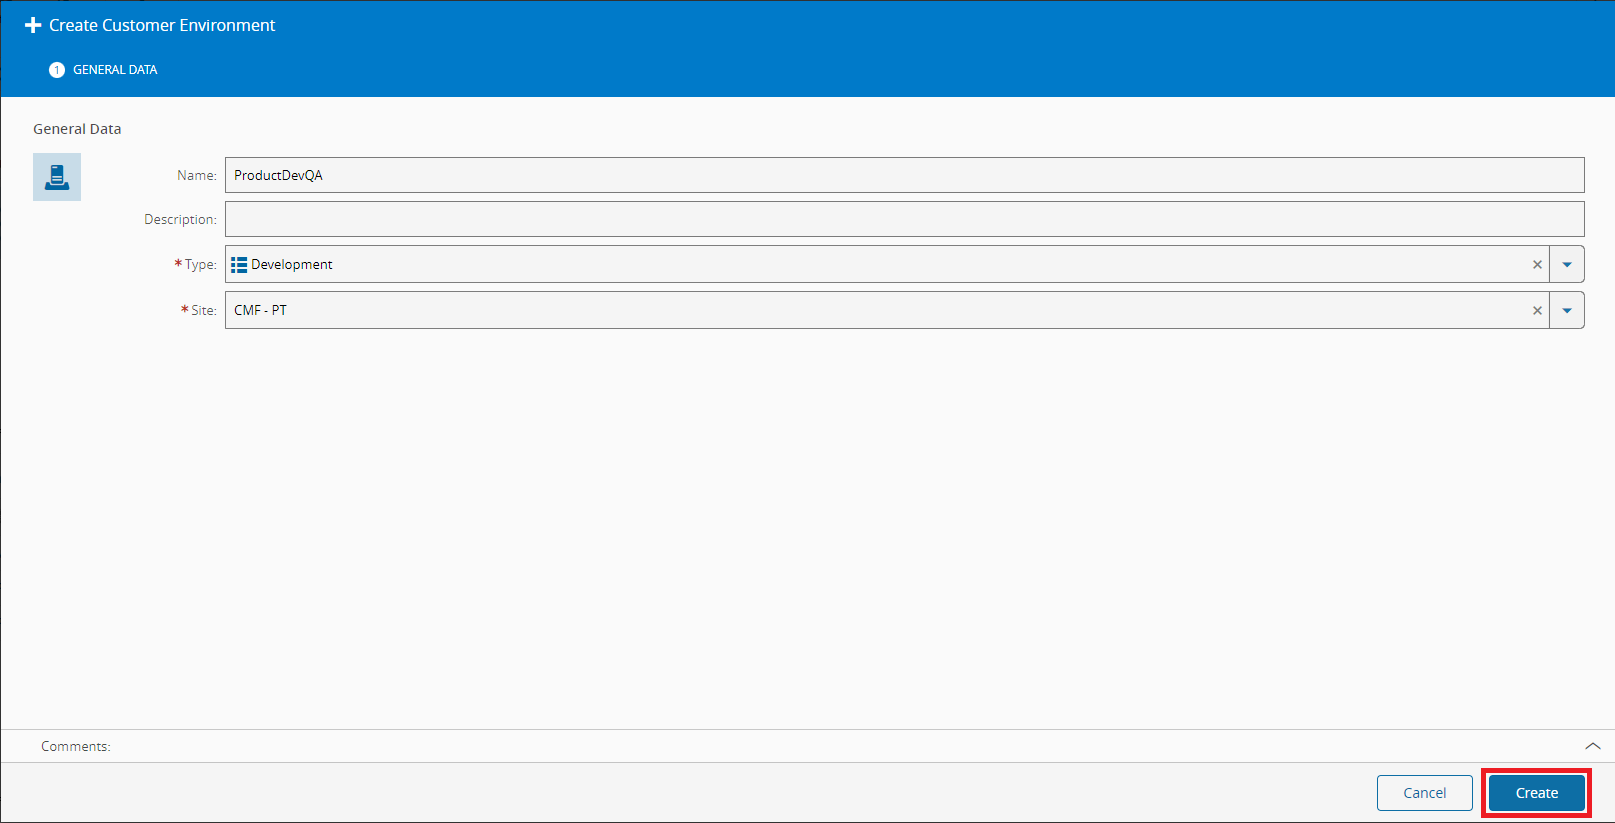
Set a Name, a Type and a Site. Select Create.
-
The Customer Environment is now created in the system and ready to be used. The current page should now be its installation view where it is possible to start configuring. The first step group is named Target and is related with the configurations' base package and version, opt-in features and the deployment target.
-
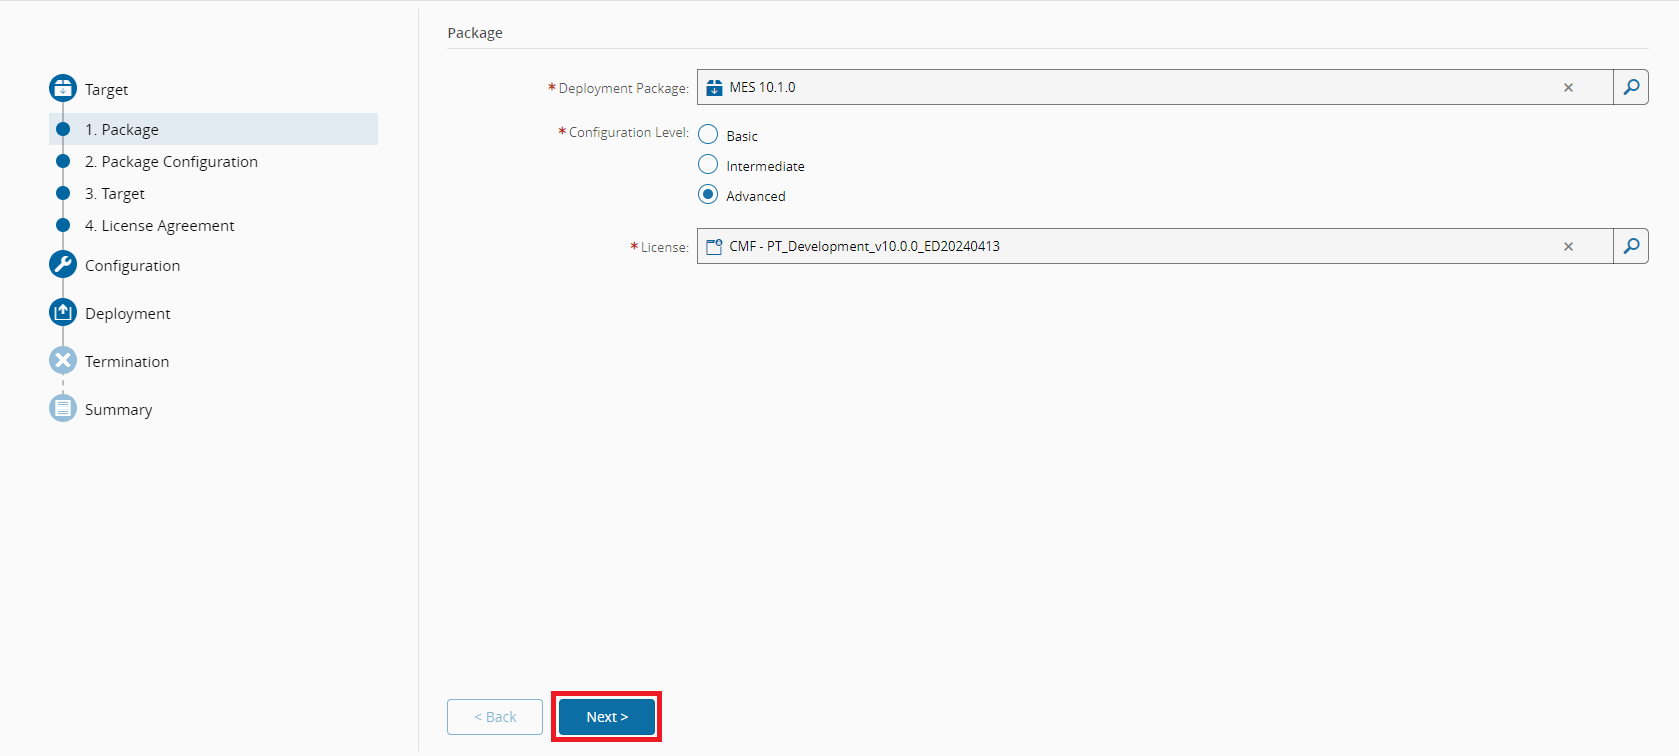
In the first step, named Package, you can define the base package and version along with other metadata. Set the following values and select Next:
- Deployment Package - base package to be used. Since you are installing a Critical Manufacturing MES 10.2.0, set the value to
MES 10.2.0. - Configuration Level - different levels which will have an impact in how many configurations will be asked and are possible to configure. Set to
Advancedso that you are able to configure everything that is currently possible. - License - license for the Critical Manufacturing MES installation. Select an available license.
- Deployment Package - base package to be used. Since you are installing a Critical Manufacturing MES 10.2.0, set the value to
-
Now configure the base package with opt-in features. These can vary based on the license modules and on the base package and version. The available ones for a Critical Manufacturing MES 10.2.0 are the following:
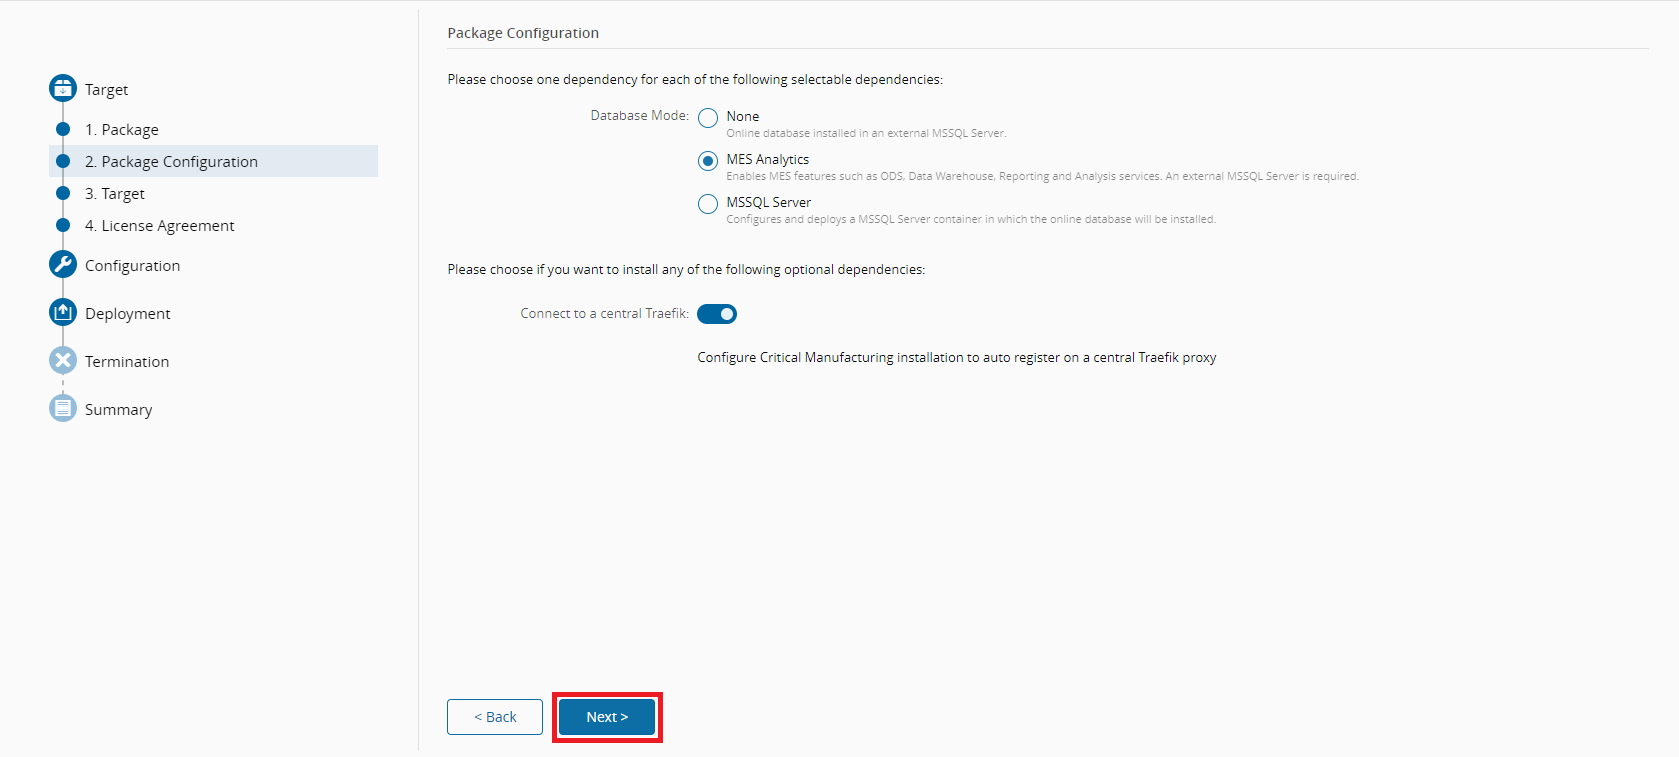
- Database Mode - different modes for the database installation. These may be:
- None - base mode where only the Online database is installed in an external MSSQL server.
- MES Analytics - enhanced version of the previous mode where more features are available but an external MSSQL server is still required. These features are: Operational Data Store (ODS), Data WareHouse (DWH), Reporting and Analysis Services.
- MSSQL Server - similar to the None mode but instead of relying on an external MSSQL server, a container is deployed along with the rest of the stack, which runs a containerized version of MSSQL server.
- Connect to a central Traefik - configures the stack's Traefik reverse proxy to not be exposed and instead connect to the Traefik that is included in the Infrastructure Agent. This is very useful as many Customer Environments can be deployed and their only entrypoint is the Infrastructure Agent's Traefik reverse proxy, which means less open inbound ports and less networking configurations. When creating a Customer Environment in a Customer Infrastructure with an Infrastructure Agent, this option will be selected by default.
To exemplify the feature, keep the Database mode set to
MES Analyticsand the opt-in feature Connect to a central Traefik set totruesince you have an Infrastructure Agent configured and running.Set the values as shown in the example above and select Next.
- Database Mode - different modes for the database installation. These may be:
-
Set the Target to
OpenShift Remoteas you are using OpenShift as your remote Deployment Target. Select Next. -
Read and Understand all the licenses that are displayed and select Next, which advances to the next step group, Configuration.
-
-
By now, the base application and its features are set. Before starting the deployment process, you need to configure the base application and features with the required data. The following steps address the available configurations for each different part of the system. Bear in mind that the Configuration Level and License have an impact on how many steps and parameters are shown along with the available Critical Manufacturing MES features.
Note
For configuration purposes, the character double quotes ( " ) is not allowed to be inserted on input fields.
-
General Data - general information regarding the system.
- Details
- System Name - name of the system. Also used to set the database(s) name(s).
- Tenant Name - tenant name of the system. Must not contain blank spaces.
- Access Information
- Application Public HTTP Address - public HTTP address to access the environment. Remember that when using Domain Name System (DNS) providers or Transport Layer Security (TLS) via certificates, such as in the case of an Infrastructure Agent, this field must comply to their specifications, for example, if configuring a wildcard certificate for
*.mydomain.comor using a Cloudflare for that same domain, this field must be set to<mysubdomain>.mydomain.com. Do not specify the HTTP Port, since the Agent's Traefik already has the ports 80 and 433 configured and these are the ones that are going to be used. For OpenShift, we should use its native routing mechanism which generally follows the cluster's certificate and domain as well instead of relying on DNS and TLS validation at the Infrastructure Agent or another level. - Application Public HTTP TLS Enabled - set to
trueif this environment has TLS enabled. This is just for internal usage, the actual TLS configuration must be set via DNS providers or certificates.
- Application Public HTTP Address - public HTTP address to access the environment. Remember that when using Domain Name System (DNS) providers or Transport Layer Security (TLS) via certificates, such as in the case of an Infrastructure Agent, this field must comply to their specifications, for example, if configuring a wildcard certificate for
- Install Information
- Package to Install - root package to be installed by the Environment Manager. If empty, it will use the default base package for the version. This can be set to override and install a different package, for example, a customization package.
- Installation Data Path - the path that the MSSQL Server can use to access the Installation Data volume. When using an external MSSQL Server, this volume must be a shared location between it and the containers.
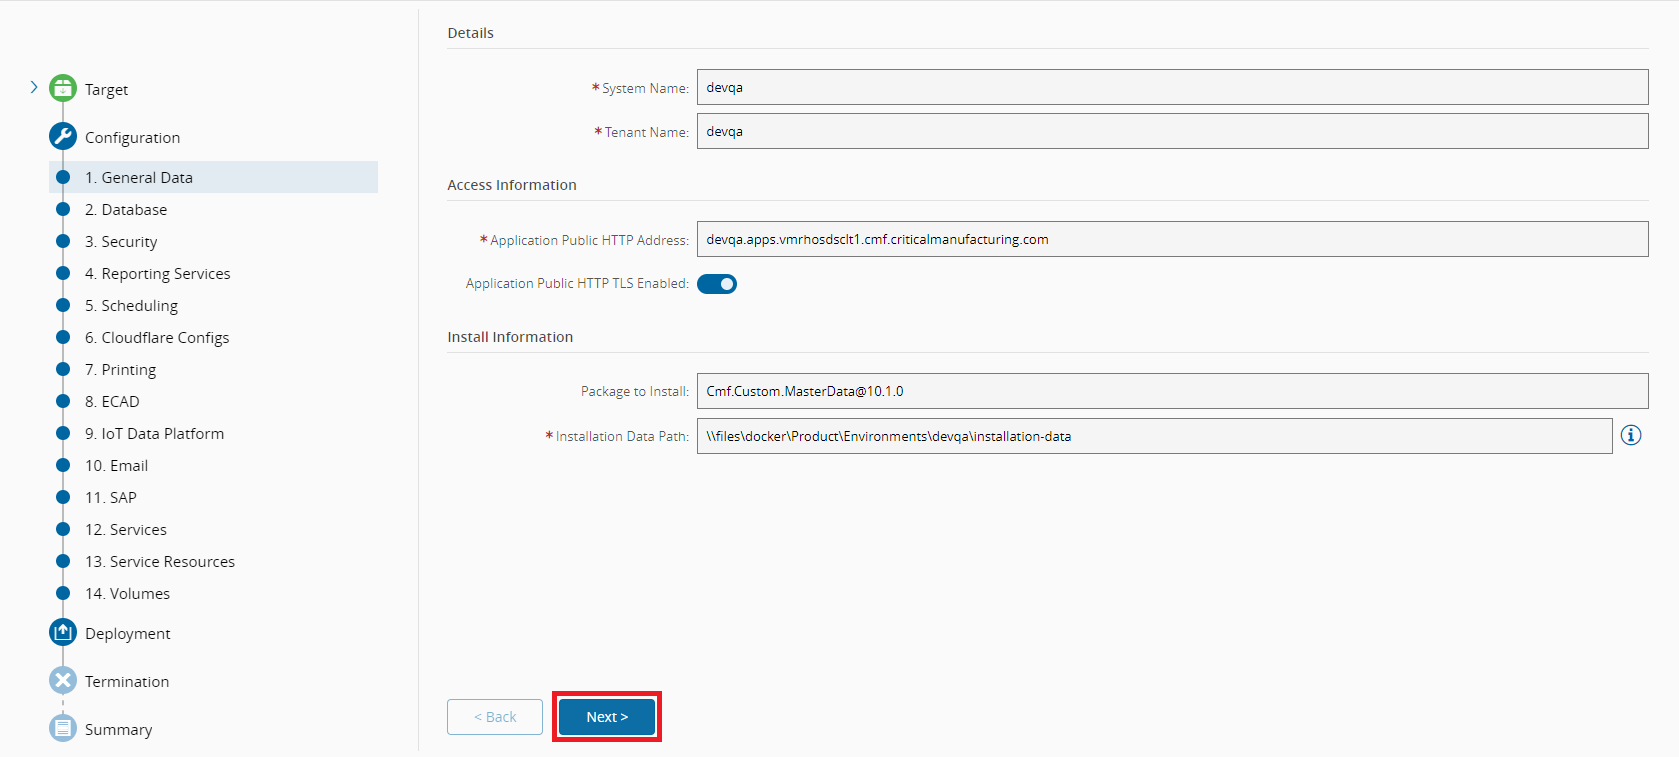
- Details
-
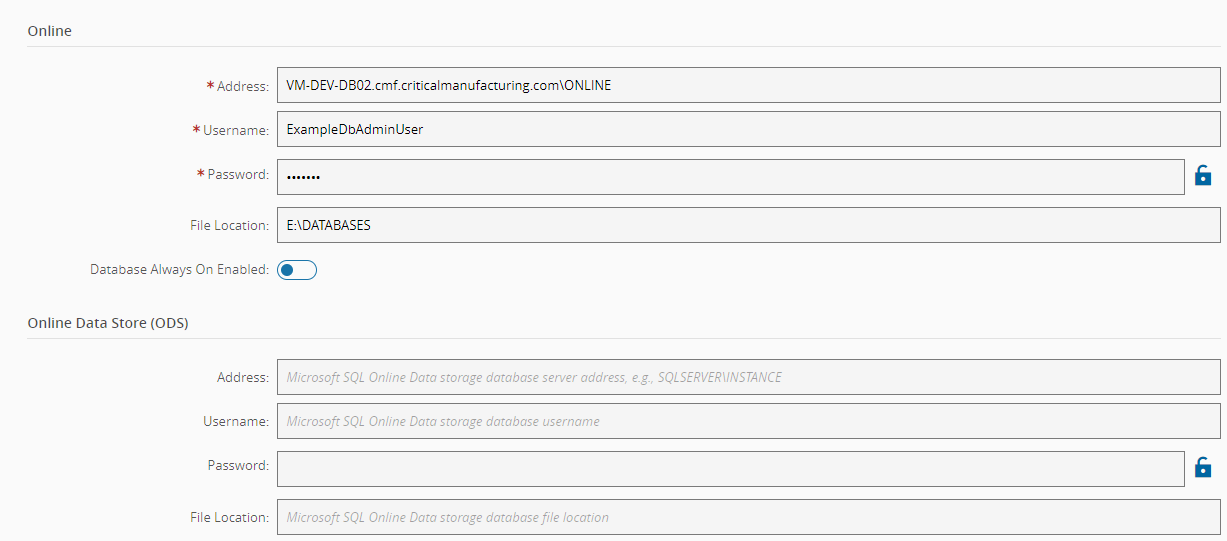
Database - information regarding database(s) connection(s).
- Online - online database information.
- Address - database address. Applies to Database Modes: None and MES Analytics.
- Username - database SA user. Applies to Database Modes: None and MES Analytics.
- Password - database SA user password. Generated when in database mode MSSQL Server. Applies to Database Modes: None, MES Analytics and MSSQL Server.
- File Location - location where the database files will be persisted. Applies to Database Modes: None and MES Analytics.
- Database Always On Enabled - whether to enabled Always On mode. Applies to Database Modes: None and MES Analytics. Feature not available with MSSQL Server database mode.
- Port - port to expose the database for remote access. Applies to Database Modes: MSSQLServer.
- Online Data Store (ODS) - ODS database information. Applies to Database Modes: MES Analytics.
- Address - database address. If left blank, will default to the Online database value.
- Username - database SA user. If left blank, will default to the Online database value.
- Password - database SA user password. If left blank, will default to the Online database value.
- File Location - location where database files will be persisted. If left blank, will default to the Online database value.
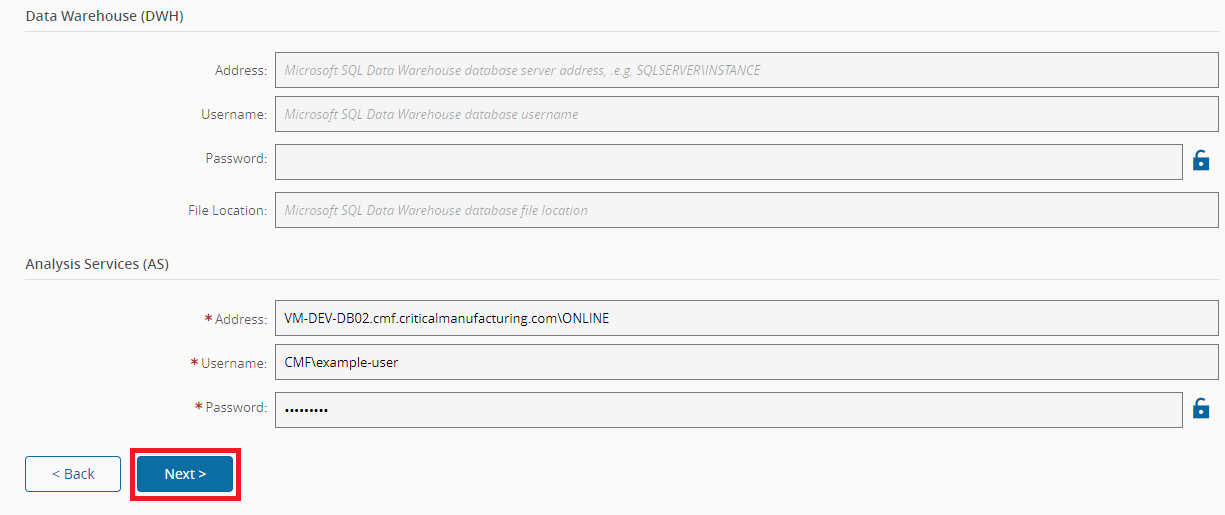
- Data WareHouse (DWH) - DWH database information. Applies to Database Modes: MES Analytics.
- Address - database address. If left blank, will default to the Online database value.
- Username - database SA user. If left blank, will default to the Online database value.
- Password - database SA user password. If left blank, will default to the Online database value.
- File Location - location where database files will be persisted. If left blank, will default to the Online database value.
- Analysis Services (AS) - AS database information. Applies to Database Modes: MES Analytics.
- Address - database address.
- Username - Windows authentication user.
- Password - Windows authentication user password.
Example:
- Online - online database information.
-
Security - information regarding the Security Portal.
- Domain
- Client Id - System's Auth Client Id. Defaults to MES and cannot be changed.
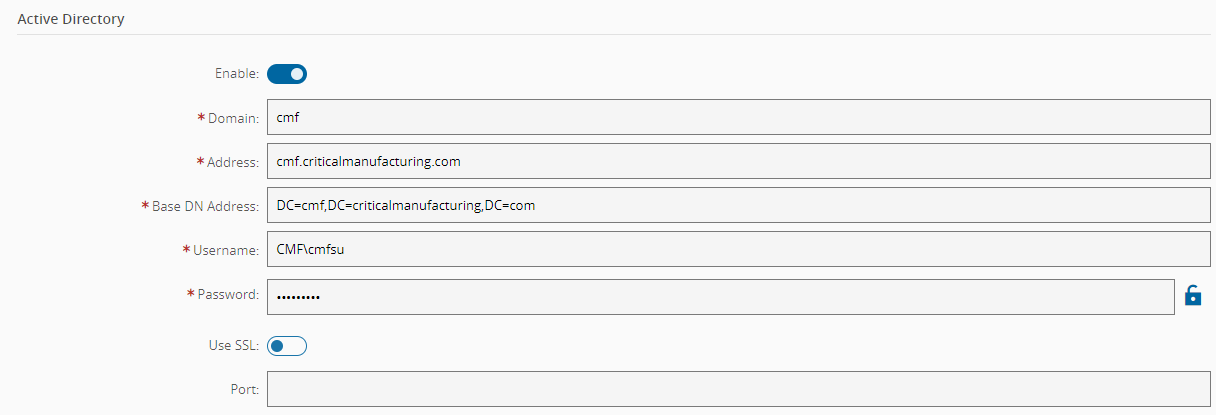
- Active Directory
- Enable - whether to enable the Active Directory authentication strategy.
- Domain - default domain where user information is stored.
- Address - AD address to connect.
- Base DN Address - base search query.
- Username - user to use for searching.
- Password - user password to use for searching.
- Use SSL - whether to use SSL.
- Port - AD port to connect.
Example:
- WebAuthn
- Enable - whether to enable the WebAuthn authentication strategy.
- Open ID Connect
- Enable - whether to enable the OpenID Connect authentication strategy.
- Display Name - The display name of the strategy in the Security Portal. Defaults to OpenID.
- Client ID - ID of an existing OpenID provider's auth client.
- Metadata URL - URL of the OpenID provider metadata.
- Session Options
- Session Duration - the duration while a session is still valid for authentication.
- Show Remain Signed In - whether the option to remain signed in via a session strategy is shown to the user after a login.
- CORS (Cross-Origin Resources Sharing)
- Allowed Origins - When set, will configure some client containers, such as the UI, Help and Security Portal, with the domains specified here, effectively blocking cross-domain requests by the browser.
- Domain
-
Reporting Services - Reporting Services access information. Applies to Database Modes: None and MES Analytics.
- Reporting Services
- Web Portal URL - URL of the MSSQL Reporting Services Web Portal.
- Web Service URL - URL of the MSSQL Reporting Services Web Service.
- Username - user with read and write access for the MSSQL Reporting Services.
- Password - user password.

- Reporting Services
-
Scheduling - access information of the scheduling component service. Currently, this service only works in Windows and it is not deployed in a containerized stack. It must be installed using the Deployment Framework in a Windows machine.
- Access Information
- HTTP Address - HTTP address to connect to the scheduling service.
- HTTP Port - HTTP port to connect to the scheduling service.

- Access Information
-
Cloudflare Configs - Cloudflare configuration to be used to create a subdomain for the current Customer Environment. Since we're not using Cloudflare to configure DNS, skip this step.
-
Printing - access information of the printing component service or to use a CUPS server. Currently, the service only works in Windows and it is not deployed in a containerized stack. It must be installed using the Deployment Framework in a Windows machine.
- Access Information
- Use CUPS - Set to true if using a CUPS server.
- Printing Service URL - URL to a printing service running in a Windows server. Available if Use CUPS is set to false.
- CUPS URL - URL of a CUPS server. Available if Use CUPS is set to true.

- Access Information
-
ECAD - access information of the ECAD component service. Currently, this service only works in Windows and it is not deployed in a containerized stack. It must be installed using the Deployment Framework in a Windows machine.
- Access Information
- HTTP Address - HTTP address to connect to the ECAD service.
- HTTP Port - HTTP port to connect to the ECAD service.

- Access Information
-
IoT Data Platform - configurations for the IoT Data Platform:
- Event Strategy
- Event Handler Strategy - either Kafka itself or an SQL Queue.
- Event Strategy
-
Email - email server information for the system used by several features.
- Email Server
- From - email address to be used to send emails.
- Address - email server address.
- Port - email server port.
- TLS Enabled - whether the email server is configured with TLS or not.
- Username - email server user.
- Password - password of the email server user.
- Support Email Address - email address of the local support team to send emails to.
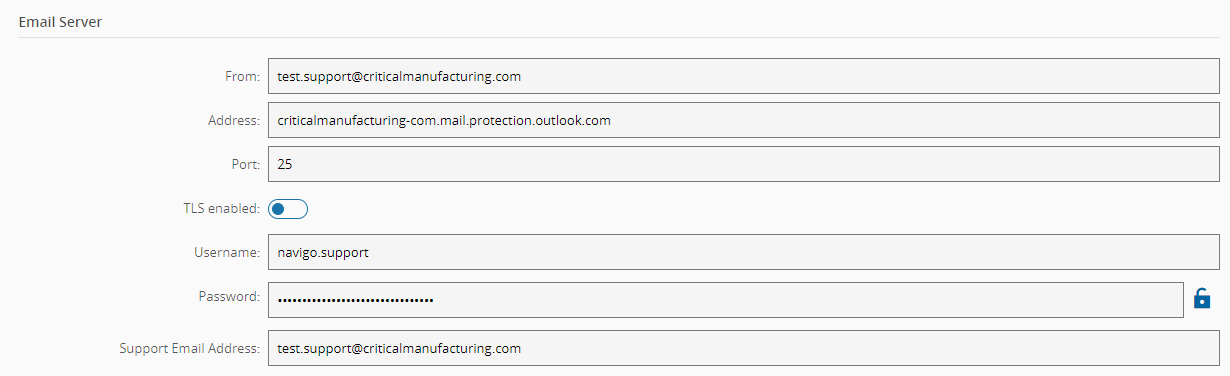
- Email Server
-
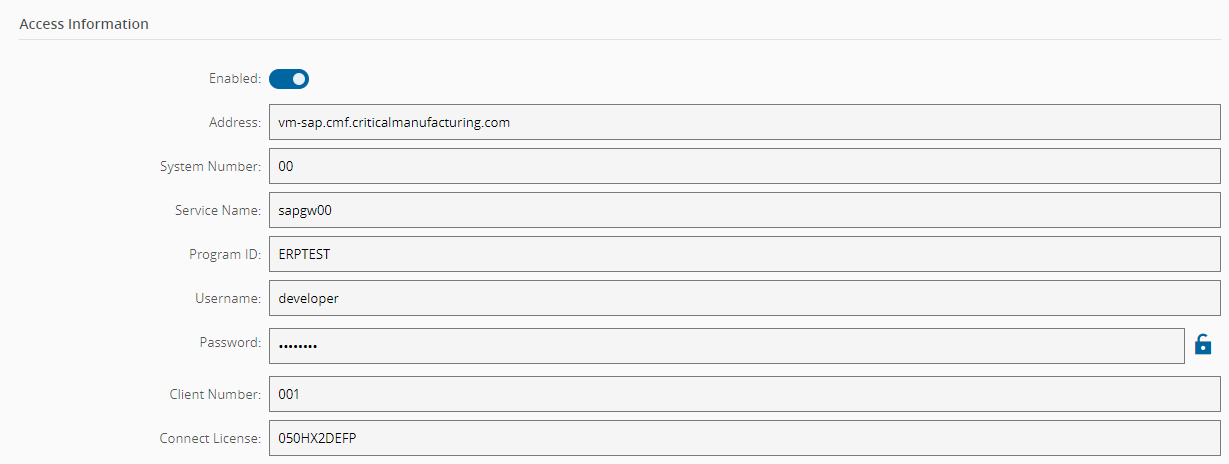
SAP - ERP SAP connection information:
- Access Information
- Enabled - whether the connection to a SAP system is enabled.
- Address - address of the SAP host.
- System Number - SAP system number.
- Service Name - name of the gateway in SAP.
- Program ID - SAP Program ID.
- Username - user to connect to the SAP system.
- Password - user password to connect to the SAP system.
- Client Number - SAP Client Number.
- Connect License - theobald ERP connect license.
Example:
- Access Information
-
Services - generic stack-wide configurations that vary depending on the base deployment package and deployment target.
- Environment Manager Boot Sync - (deprecated in newer versions) set which services will wait until the Environment Manager indicates that the system is installed and ready. Some parts of the application will be set to
trueby default, to ensure that it is not possible to access the environment until its installation is done. - DNS - allows to set custom DNS domains to use for resolving host names. It's recommended to use Fully Qualified Domain Names (FQDN) everywhere instead of short names and configuring this setting since it will impact the performance of hostname resolving and may even lead to unexpected issues.
- Container Image Registry Override - this setting can be used to override the image registry used to pull container images from. Useful in the case that a private registry is preferred.
- Custom CA Certificates - allows adding new certificates to the running containers. It is possible to add more than one certificate, and all of them will be injected into the containers that accept this feature. Before starting the deployment, a secret for each certificate must be created with the content of the certificate (same logic as external secrets). It is necessary to insert the name of the created secrets in this field. If there are proxies performing SSL Inspection on the network traffic, the respective certificate should also be added through this feature.

- Environment Manager Boot Sync - (deprecated in newer versions) set which services will wait until the Environment Manager indicates that the system is installed and ready. Some parts of the application will be set to
-
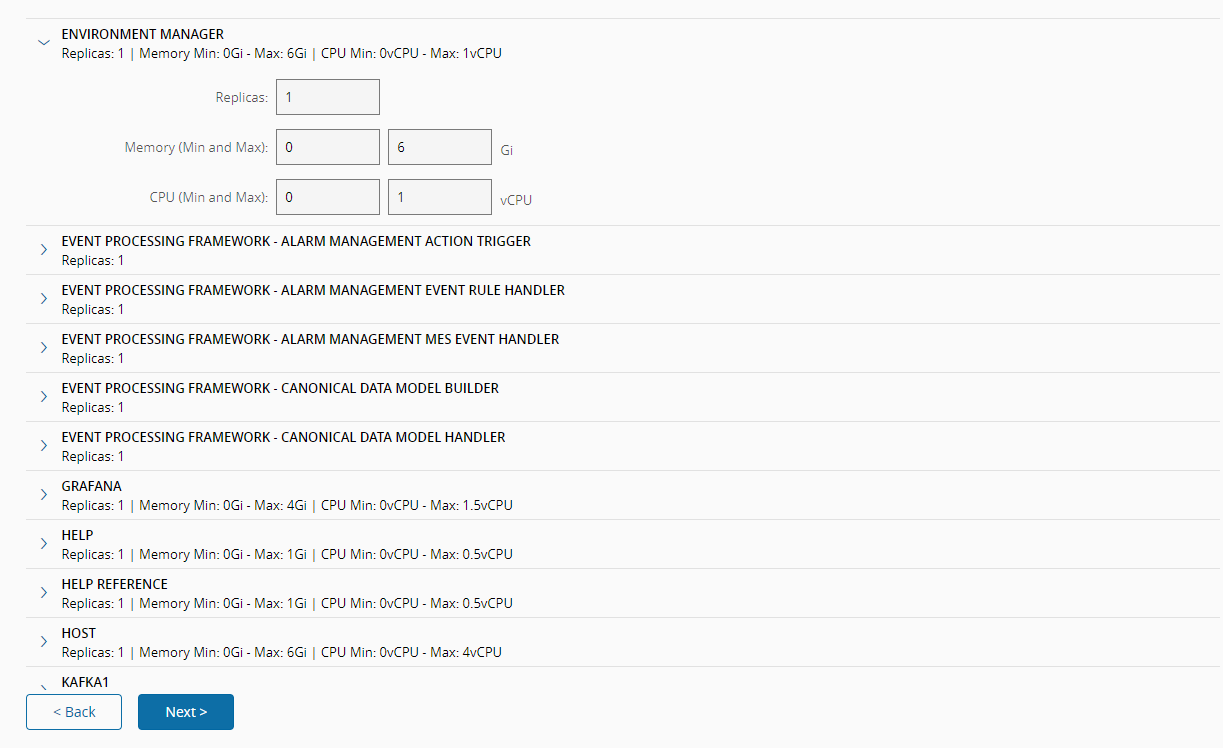
Service Resources - Definition of resources used by stack. You can define the memory (GB/GBi) and CPU (number of virtual cores) needed to deploy the specific container and maximum available to it. Also, you can specify the number of replicas to be deployed. Note that, in the upper right corner, there is a button to restore these configurations to their default values, as defined in the deployment package manifest, depicted in the image below.
-
Volumes - configuration for each required volumes. The entries here depend on the deployment package, database mode and opt-in features.
- ML Platform Export - repository used to store datasets that have been extracted in order to be used by the Machine Learning (ML) training server more efficiently.
- ML Platform Agent - repository to store the Ml models binaries that are deployed and in use.
- ML Platform Training - repository to store the ML models' configurations and other associated data such as CSV datasets, transformed data and binaries.
- Redis Data Folder - repository for the Redis Data files. Recommended to be a local high-performance disk.
- Zookeeper Data Folder - repository for the Zookeeper Data files. Recommended to be a local high-performance disk.
- Zookeeper Datalog Folder - repository for the Zookeeper Log files. Recommended to be a local high-performance disk.
- Kafka1 Data Folder - repository for the first Kafka instance Data files. Recommended to be a local high-performance disk.
- Kafka2 Data Folder - repository for the second Kafka instance Data files. Recommended to be a local high-performance disk.
- Kafka3 Data Folder - repository for the third Kafka instance Data files. Recommended to be a local high-performance disk.
- Grafana Folder - repository to persist the Grafana's data.
- Installation Data - shared location between the MSSQL Server and the Environment Manager. When using an external database, the shared path must point to the same location as the Installation Data Path setting.
- MSSQL Server Data - volume to persist the database files to. Currently, MSSQL Server does not support restoring a database when persisting the data to a Windows directory. Ensure that the environment is running on Linux. Applies to Database Modes: MSSQL Server. Recommended to be a local high-performance disk.
- Documents Folder - location where the Critical Manufacturing MES documents and attachments are persisted to. Advised to be a shared location, so that when having more replicas of the Critical Manufacturing MES host, the containers maintain data consistency.
- Logs Folder - location to persist logs as files. This is an optional volume. Starting from the version 10.2.0, the Infrastructure Agent is shipped with a monitoring solution that already collects all logs from all containers. You can set this volume to the type None in order to not use it.
Each volume can be configured with a different volume type. These types are Deployment Package specific. For more information on each type and their configurations, see Kubernetes Volumes Configuration documentation. Also, check the requirements for each volume System Requirements ⧉.
For local volumes, it's recommended to use dynamic provioning so that all local paths are handled by the cluster and not by you. For more information, see Local Volumes with dynamic provisioning ⧉.
-
-
Selecting Next will trigger the deployment process. It is automatic and you are provided with feedback to follow during the installation.
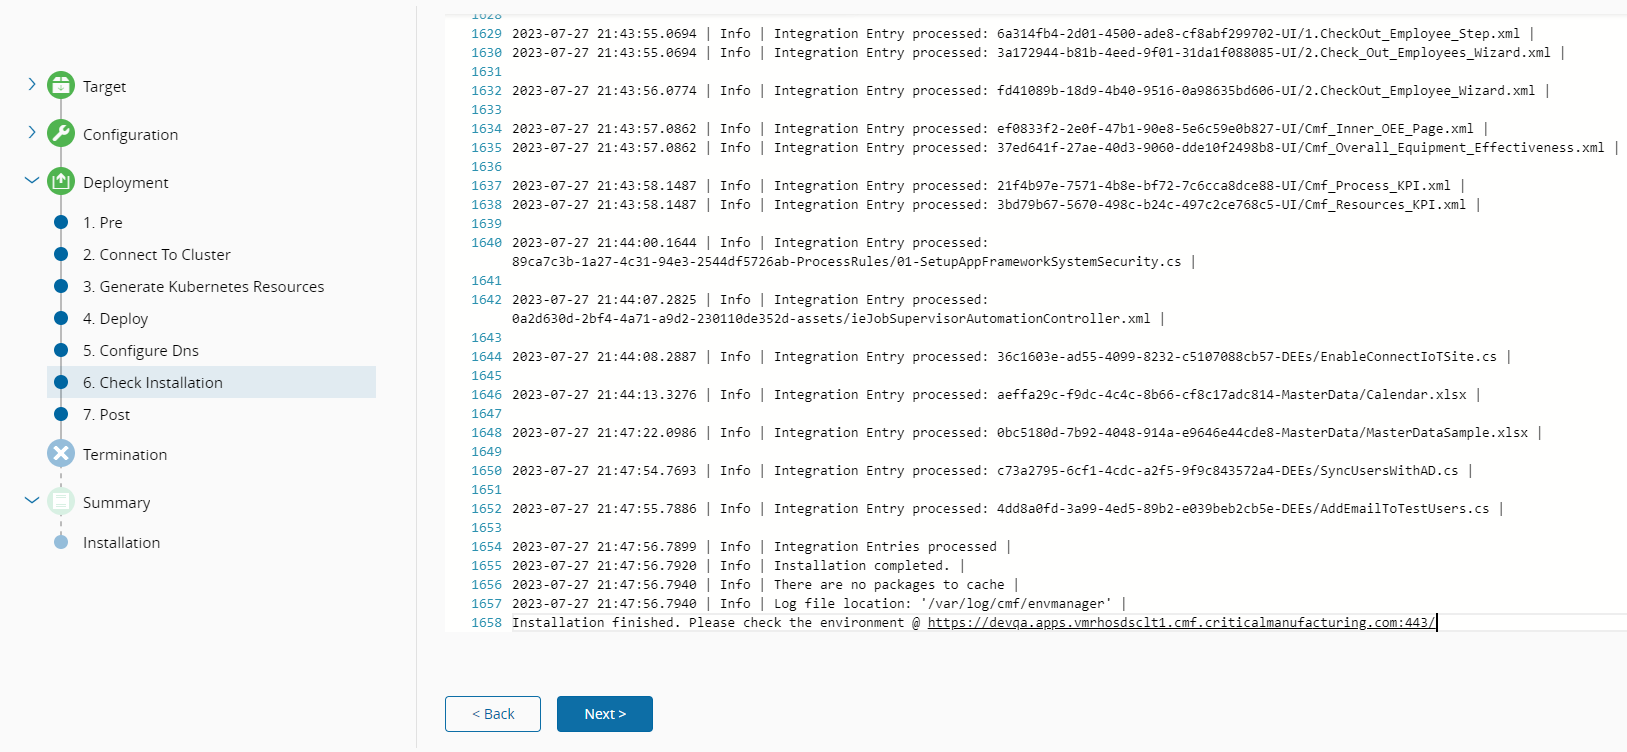
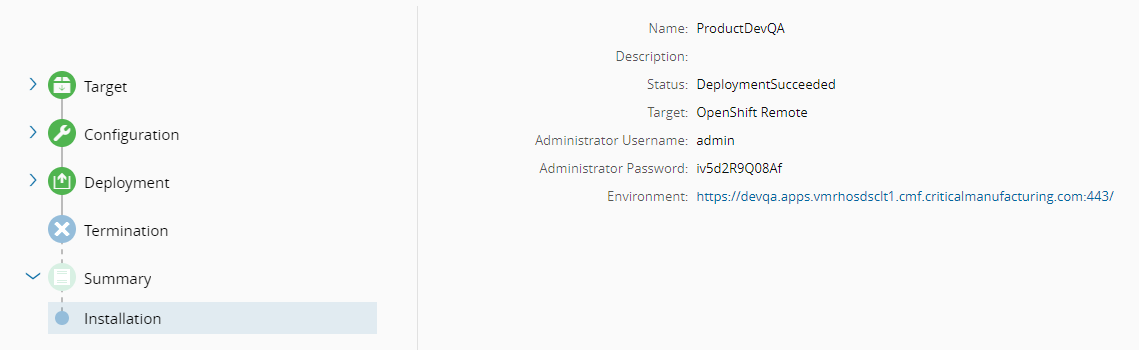
If everything is correct, the last screen should present you with the deployment Summary, which includes information such as the outcome, admin credentials to use to access the environment, and the URL.
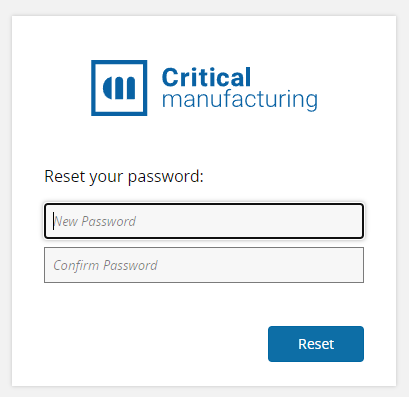
Accessing this URL should present the Critical Manufacturing MES to be used. In this case, you must log in and because this is the first login, the credentials in the Summary must be used to access the system and the password must be reset after logging in:
After resetting the password, you'll be redirected to the Home Page which will show there are no Apps installed:
Info
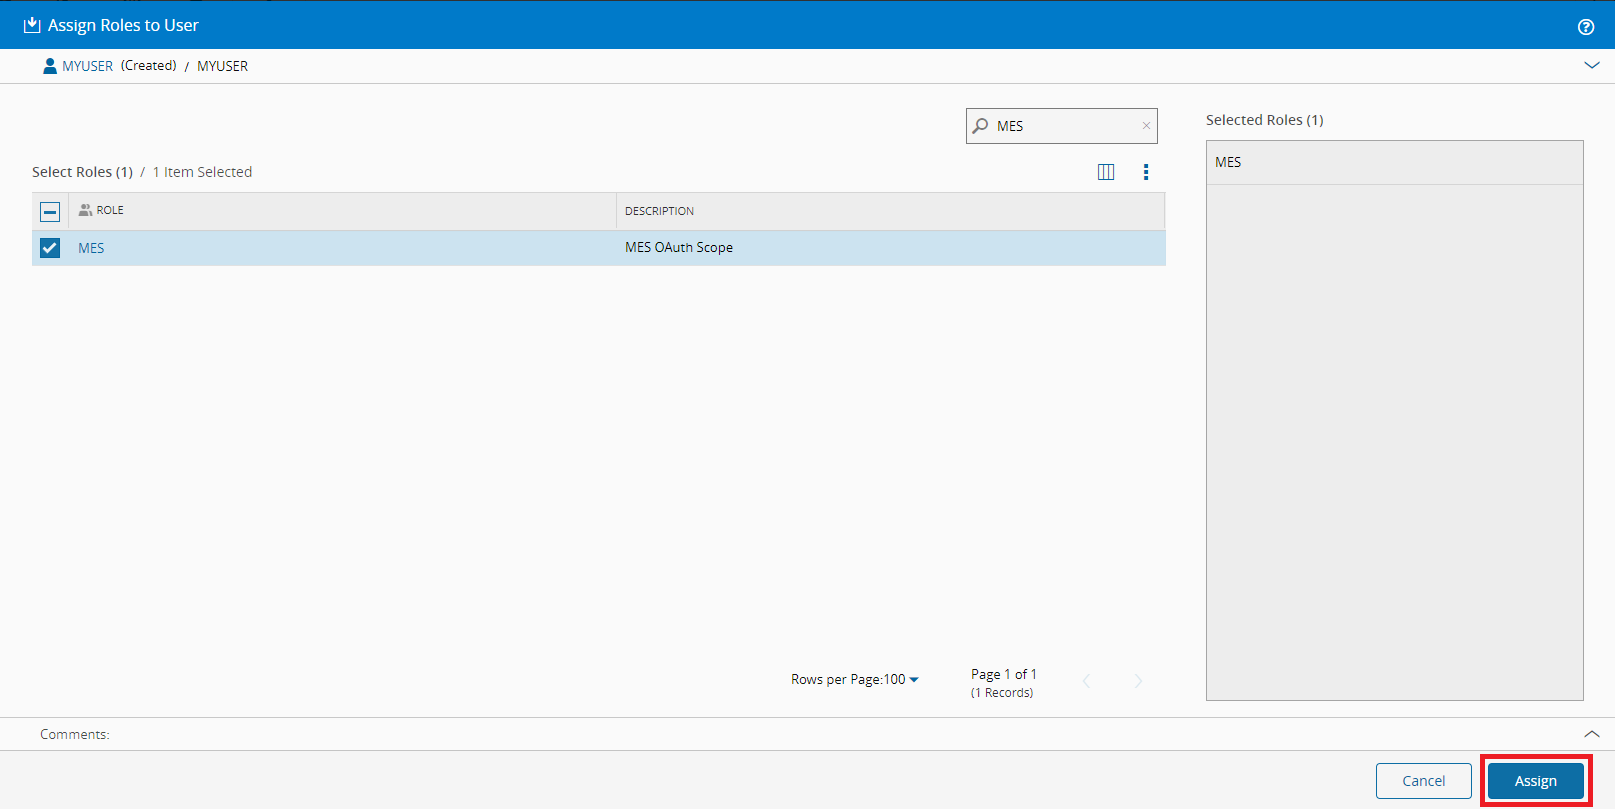
At this stage, only Administrator users have access to the MES. To allow other users to access it, you need to assign them the MES OAuth Role in the security page:
ISO-based installation#
The Critical Manufacturing MES installation procedure is supported by an installation wizard that is described step-by-step in this section. Depending on whether the installation is performed with or without Internet access, and on the chosen installation package, the setup's interface may present changes. Therefore, you may notice slight differences between the screenshots included in this guide and the version being installed.
The image below shows the first screen of the setup wizard:

All screens of the setup wizard are divided in three areas:
- The top area displays all the steps of the installation, and the current step is highlighted. It also displays the name of the user who is logged in to the Customer Portal or Offline. If the setup process is launched in Online mode without previous valid user authentication for the current user in the Customer Portal, a separate browser tab window is automatically opened for proper user authentication.
- The middle area shows the information setup step and the text boxes to be filled out with the required setup information.
- The bottom area is the navigation area. In this navigation area, you can go to the next screen or return to the previous one. It is also possible to cancel the installation, thus aborting the setup. The Install button is only enabled when all the configurations are filled out, and the setup is then ready to start.
Completing the text boxes may be mandatory (flagged by ). Throughout the steps, the existing groups may have an associated Validate button which if selected, will check if the entered value is within the expected ranges.
See the example below:
Preconditions#
- The setup must be performed on an English-based computer.
-
Before mounting and starting the installation, execute the following procedure to unblock your ISO file:
- Open the folder containing the ISO file on Windows Explorer.
- Right-click on the file and select the Properties option.
- Select the Unblock option, if available.
- Select the Apply button and then the OK button.
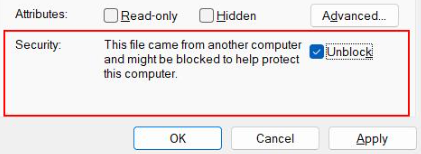
Note
Random errors may occur during the Critical Manufacturing MES installation process if it is initialized using a blocked ISO file. This occurs when Windows Attachment Manager marks ISO files as blocked (more information here ⧉).
Main Installation Process#
If you need to backup existing databases, visit Database Backup and Restore for a specific guide for this process.
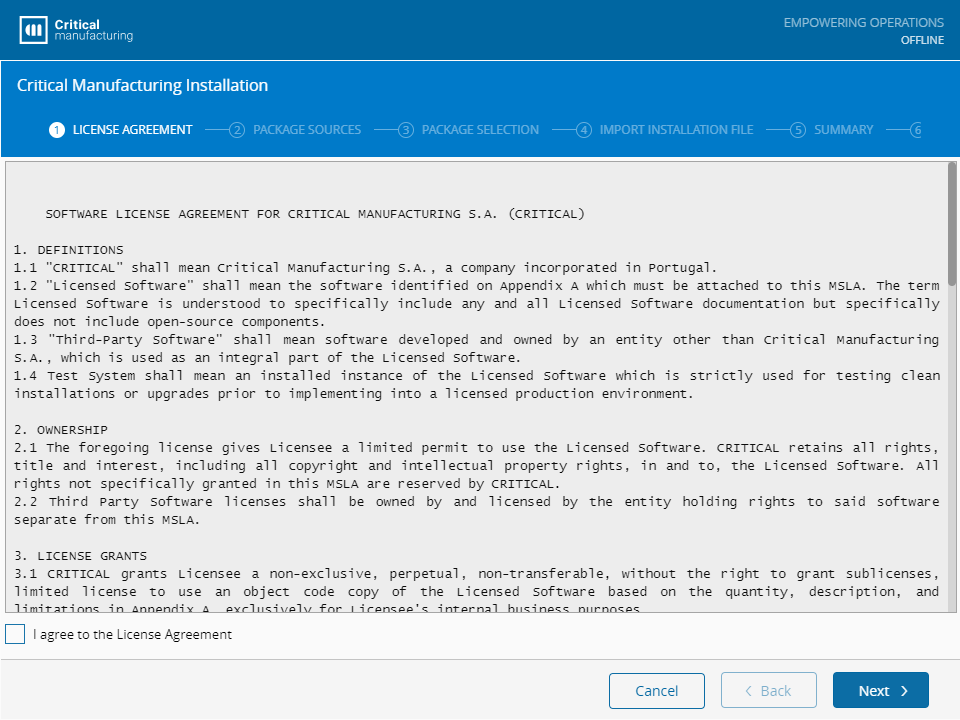
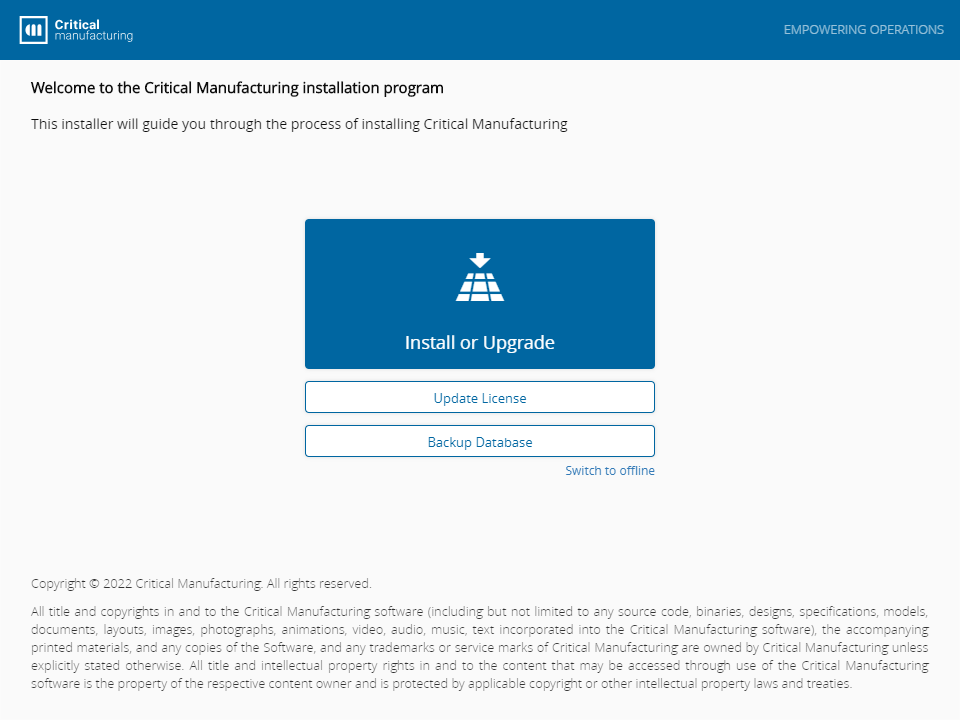
The first step of the installation process is the License Agreement. Select Install or Upgrade to get started.
License Agreement#
In this step, you need to read and agree to the Critical Manufacturing License Agreement.
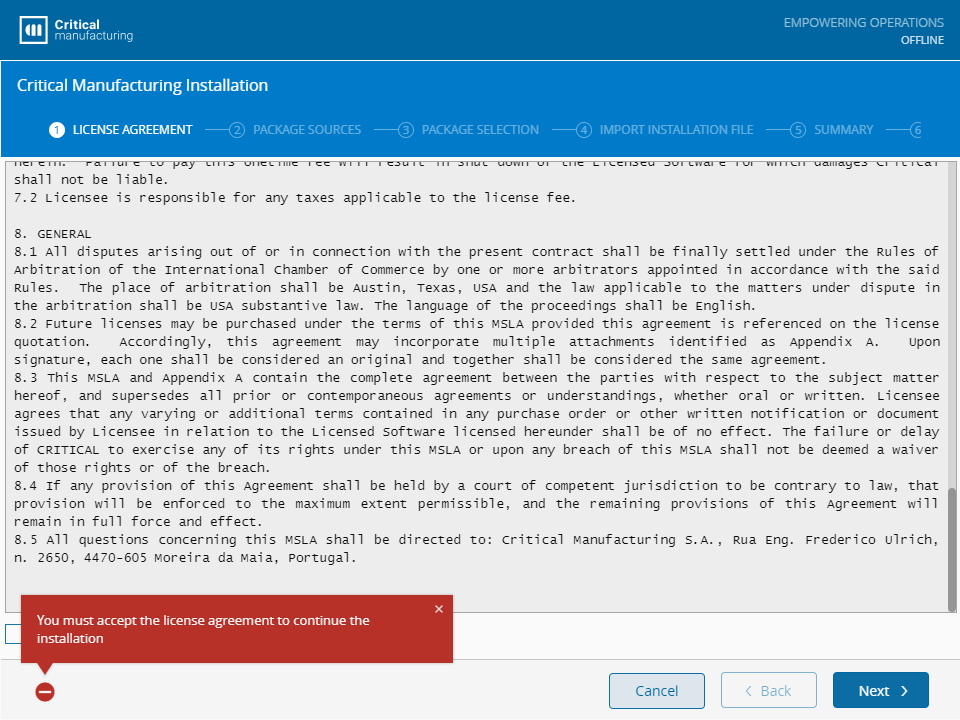
It is necessary to accept the License Agreement to continue with the installation, otherwise the wizard will display an error message:
To accept the License Agreement select I agree to the License Agreement. Then, select Next to continue.
Package Sources#
In the Package Sources step, you can add a location to search for installation packages. You can also add multiple package sources, and dependencies are resolved using the provided source order. If the setup is running in Online mode, the default process will add the local packages folder, and the server, to the list.
The package source can either be a Server or a FileSystem. The Server should be an NPM compatible endpoint. The FileSystem should be a folder accessible by the user running the setup, when the installation is started from the installation media, or the user running the master agent windows service is using a master only or master/slave configuration.
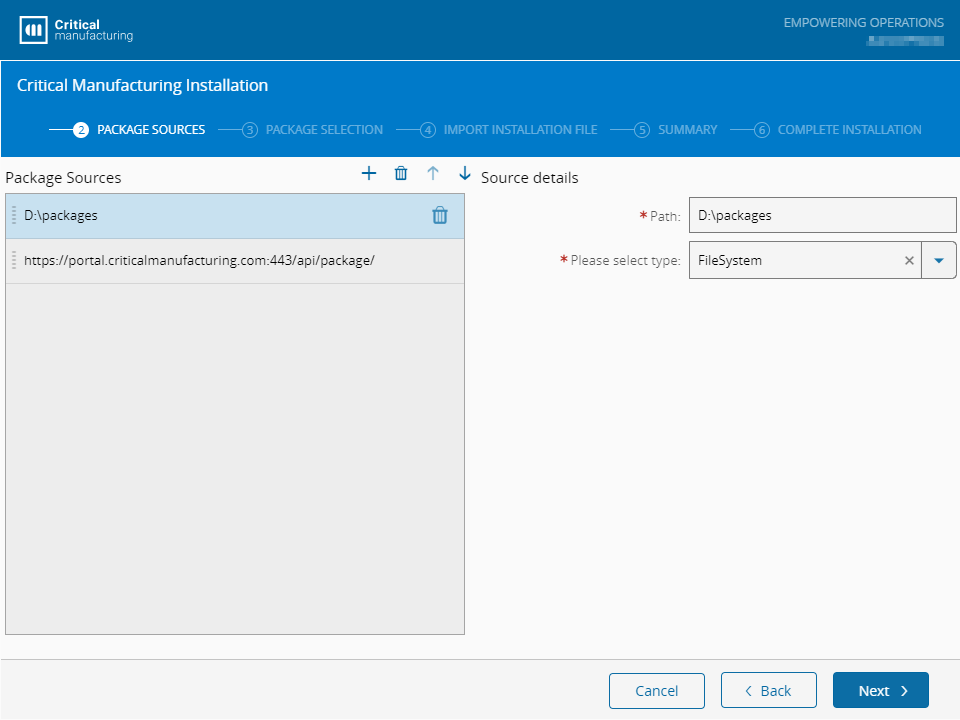
Select Next to continue.
Package Selection#
In the Package Selection screen, you must select the product and the version to be installed. The available packages are:
- CriticalManufacturing: Critical Manufacturing MES standard product line. This is the default installation package.
- Cmf.ConnectIoT.Packages: Connect IoT packages to upload to a supported Package Repository.
- Cmf.DataPlatform.Consumers: Consumers to use with Critical Manufacturing IoT Data Platform.
- Cmf.ECADService.Server: Critical Manufacturing MES ECAD (Electronic Computer-Aided Design) server to run as a service.
- Cmf.Scheduling.Server: Critical Manufacturing MES Scheduling Server.
- Cmf.PrintingService.Server: Critical Manufacturing MES Printing Service.
After selecting the package and the version to install, the available installation options for the selected product are displayed on the right-hand side of the screen. For Critical Manufacturing's standard product line, the following default installation types can be selected:
- Critical Manufacturing (All) - use this option to perform an installation of Critical Manufacturing MES. This action only needs to be performed one time as it installs the Critical Manufacturing Database Server or Business Tier, and the Presentation Tier.
- Critical Manufacturing Application Server - this option installs application server-related modules such as the Message Bus and Discovery Service.
- Critical Manufacturing Database Server - use this option to install all database instances.
For Critical Manufacturing Connect IoT packages there is only one available option. The product names, versions, and installation options can vary according to the installation packages available on the installation media.
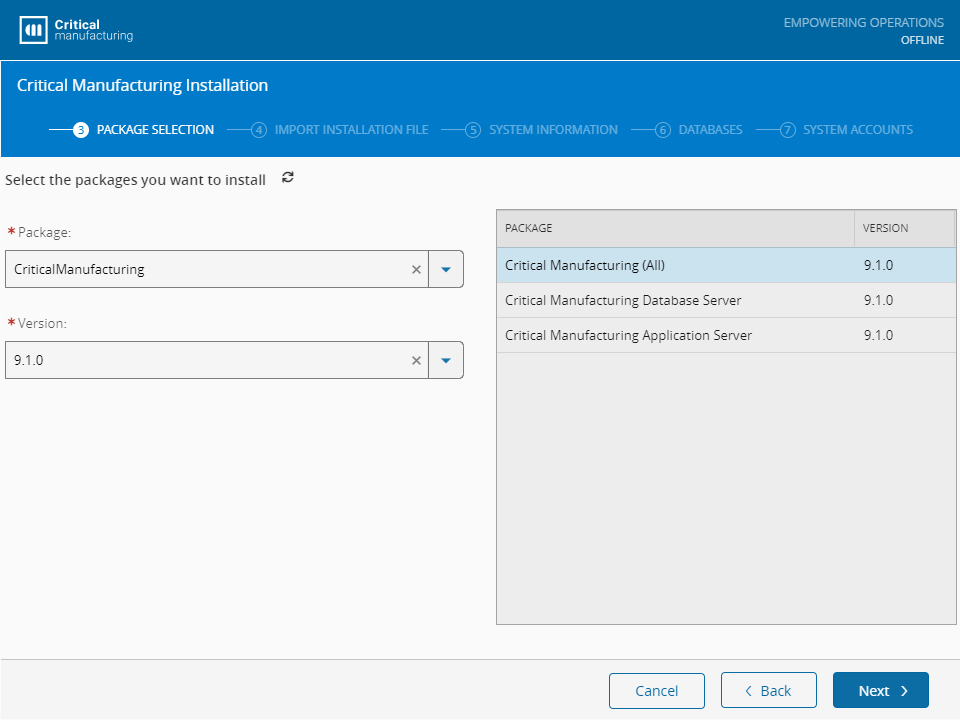
Select Next to continue.
Import Installation File#
The Import Installation File step allows you to load a file with the configuration of the installation. It will automatically fill out the information existing in the selected file. The installation file can also include product licenses.
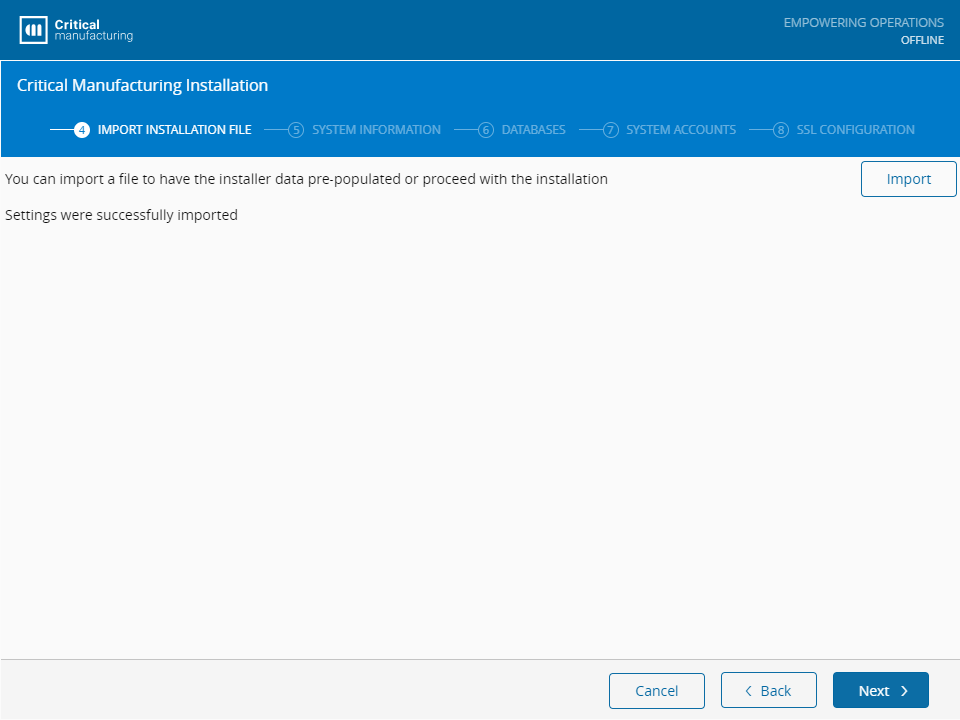
Select Next to continue.
System Information#
In the System Information screen, you need to provide the default accounts used by the Critical Manufacturing MES application. These accounts will be used to access the system after the installation. It is also necessary to provide a name for the system that will be used to identify the application services.
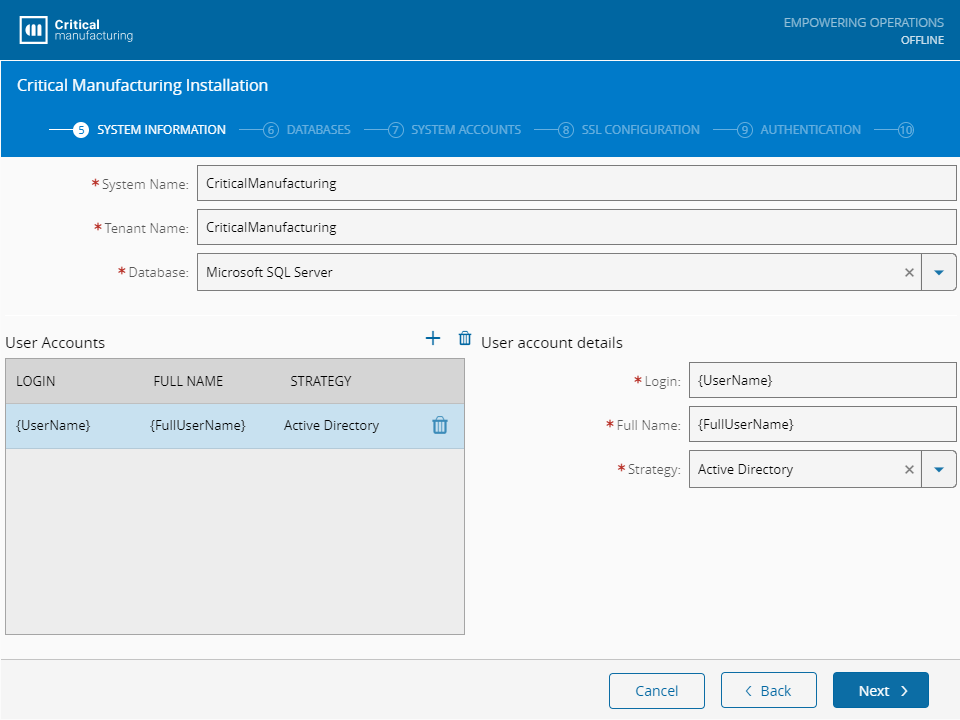
Fill out the fields as described below:
- System Name - provide the system name which defaults to CriticalManufacturing.
- Tenant Name - provide the tenant name which defaults to CriticalManufacturing.
- Database - select the Database to use in the installation of CriticalManufacturing:
- Microsoft SQL Server
- Azure SQL Managed Instance
Note
The Tenant Name is a client identifier and it should be the same for all client environments.
- User Accounts - add one or more users to the system. It is necessary to provide at least one user.
- Login - the user must be specified in the form domain\user.
- Full name - provide the name of the user.
- Strategy - which strategy is used when authenticating the user:
- Active Directory
- Local User
You can add new users by selecting on top of the User Accounts panel. Similarly, you can remove users by selecting on top of the User Accounts panel or by selecting an existing user and selecting in the respective row.
Local installation#
Depending on the strategy option you selected, users can be retrieved from Active Directory or created as a Local User. This requires the user performing the installation to specify an email and password to use when the user is created in the system during the installation process.
Note
The Email field is used to send an email to the user (to reset their password if required).

Select Next to continue.
Databases#
In the Databases screen, you need to define the database settings. Some of the settings depend on the Database selected in the previous step:
Microsoft SQL Server#
Note
The Backup Share field of the AlwaysOn group must represent an already existing folder with full access of the user that will be created in the System Accounts step. This folder is mandatory because it is used to place template backups from the installation starting point.
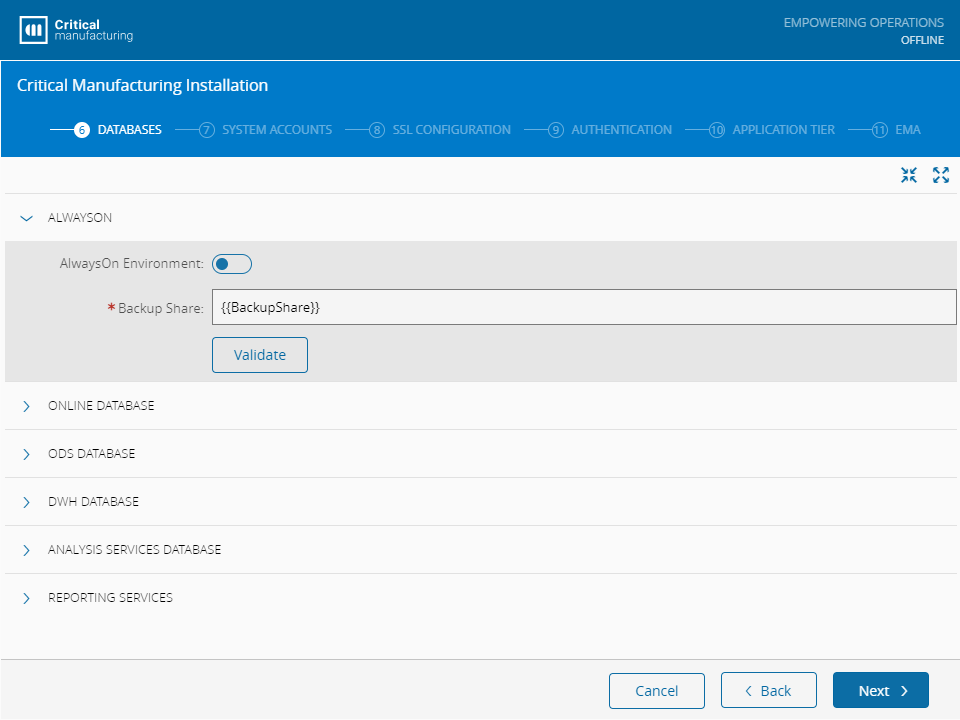
For the ONLINE DATABASE, ODS DATABASE, and DWH DATABASE, the Server Name, User Name and Password must be provided. The advanced fields of the referenced databases are used to override the default file locations and default file sizes.
Azure SQL Managed Instance#
If the Database selected in the previous screen was Azure SQL Managed Instance, specific fields must be provided:
Azure Storage#
- Storage Account Blob - specify the storage account blob of the Azure Storage location.
- Shared Access Signature Token - specify the signature token for shared access.
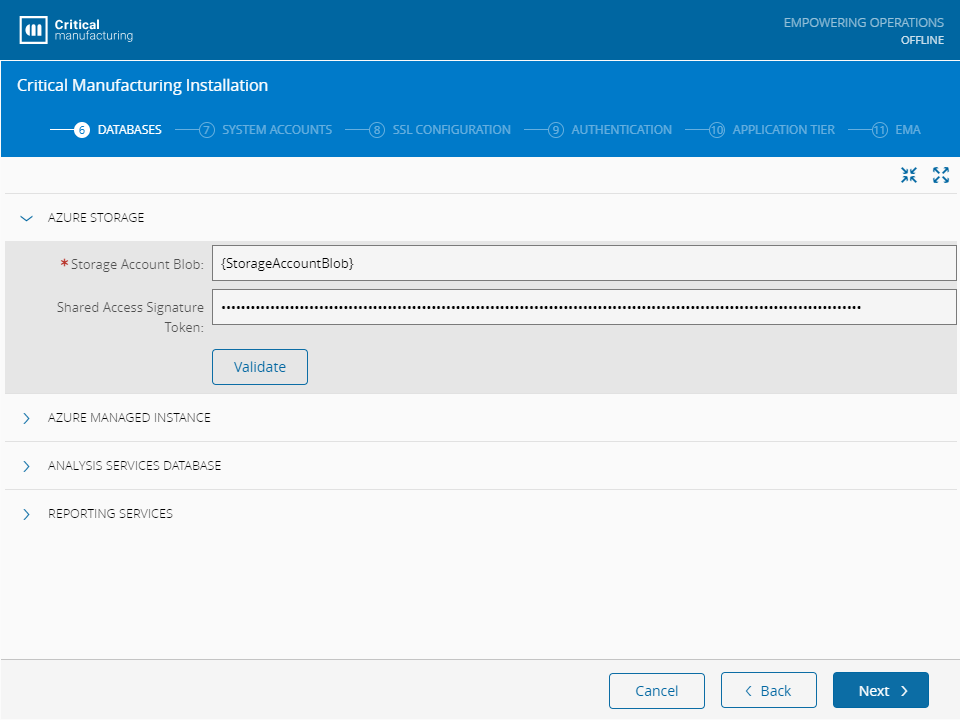
Azure Managed Instance#
- Database Server - specify the database server name.
- Database User - specify the database user name.
- Database User Password - specify the database user password.
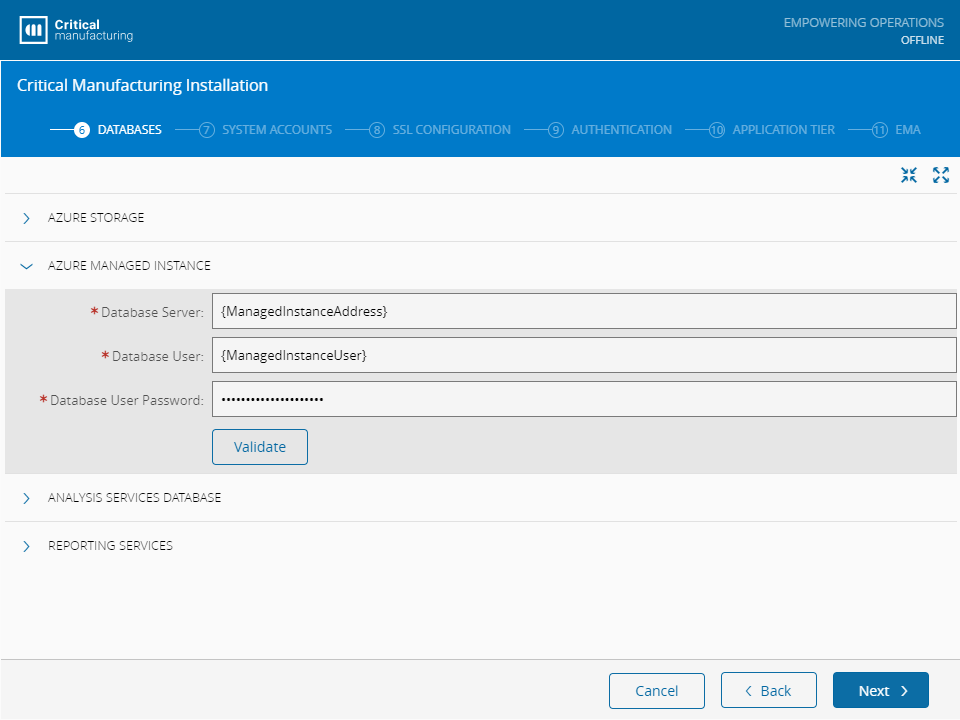
Note
You can test the database connection by selecting the Validate button.
Warning
When performing a clean installation and the Azure Managed Instance is used, the ISO file has a packages folder that contains the DbBackup packages. These must be extracted and copied to the Azure Storage location.
Microsoft SQL Server (continued)#
In the Analysis Services Database group, you must enter the Web Service URL used to access the Report Server.
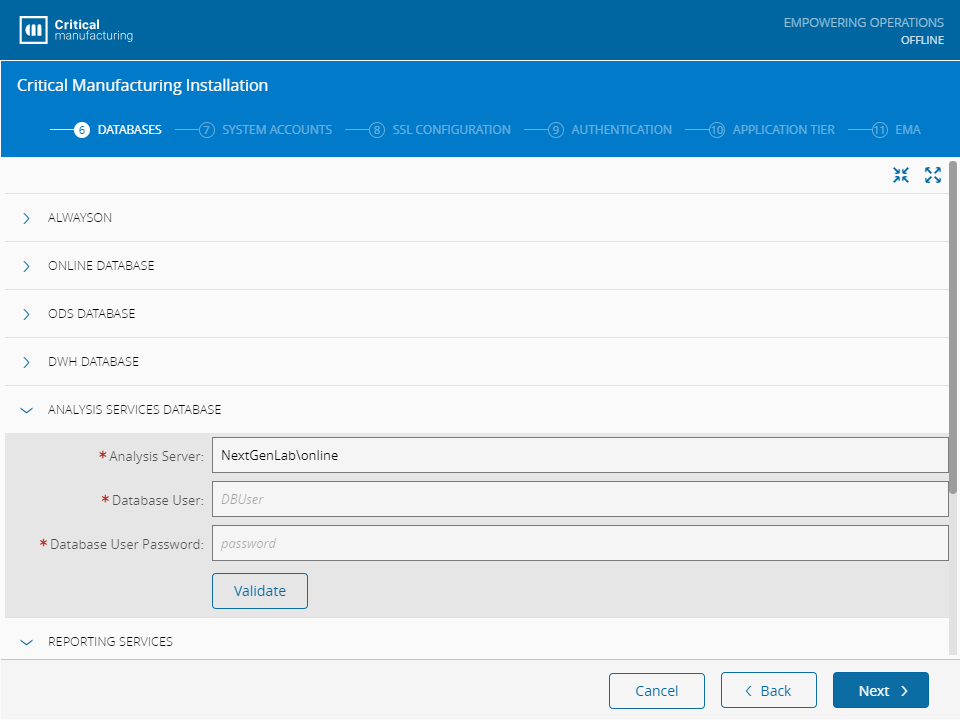
Fill out the field as described below:
- Analysis Server - configure the URL used to access the Analysis Server.
- Database User - add the user that will be given access to the Analysis Server.
- Database User Password - password for the user to access the Analysis Server.
Note
You can test the database connection by selecting the Validate button.
Note
Make sure that the Database User has permission to create the Analysis Services database. This user must be a Windows user (the domain information must be included, example: domain\user).
In the Reporting Services group, you must enter the Web Service URL used to access the Report Server.
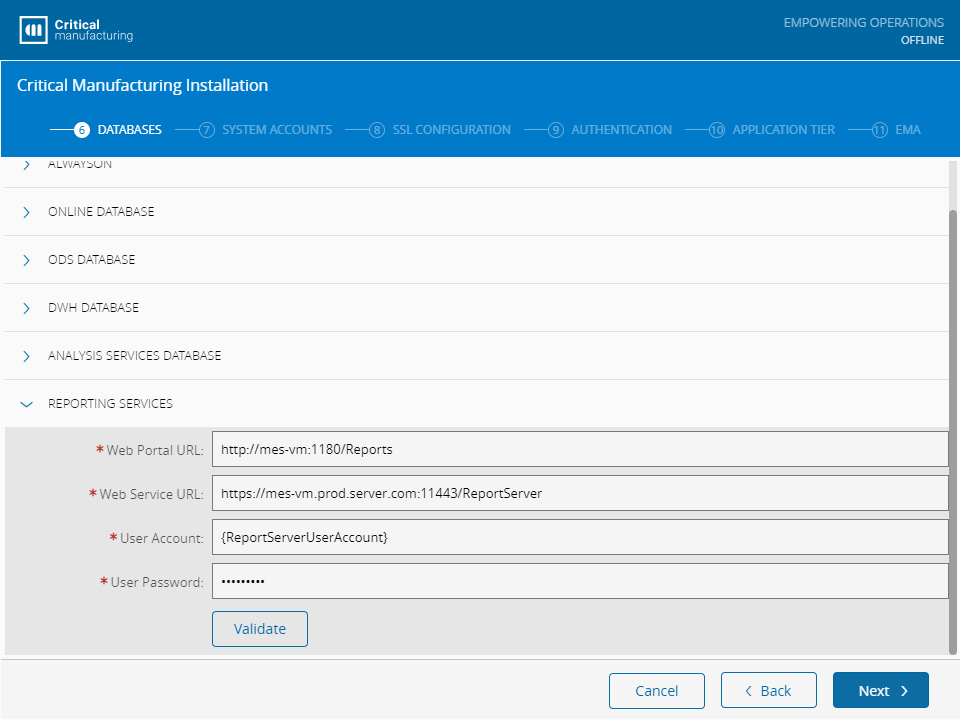
Fill out the field as described below:
- Web Portal URL - configure the URL used to access the Report Server.
- Web Service URL - configure the URL used by the Application Server to access the Report Server.
- User Account - add the user that will be given access to the Report Server.
- User Password - password for the user to access the Report Server.
Select Next to continue. By performing this action, the database connections will be tested. An error will appear if any of the connections is invalid.
Note
The Report Server address must start with http://. ⧉
Note
You can test the database connection by selecting the Validate button.
Select Next to continue.
System Accounts#
This step is used to set the accounts linked to services (SQL Server Agent, for example). Ensure that the accounts must have the necessary security rights.
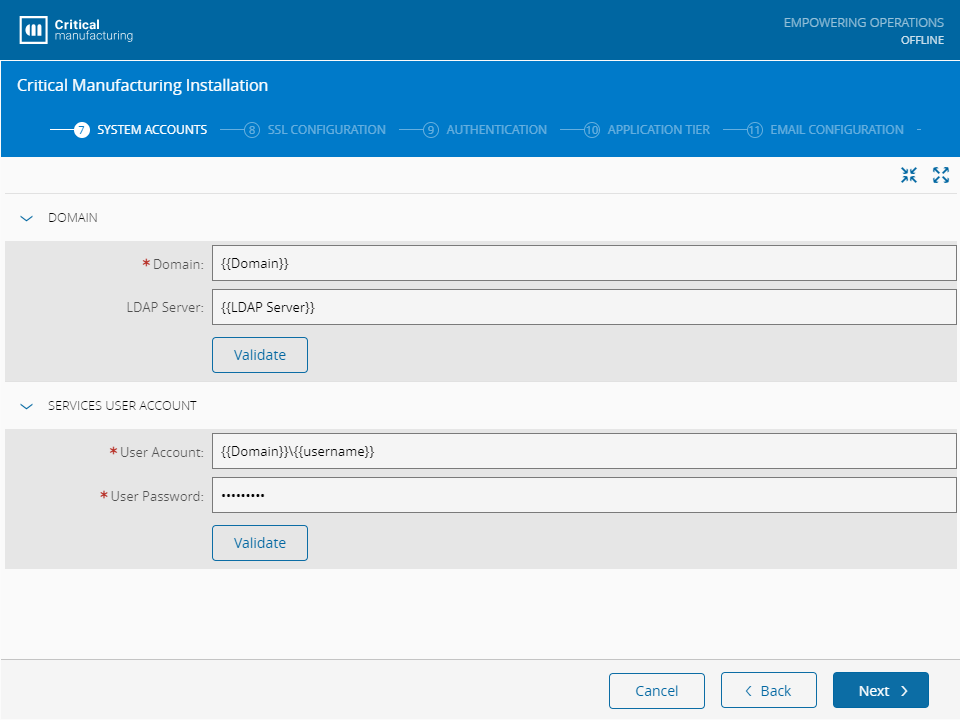
Select Next to continue.
SSL Configuration#
To enable SSL access (strongly recommended) in the System, you must enable the SSL installation and choose an appropriate SSL certificate. The available SSL certificates are the ones installed in the machine under the Personal Certificate Store. Two SSL certificates need to be selected, one is used to access the Critical Manufacturing MES GUIs, and the other one is used to access the Security Portal.
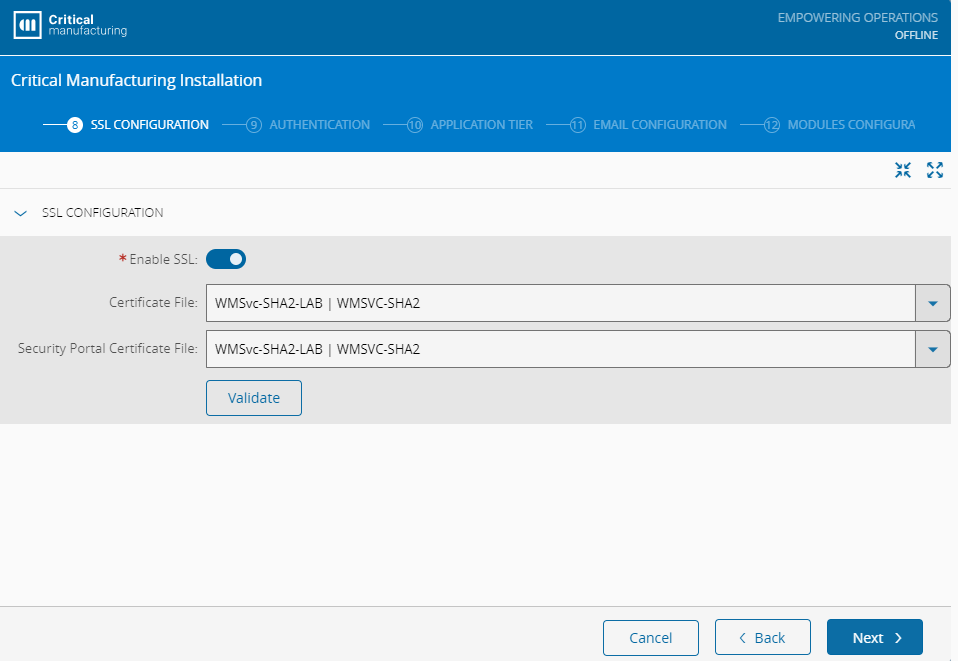
Select Next to continue.
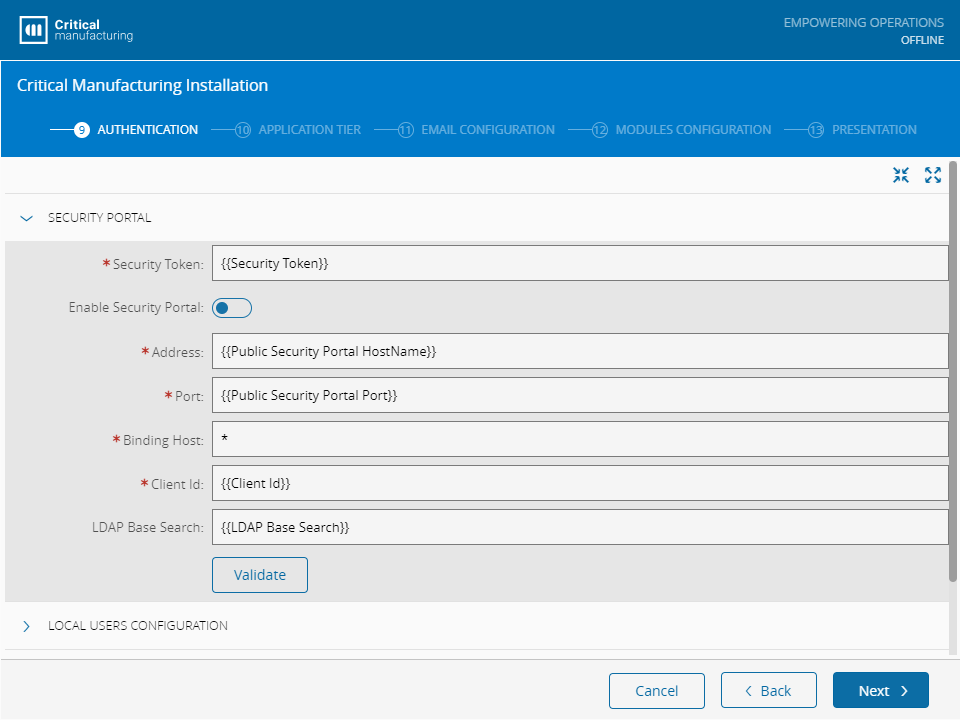
Authentication#
The Authentication screen is used to define the settings to configure the Security Portal. The settings shown on this step are used to configure the Security Portal to use an LDAP connection for authentication. For more information, see Security Portal.
Security Portal#
- Security Token - this is a random security string that must be the same for all application servers.
- Enable Security Portal - specify if the Security Portal should be enabled in this Critical Manufacturing MES installation.
- Address - specify the hostname where the Security Portal site will be accessible.
- Port - specify the port where the Security Portal site will be accessible.
- Binding Host - specify the IIS binding host for the Security Portal site.
- Client Id - specify the string to identify the Critical Manufacturing MES environment in the tokens generated by the Security Portal.
- LDAP Base Search - specify the LDAP query string that will be used as the root when searching for users to authenticate.
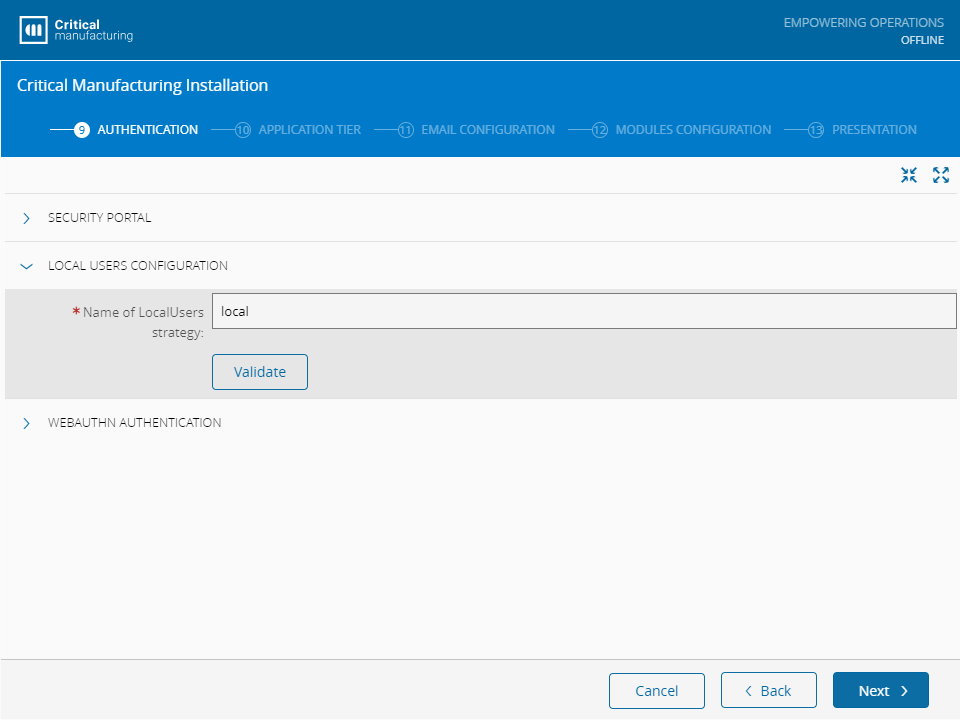
Local Users Configuration#
Define the strategy to be followed for authentication of local user accounts. This is used to select the name of the LocalUsers strategy that will appear when the user performs a login into the Security Portal.
Webauthn Authentication#
Select whether to enable Webauthn Authentication.
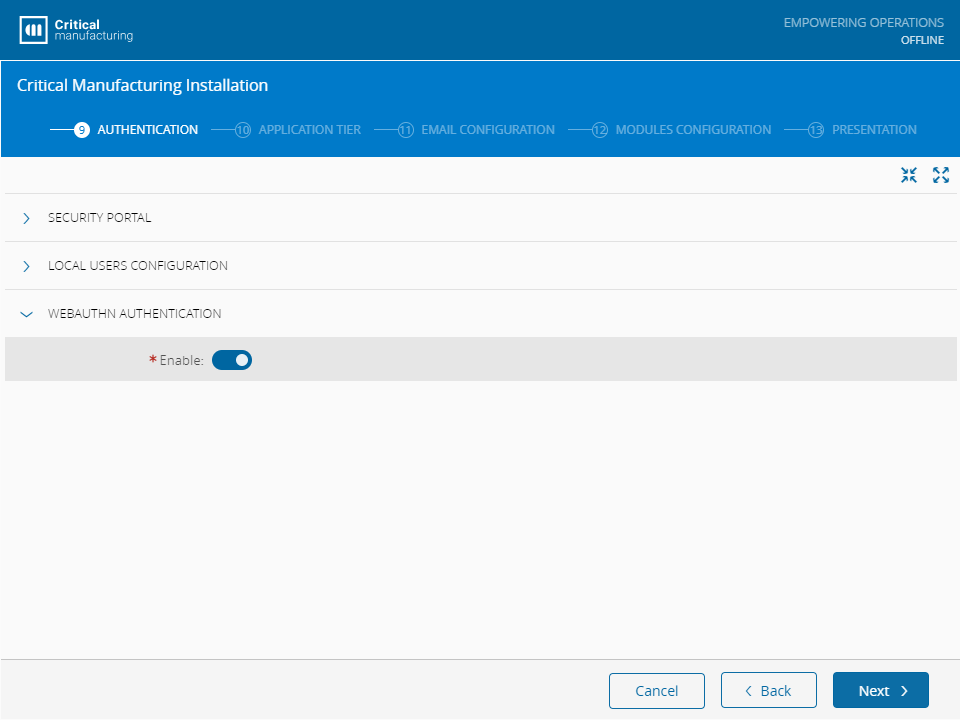
Info
For more information, see Webauthn.
Select Next to continue.
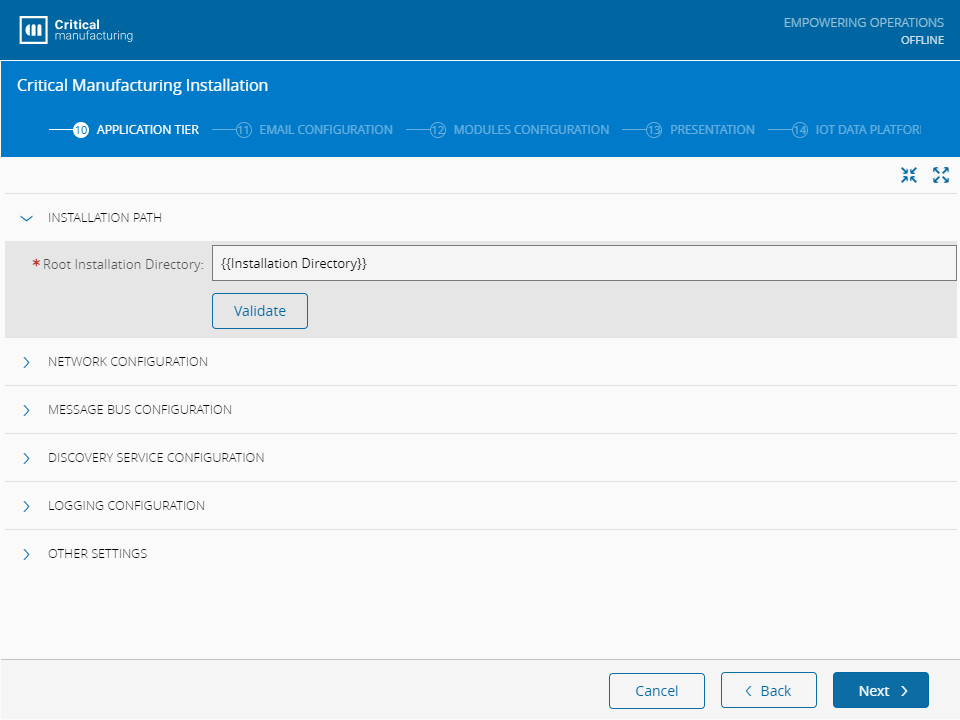
Application Tier#
The Application Tier screen is used to define the settings for all the application server modules such as the Message Bus Configuration and Discovery Service Configuration.
Installation Path#
The installation directory must be a path that ends with the system's name.
Network Configuration#
The Network Configuration group is used to configure the address for protocols. For each protocol, you need to provide the address and the port that will display the Critical Manufacturing Services.
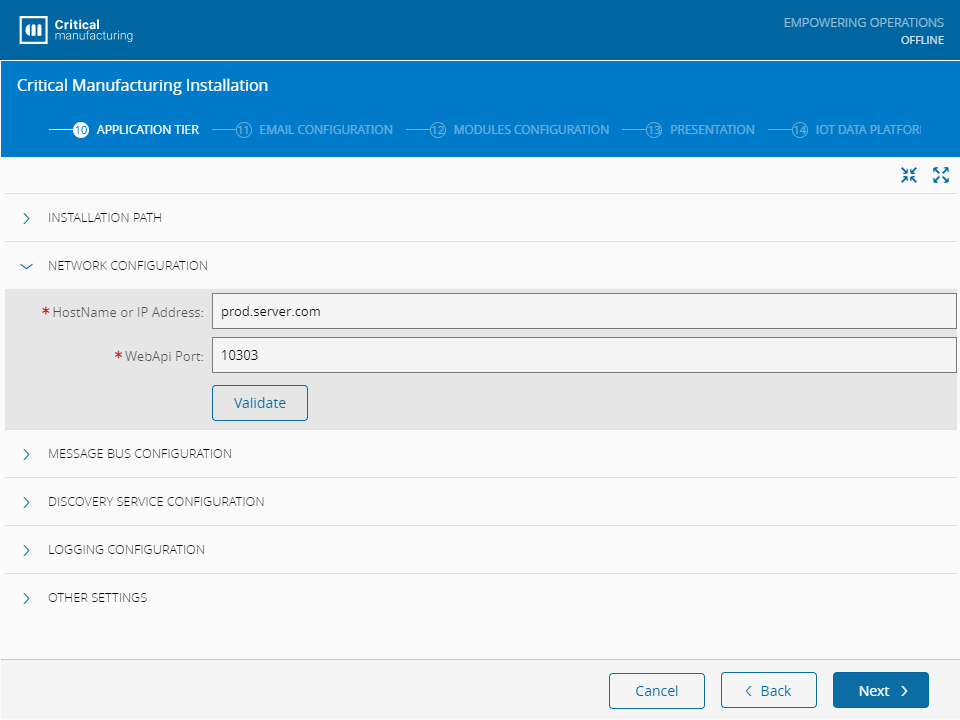
- HostName or IP Address - specify the address to use for communication.
- WebApi Port - specify the port to use for protocol WebApi.
Message Bus Configuration#
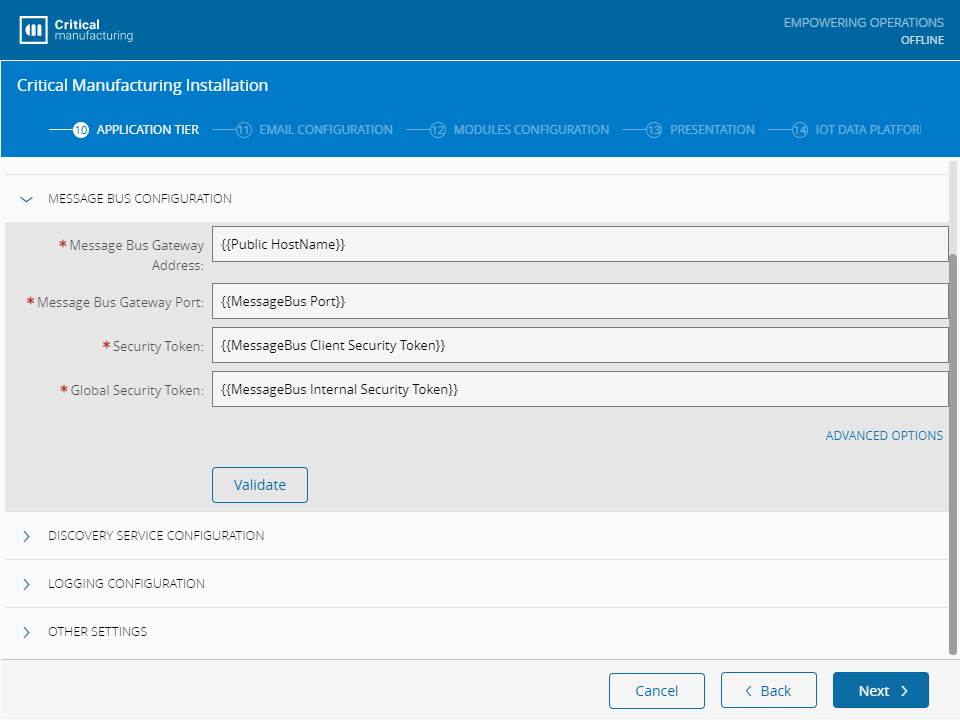
- Message Bus Gateway Address - specify the address to use for message bus (example: 239.255.28.99).
- Message Bus Gateway Port - specify the port to use for message bus.
- Security Token - used to communicate with a specific Tenant.
- Global Security Token - used to communicate with all Tenants.
Note
The Message Bus Gateway Port must contain a value between 4503 and 4534.
Discovery Service Configuration#

- Address - specify the Server Name or Role Name created in Failover Cluster.
- Enable - specify whether the Critical Manufacturing Discovery Service will be enabled.
- HTTP Port - port for Critical Manufacturing Discovery Service API access.
- Host Link Port - port for Critical Manufacturing Discovery Service Host.
- Gateway Link Port - port for Critical Manufacturing Discovery Service Gateway.
Note
If Critical Manufacturing Discovery Service is not being used, the Address field should be filled out with the NLB name.
Logging Configuration#
The log directory must be a path that is set at the root of the system or a network share with access from both the servers (APP & DB) and the user running the services.
- Logging Folder - specify the local folder where the logs generated by Critical Manufacturing will be stored.

Other Settings#
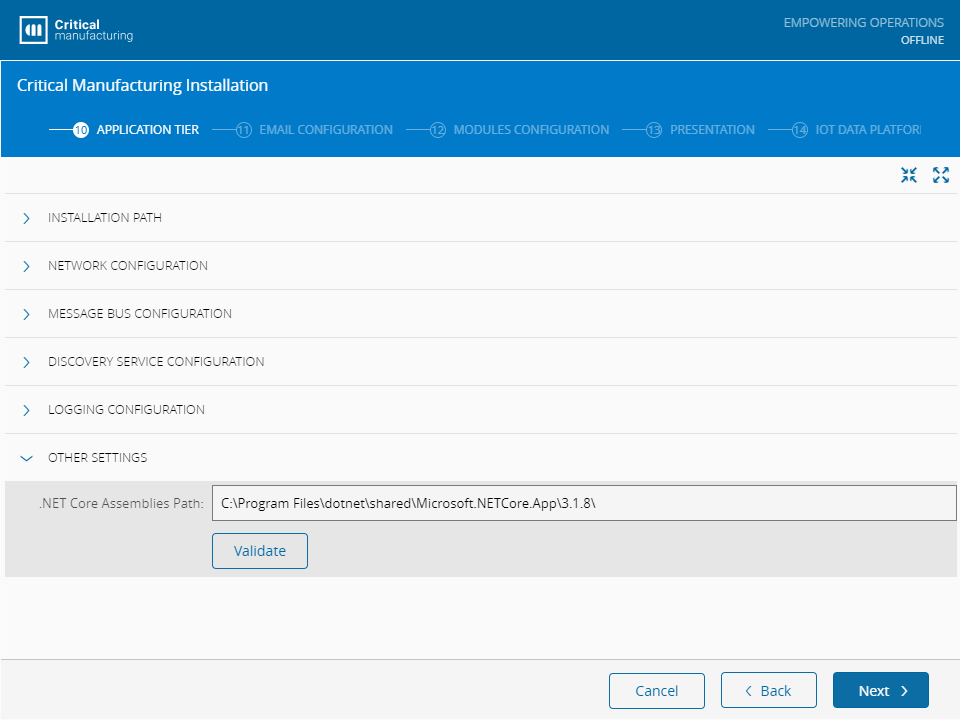
- .NET Core Assemblies Path - specify the path of the .Net Core assemblies (pre-filled with the default location).
Select Next to continue.
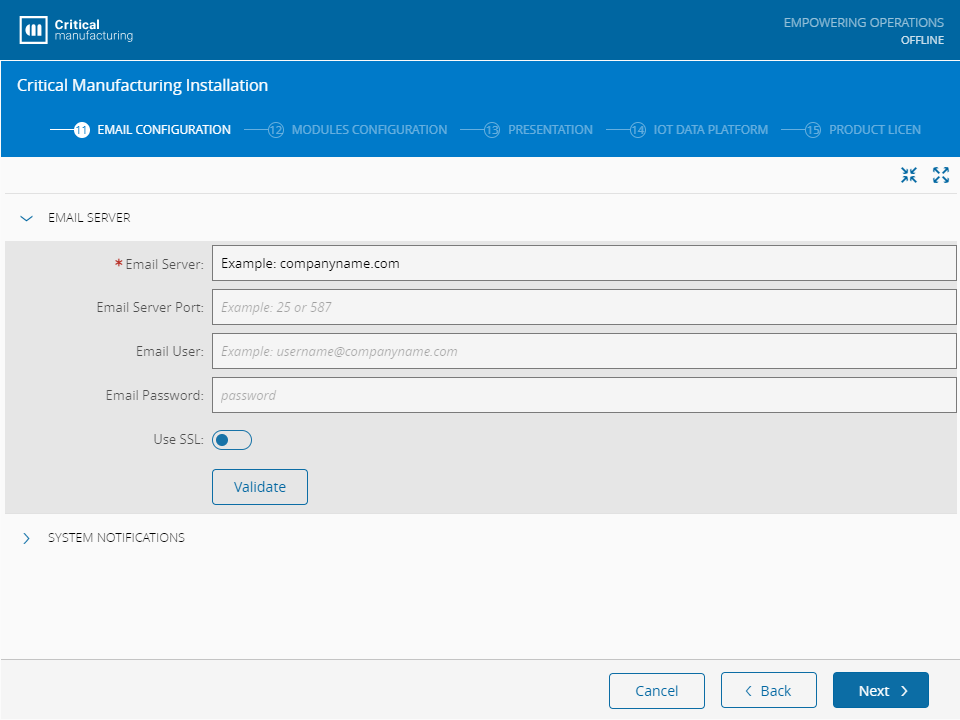
Email Configuration#
The Email Configuration screen is used to configure the email server used by the Critical Manufacturing application to send emails.
In the Email Server group, fill out the fields as described below:
Email Server#
- Email Server - address of the email server.
- Email Server Port - port of the email server.
- Email User - the user name to access the email server (example:
criticalmanufacturingsupport). - Email Password - the user password to access the email server.
- Use SSL - if you want to use SSL, enable it. The Email Server Port will be changed to the default SSL port (
587).
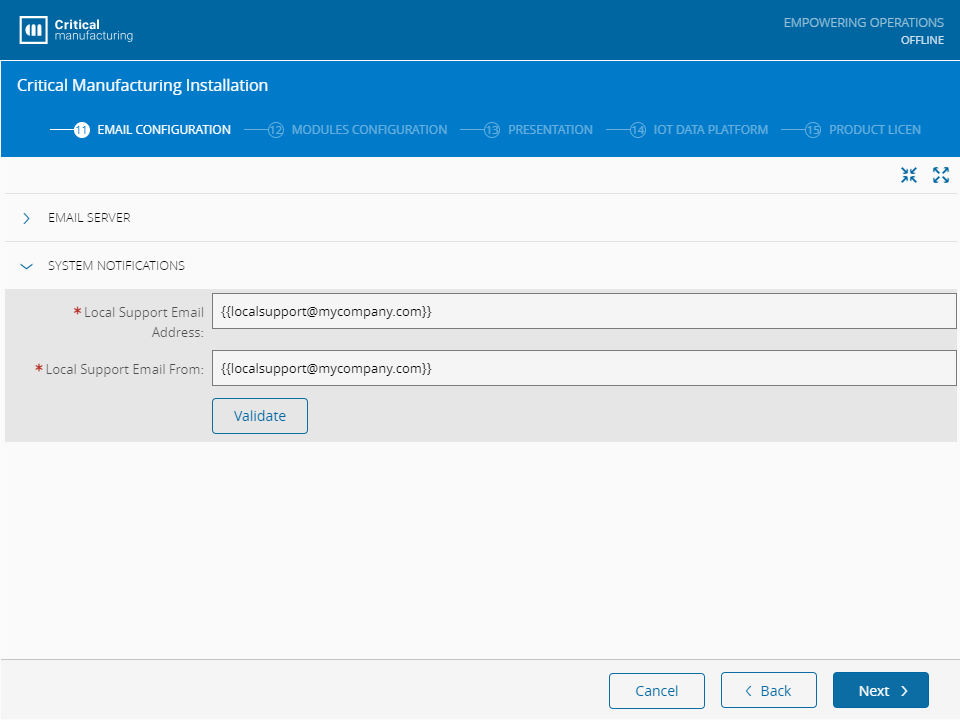
System Notifications#
- Local Support Email Address - the local support email address for Critical Manufacturing (example:
[email protected]) - Local Support Email From - the local support email for Critical Manufacturing (example:
[email protected])
Select Next to continue.
Modules Configuration#
The Modules Configuration step captures specific configuration options for the application modules.
Document Management#
The Document Management information is necessary to configure Critical Manufacturing's folders that will be used for the lifecycle of the documents.
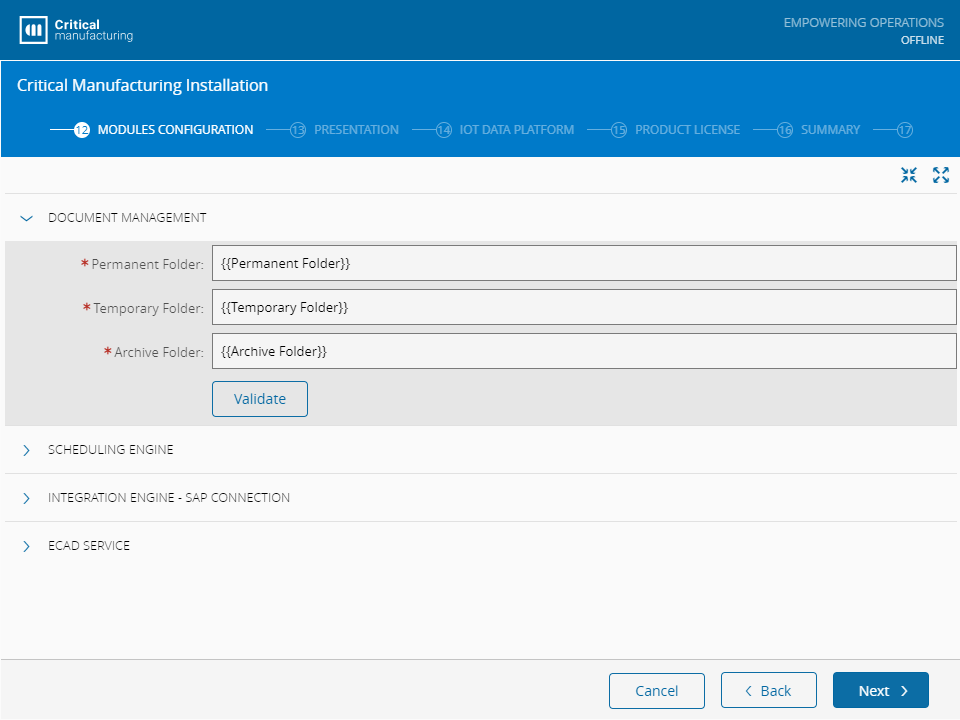
Note
The Document Management location must be set with an already existing folder to which the system accounts have Full Access. Also, the location for documents should to be the same on all Application Servers for a common accessible share.
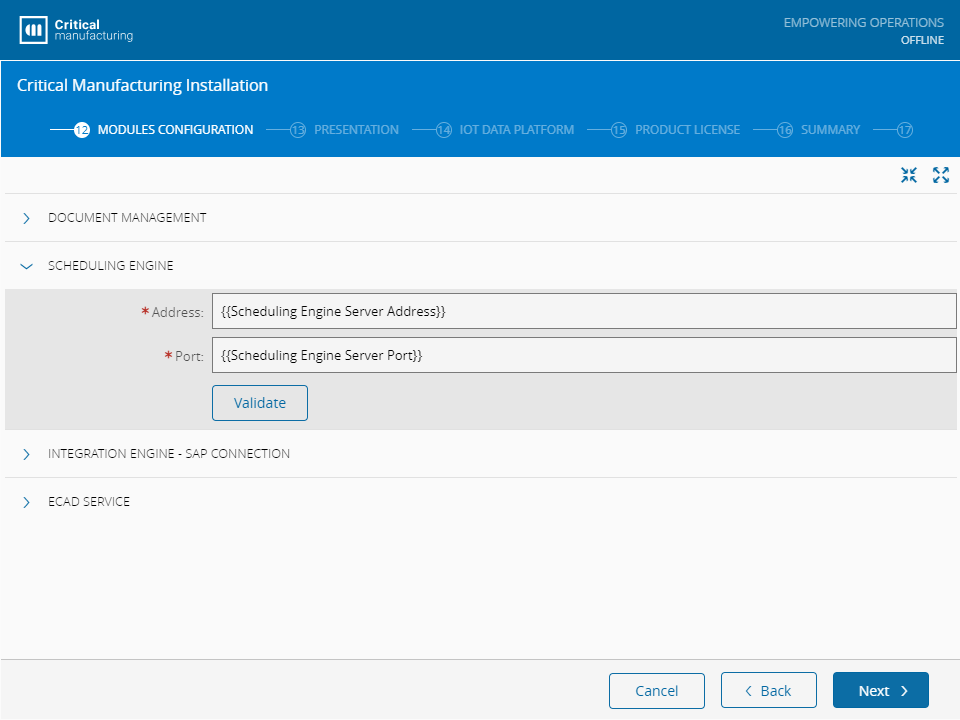
Scheduling Engine#
To configure the Scheduling Engine, and have access to its server, you need two simple parameters:
- Address
- Port
Integration Engine - SAP Connection#
The Integration Engine - SAP Connection is used to enter the connection data for the Critical Manufacturing system to use with the ERPConnect Service Application.
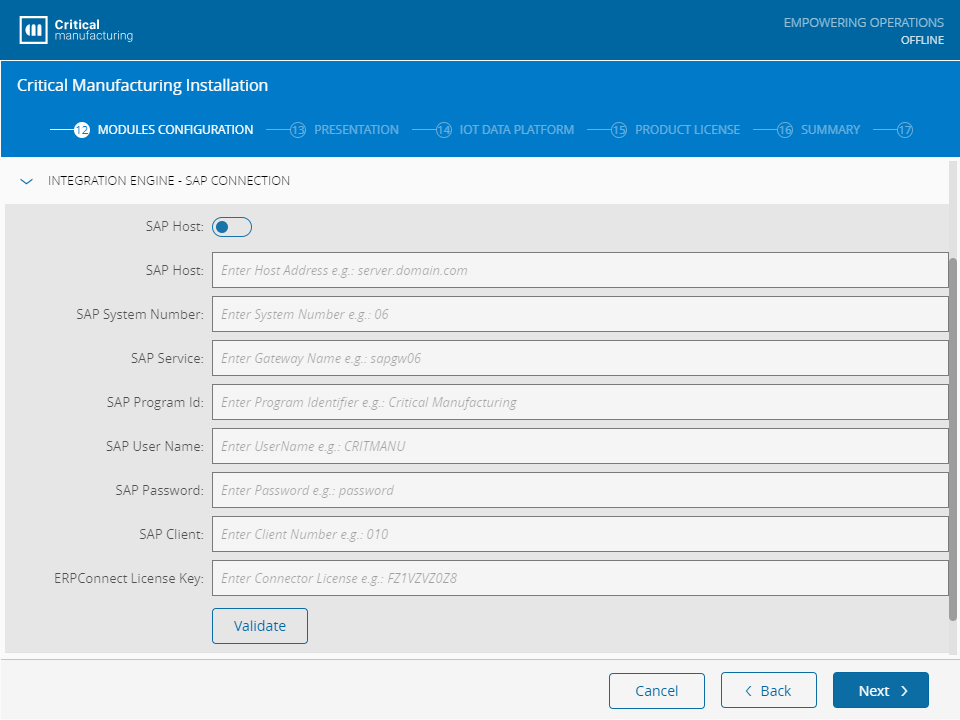
- SAP Host - specify the SAP host server address.
- SAP System Number - specify the SAP system number.
- SAP Service - specify the gateway name.
- SAP Program Id - specify the name used to identify Critical Manufacturing in SAP.
- SAP User Name - specify the username used to connect to SAP.
- SAP Password - provide the password of the user.
- SAP Client - specify the client login name. This is the 3-digit client to which it should be connected.
- ERPConnect License Key - specify the ERPConnect license key.
Note
The SAP Password and the ERPConnect License Key will be encrypted.
ECAD Service#
Before installing the ECAD Service, ensure that the Visual C++ Redistributable Packages for Visual Studio 2013 are installed. Afterwards, the ECAD Service can be installed using several different configurations, as shown in the image.
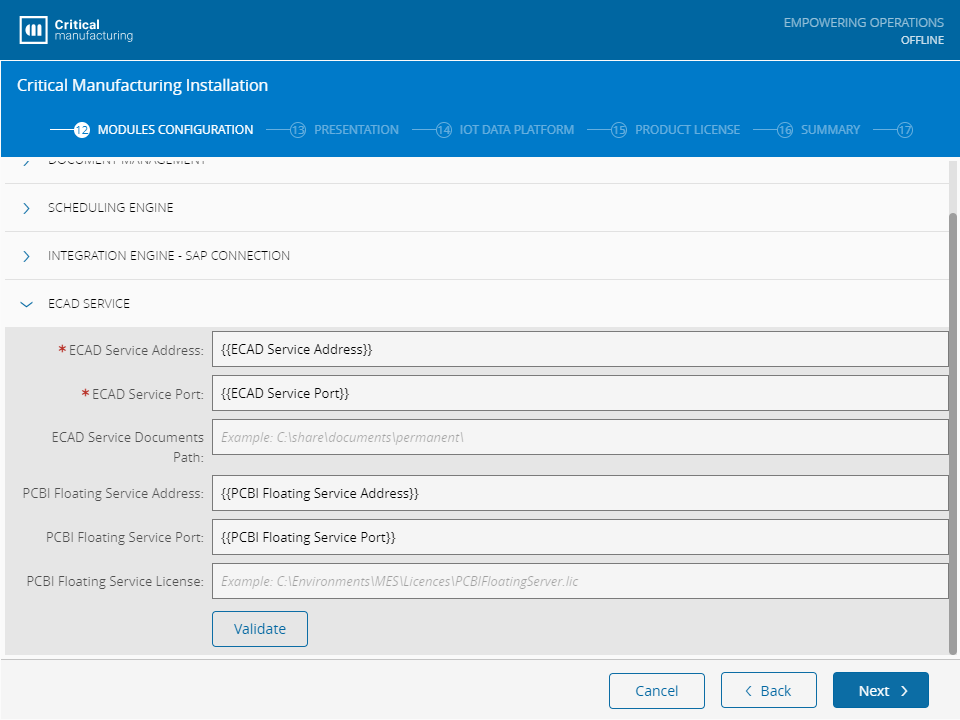
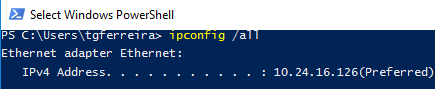
The PCBI Floating Service Address should use the default IPv4 address and the PCBI Floating Service Port can use any available port.
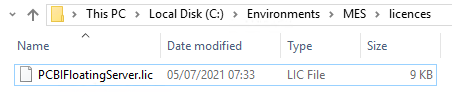
The current way to get the PCBI Floating Service License is by requesting a license file using the Server ID.
If you do not have the PCBI Floating Service License you can keep this field empty and follow the manual steps below (after the setup finishes).
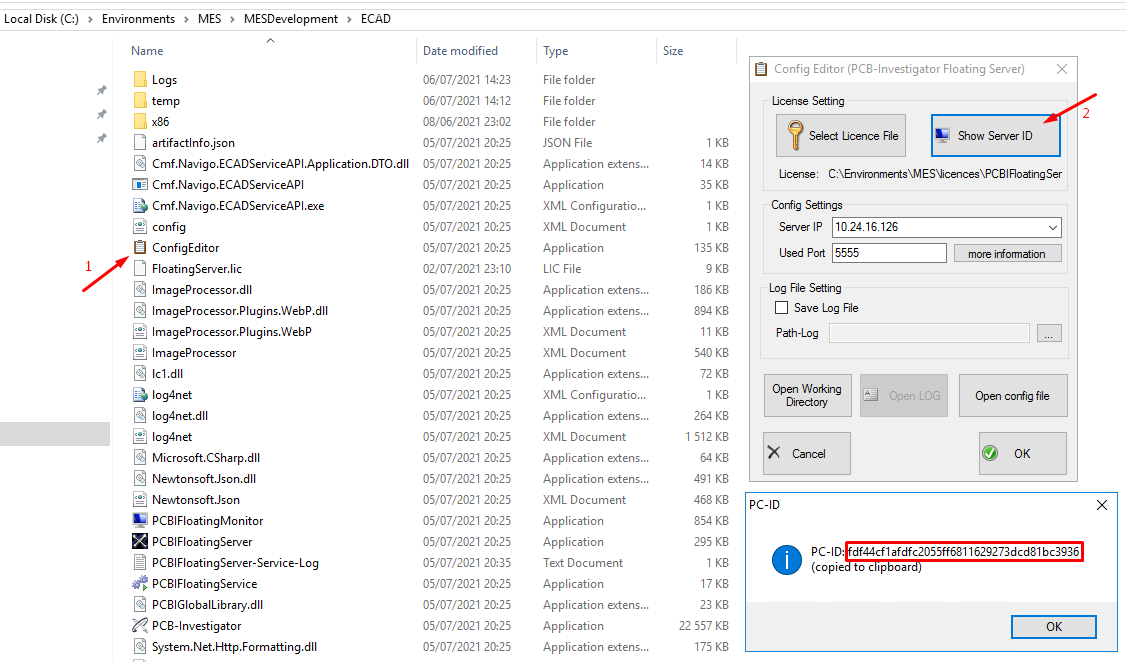
Contact the System Administrator by sending the Server ID to generate the license.
When you get your license, place the file inside a folder and make sure that the configuration properties of ECAD are duly set. These configurations can be found inside the ECAD folder named config.xml and Cmf.Navigo.ECADServiceAPI.exe.config.
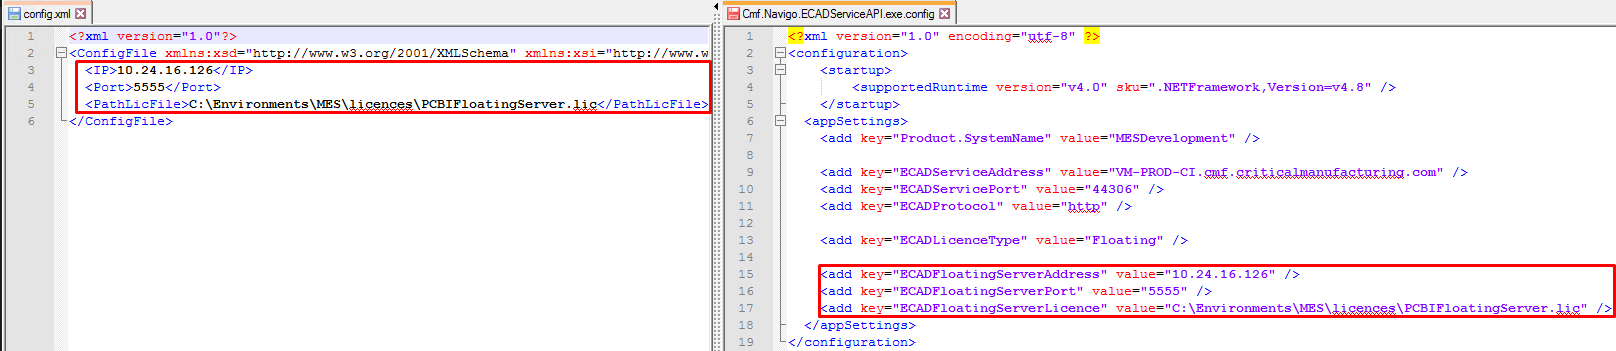
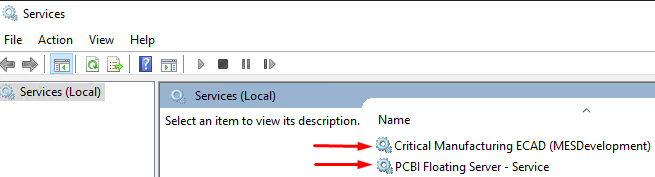
Restart the PCBI Floating Server and Critical Manufacturing ECAD services.
Note
If you have multiple environments in the same machine, all environments should point to the same PCBI Floating Service and only one PCBI Floating Service can be started.
Select Next to continue.
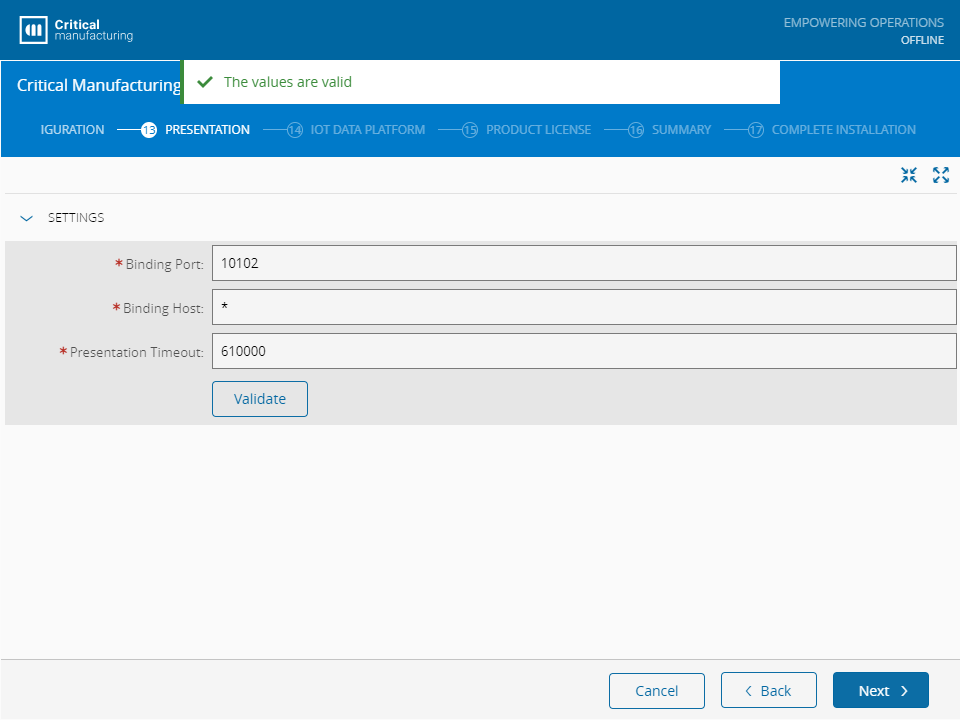
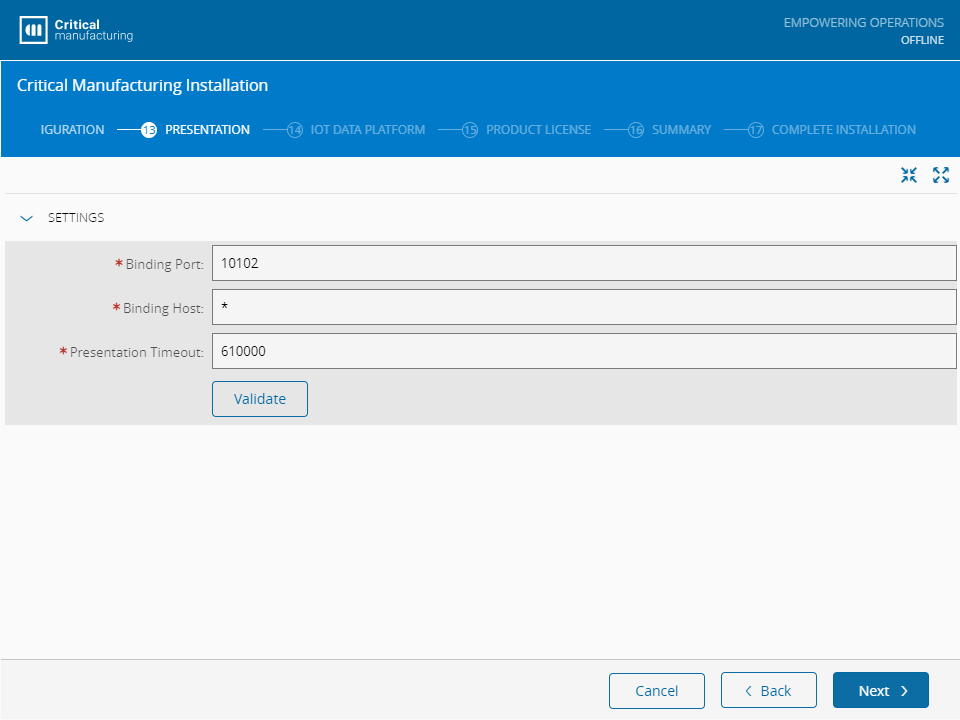
Presentation#
In the Presentation screen, you must set the ports for Critical Manufacturing MES:
Select Next to continue.
IoT Data Platform#
The Critical Manufacturing MES IoT Data Platform provides a standard, scalable and functionally rich data architecture and infrastructure to store, monitor and analyze equipment and sensor data, applicable for every MES Implementation project. For proper configuration, the event handler strategy must be defined to use one of the following handlers:
- SQLQueue
- Kafka
If Kafka is selected as the IoT Event Handler Strategy, further configurations are required:
- Kafka Bootstrap Server - specify the Kafka Bootstrap server address.
- Spark Machine - address of the host of the Spark machine.
- Maven Repository Location - address of the Maven Repository.
- Maven Username - username for Maven authentication.
- Maven Password - password for Maven authentication.
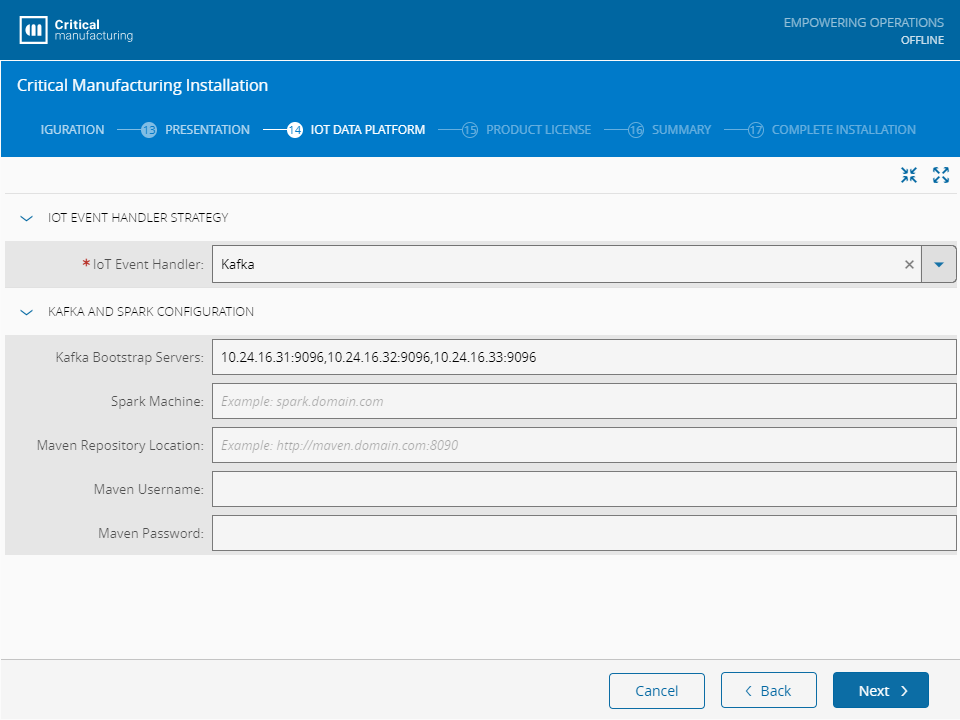
Select Next to continue.
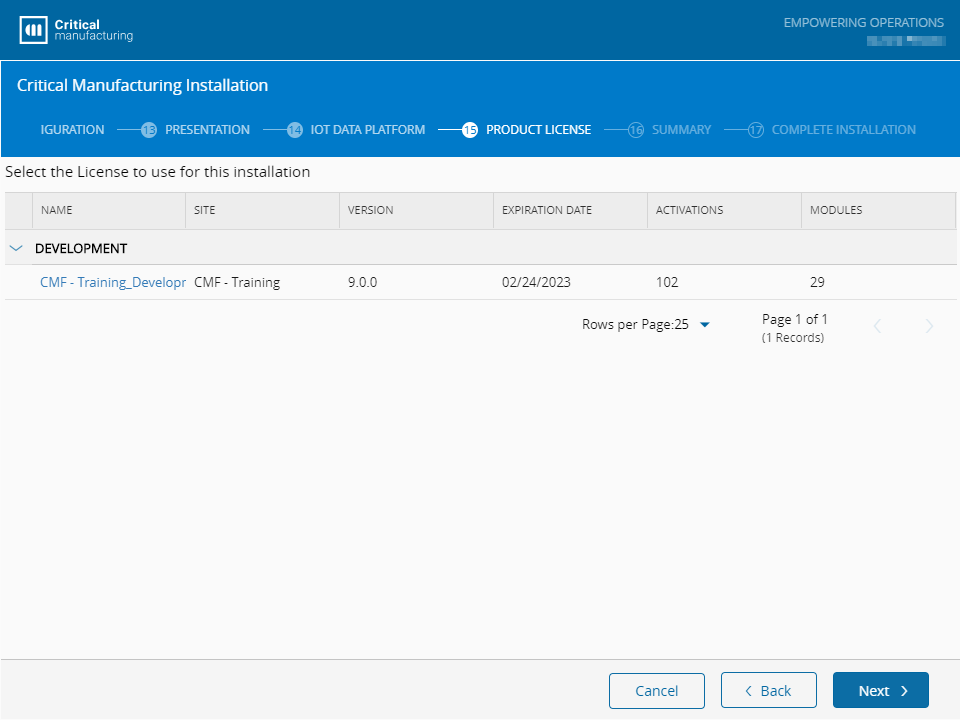
Product License#
The installation of the Product License is a process that requires access to the Critical Manufacturing Customer Portal.
The installation machine itself does not need to have access to the portal, but the user installing the license must have access to a device that has access to the portal.
Below are the steps describing the installation of the Product License process for both Online and Offline installations.
Online Installer#
When installing the license using the online installer, the setup will automatically display the available licenses to install. The user must select one of the available licenses and select Next.
Offline Installer#
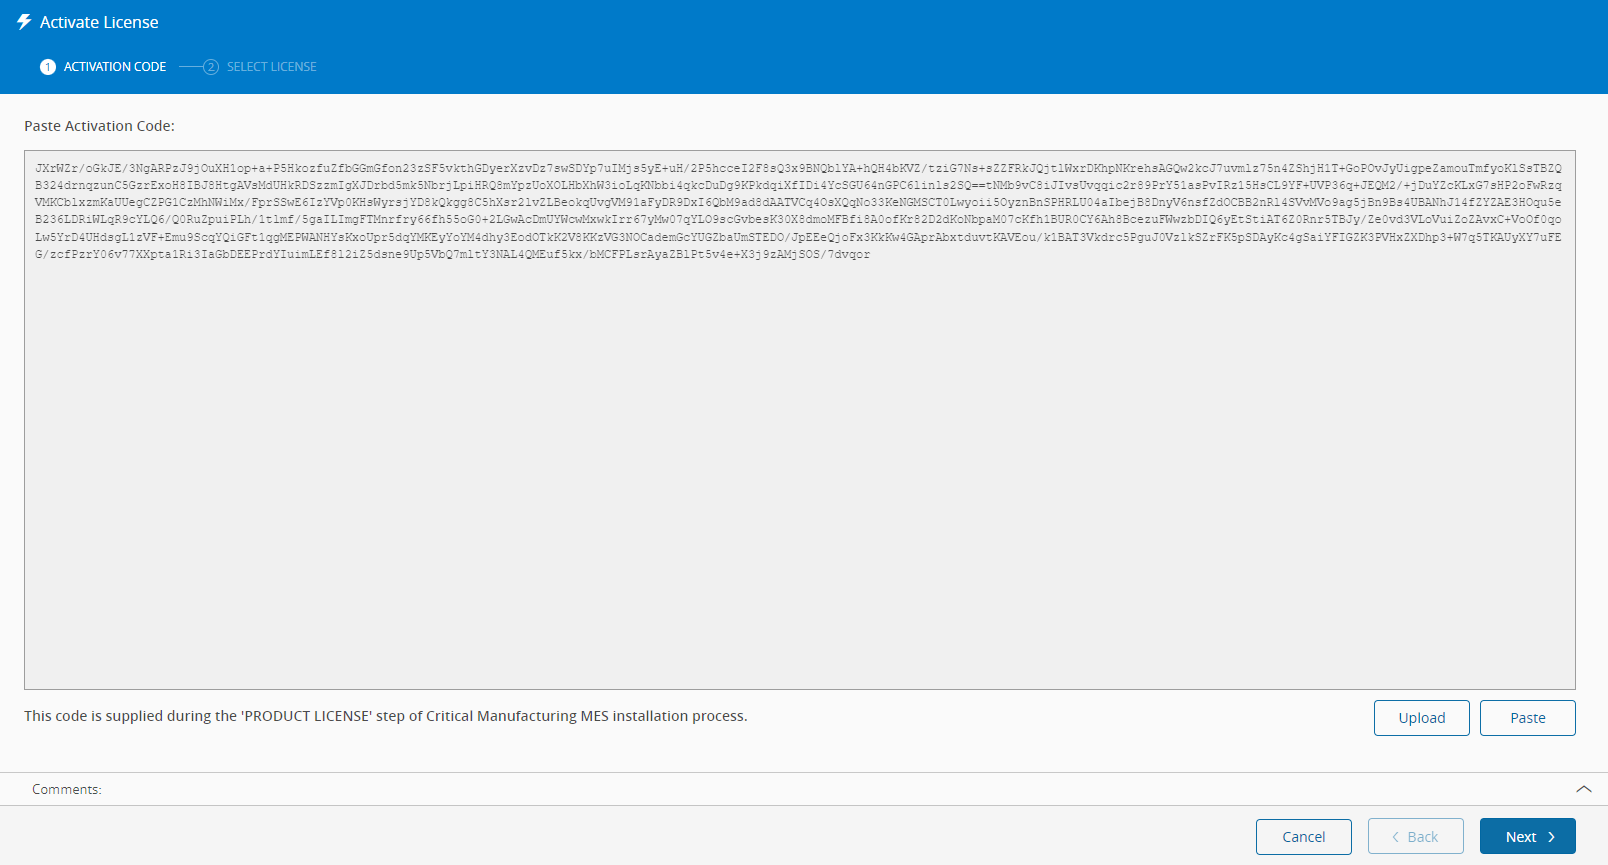
In the Offline license installation step, you are presented with an activation code that will enable you to activate the license in the Critical Manufacturing Customer Portal.
The activation code can either be copied to the clipboard or downloaded using the appropriate buttons.

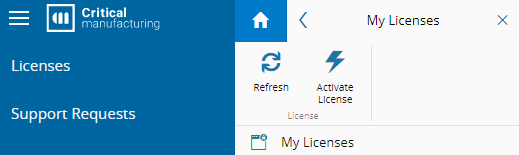
After copying the activation code to a device with access to the Critical Manufacturing Customer Portal, you can select Go To Portal and be automatically redirected to the My Licenses section of the Critical Manufacturing Customer Portal. Alternatively, follow these steps to navigate to the section:
- Navigate to https://portal.criticalmanufacturing.com ⧉.
- Authenticate using your Critical Manufacturing user account.
-
Open the Licenses menu and select My Licenses:

After entering the My Licenses page, follow these steps:
-
Select Activate License on the top ribbon.
-
Upload or paste the Activation Code and select Next:
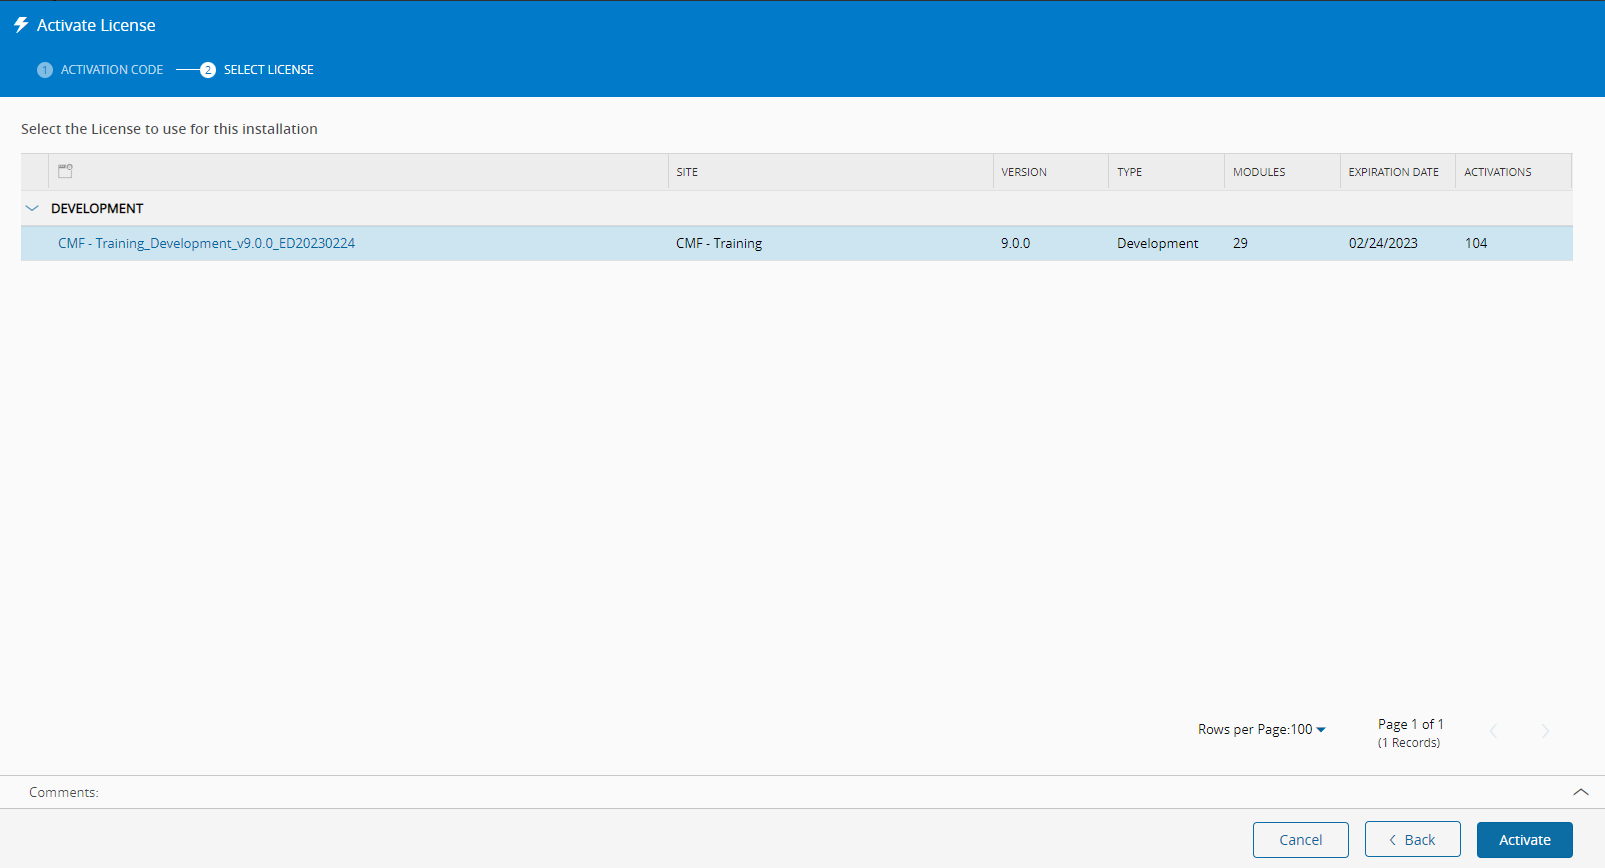
-
Select the license you need and select Activate:
-
Copy or download the License Code.
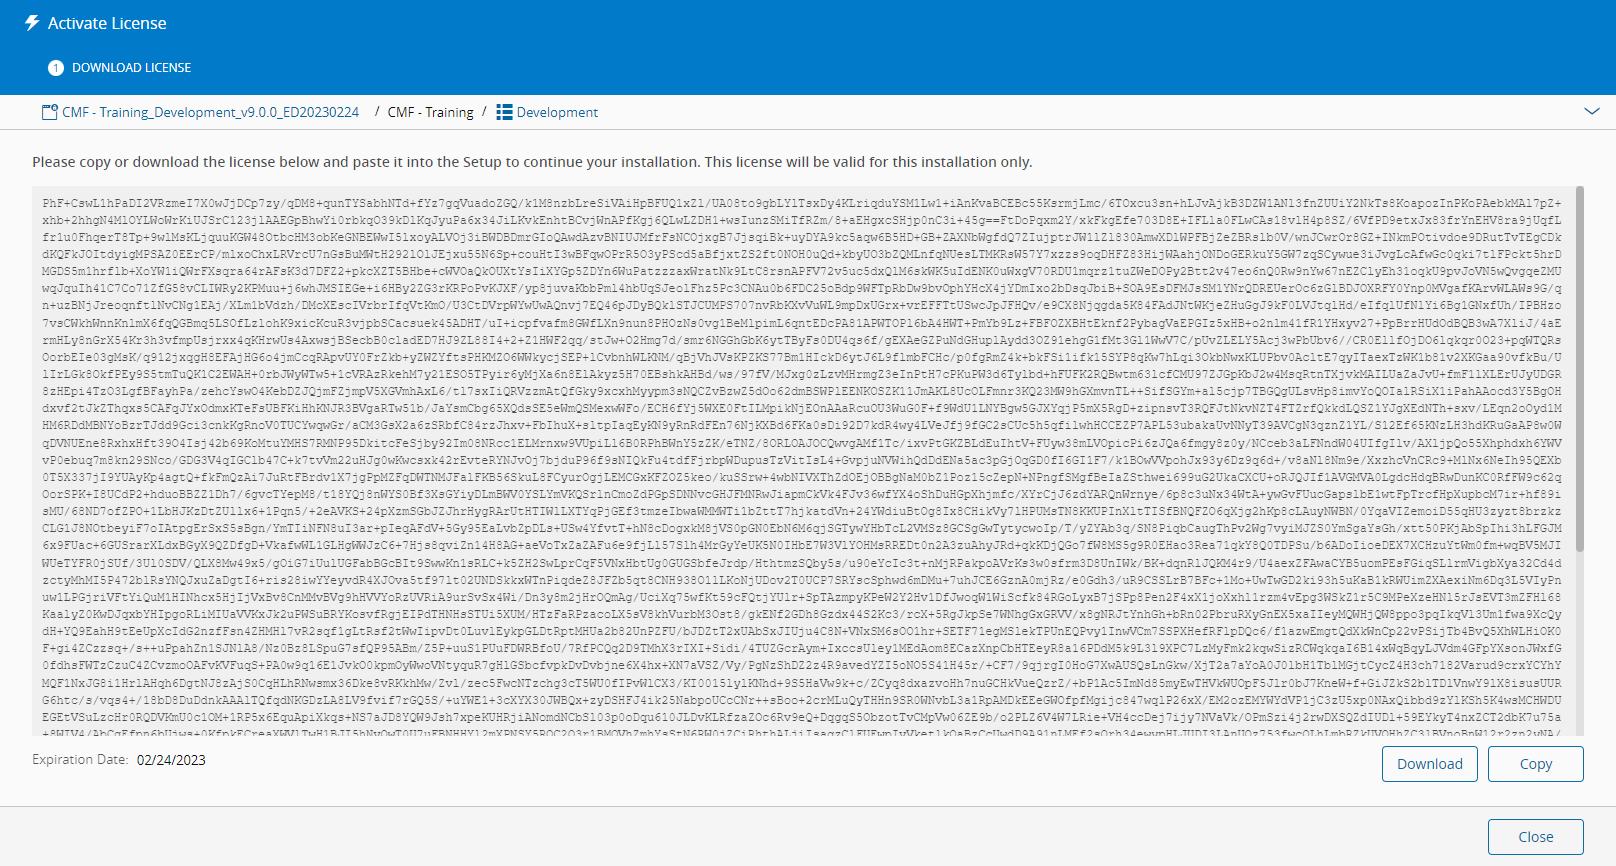
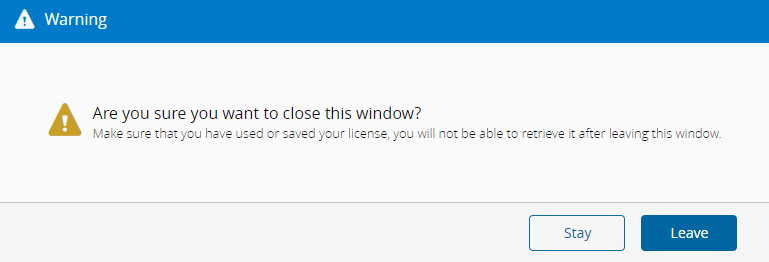
Warning
Ensure the License Code is copied or downloaded to a secure location. After closing this dialog, you will not be able to access the License Code you just generated.
-
Paste or upload the License Code into the Critical Manufacturing Setup and select Next:

Summary#
Before the installation actually begins, a summary is displayed with all the packages that will be installed. If the version you are installing already exists on your system, you can choose to force the reinstallation of that version.
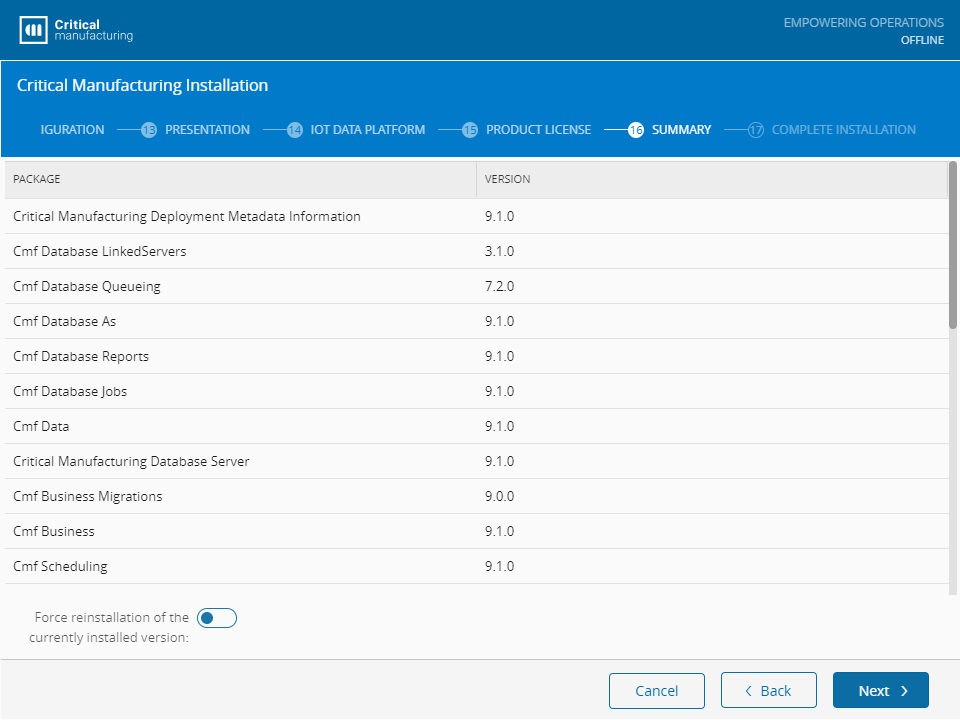
Select Next to continue.
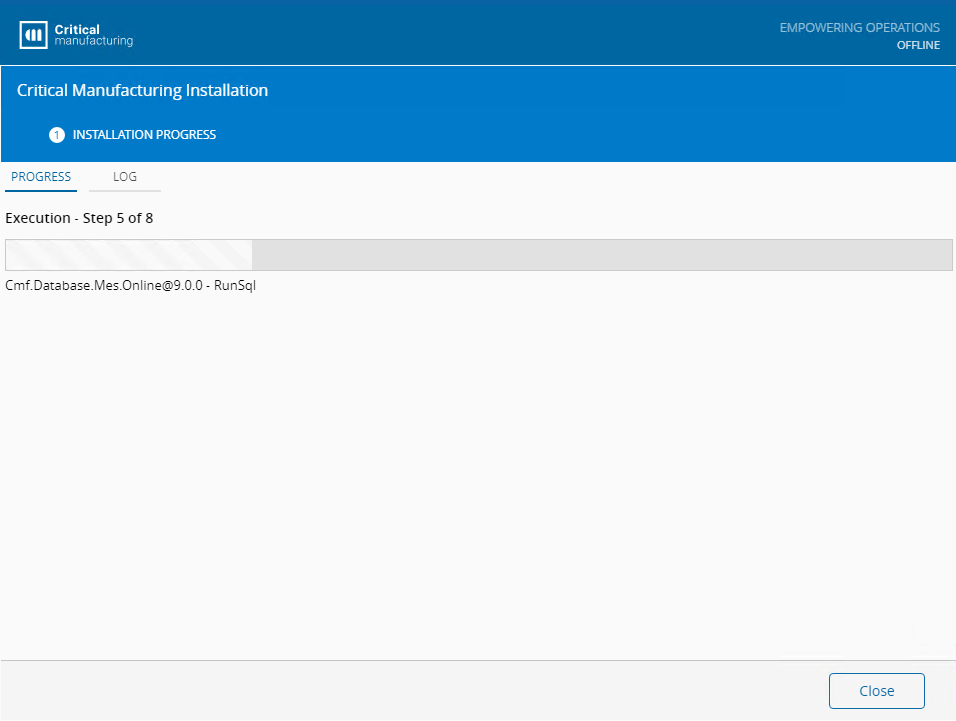
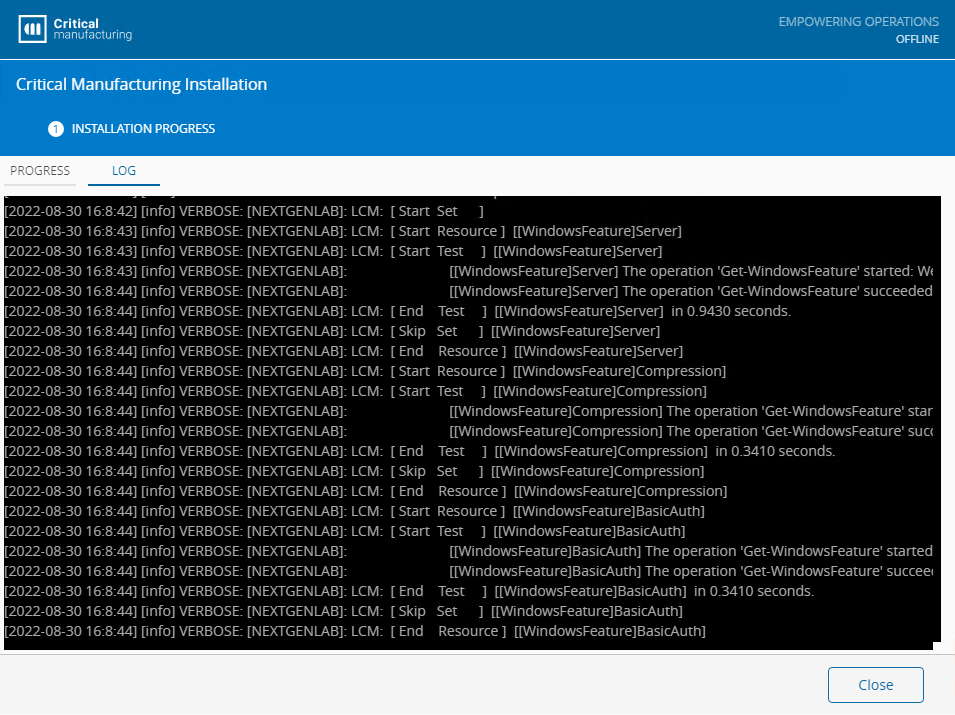
Complete Installation#
In the Complete Installation screen, you can export all the current installation configuration data (including licenses) to a file. To export the current configuration data, select Export and then choose a location and a file name.
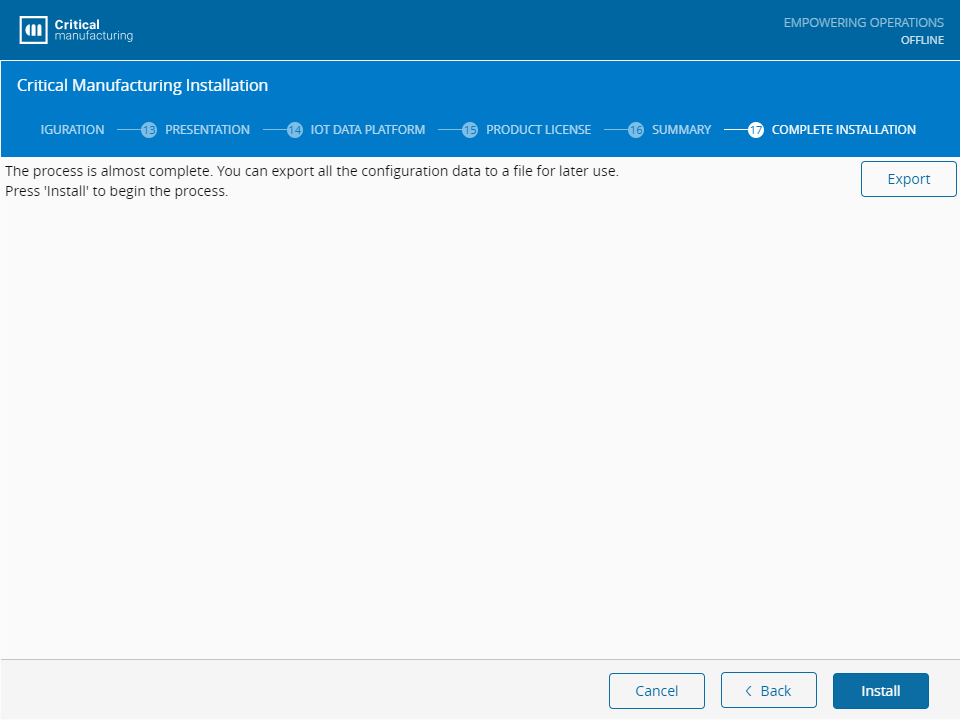
Select Install to begin the installation. You will have two tabs, one that shows the progress of the installation, and another that shows details of the installation log. An example of each tab is shown below:
Update Product License#
The Product License can be updated using the Critical Manufacturing setup program in three ways:
- Setup - Online
- Setup - Offline
- Command Console
For the Setup - Online, follow the steps below:
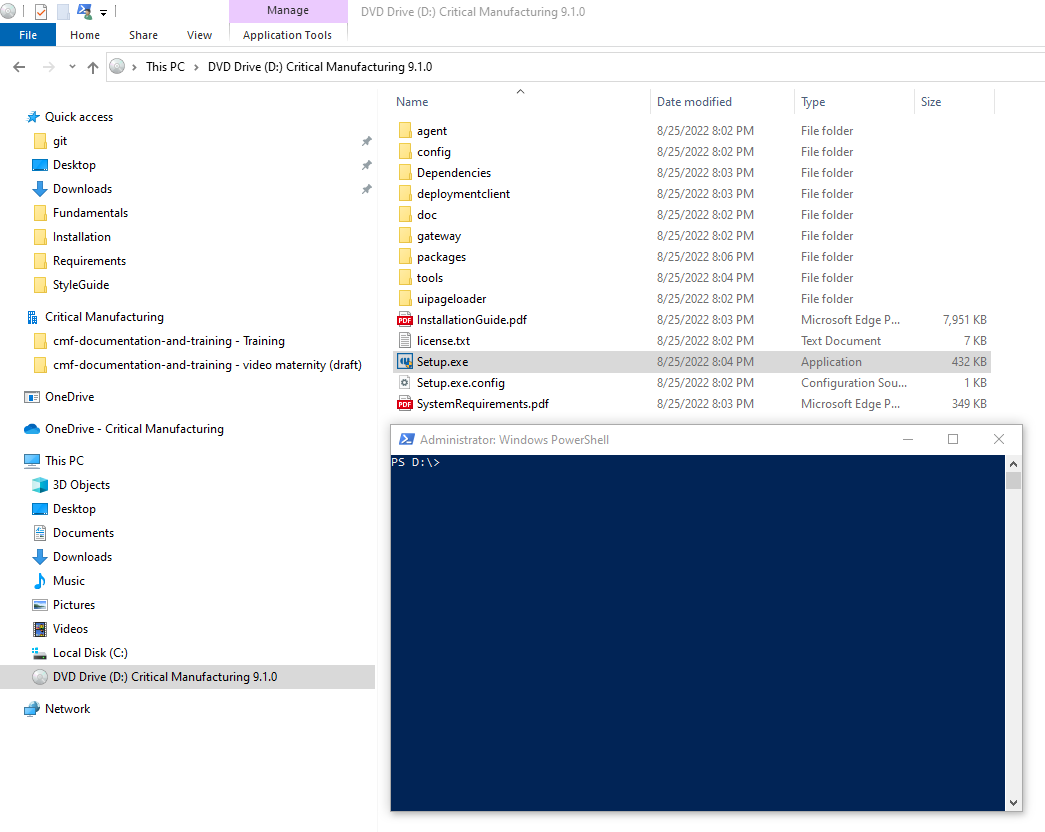
- Mount the Critical Manufacturing MES ISO.
-
Run the Setup.exe:
-
Select Update License:
-
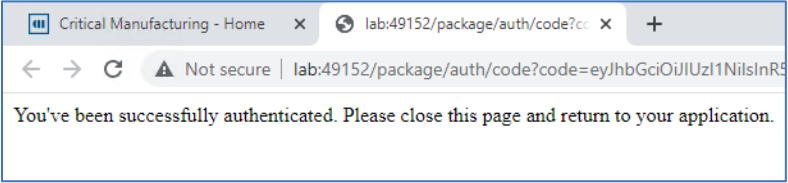
You will be redirected to the Critical Manufacturing Customer Portal and will need to log in with a User that has access to Critical Manufacturing Licenses:
-
Import the
.jsonparameters file used with the original installation: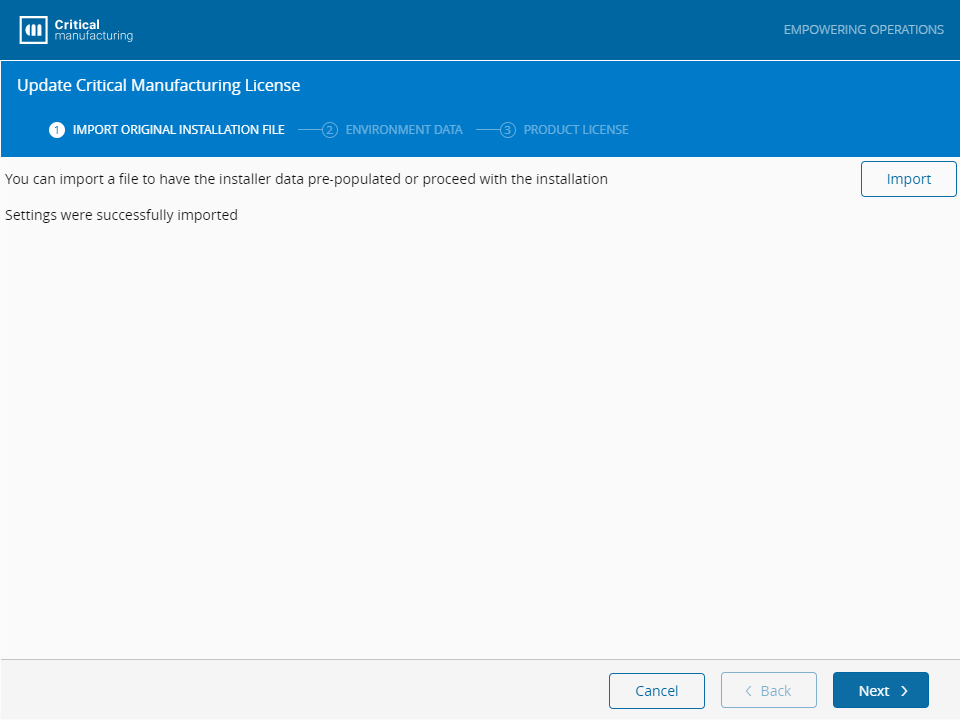
-
Select Next to continue.
-
The Environment Data screen will contain the System Name and the connection to the Online DataBase:
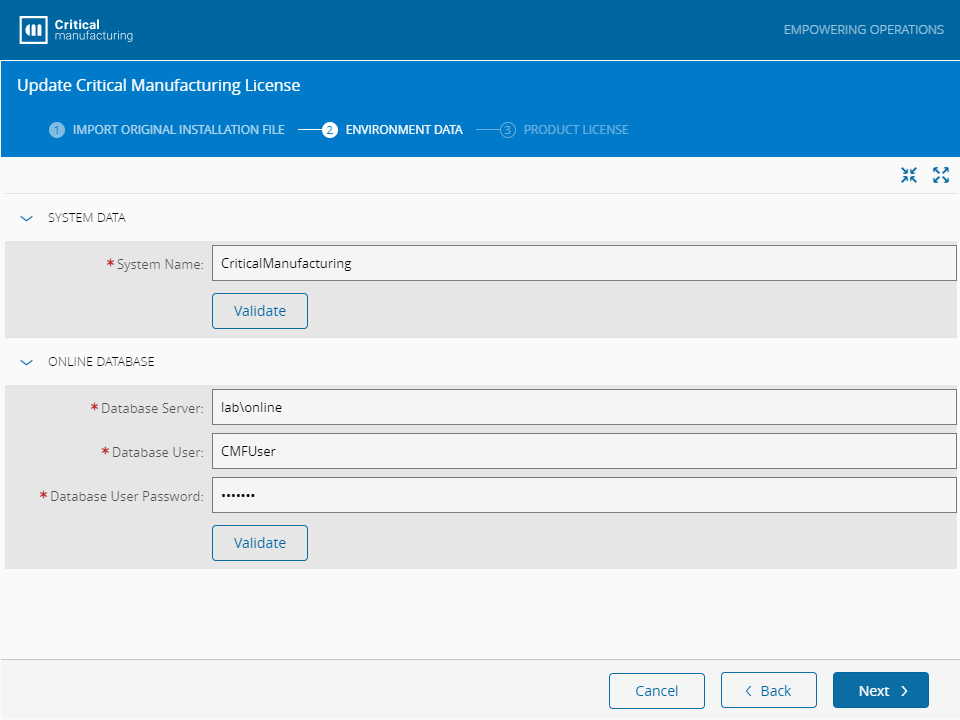
Note
You can also set the parameters manually if you know the settings.
-
Select Next to continue.
-
Select the license you want to use:
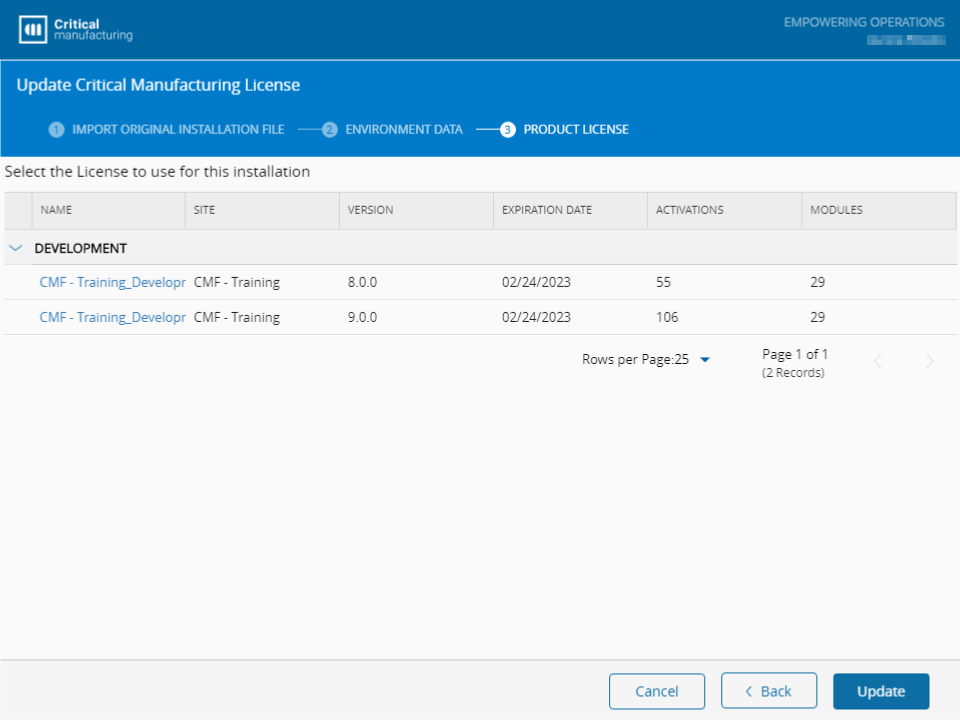
-
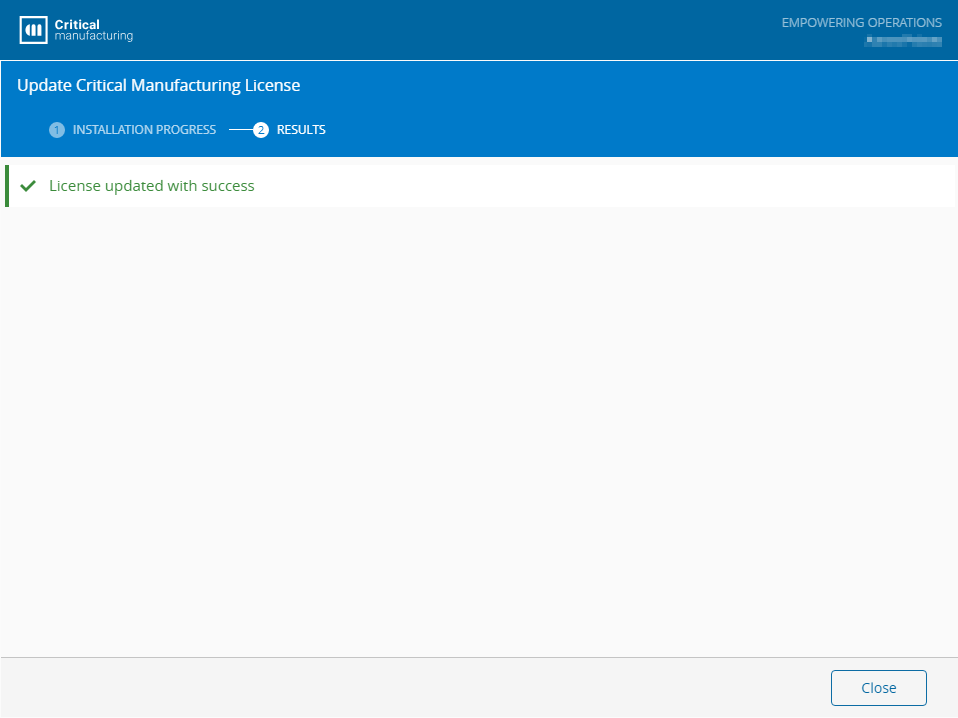
Proceed with the Update:
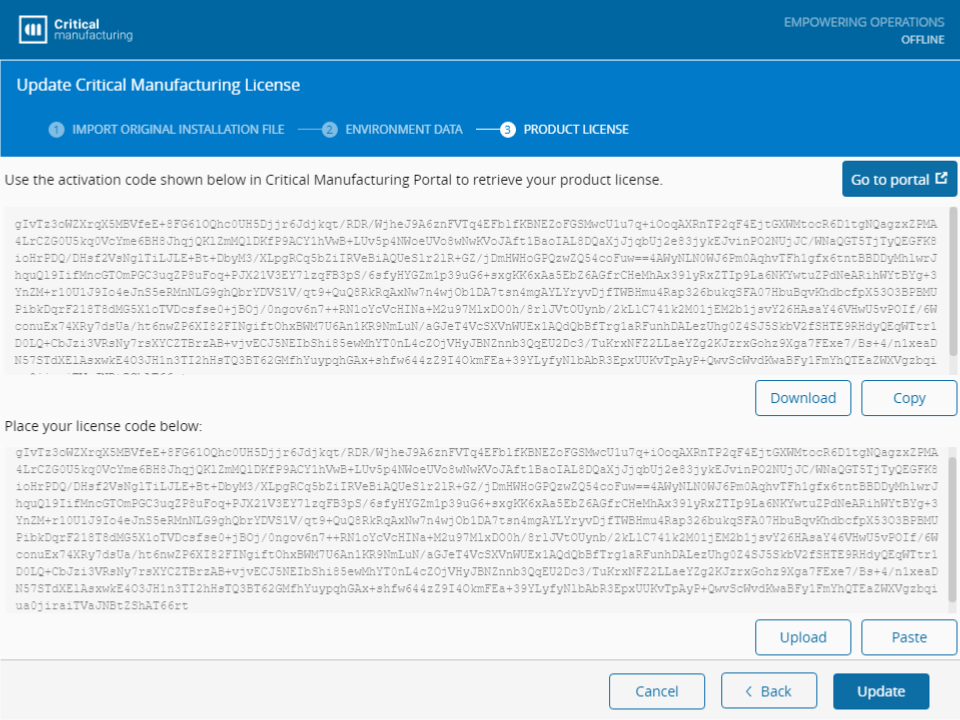
For the Setup - Offline, follow the steps below:
-
Before selecting Update License, select the Switch to offline option:
-
After importing the
.jsonparameters file used with the original installation or manually setting the Environment Data, an activation code is provided:
-
Copy the activation code.
- With a different device, log in to the Critical Manufacturing Customer Portal with a User that has access to the required license.
-
Open the Licenses menu and select My Licenses:
-
From here you can:
- Select the Activate License in the top ribbon:
- Paste the Activation Code from the Setup - Offline update license operation:
- Then select the required Environment License and Activate it:
-
A license code will be provided and you should Download or Copy it:
-
Use the license code with the Setup - Offline installer, accordingly, and then select Update:
For the Command Console, follow the steps below:
Note
This method requires that you know the License Id or the License Name. You also need to have a valid json file with the Environment data (original installation json file), and online access to the Critical Manufacturing Customer Portal.
- Mount the Critical Manufacturing MES ISO.
-
Open a console at the mounted ISO root:
-
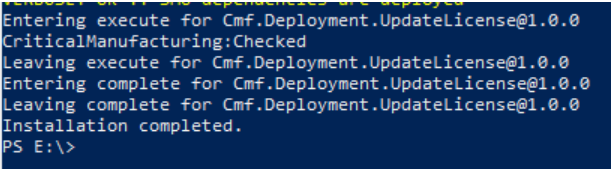
Run the CmfDeploy.exe and provide the
licenseIdand theparameters:- Command for reference:
.\tools\CmfDeploy.exe installlicense --licenseId="LicenseName" --parameters="OriginalInstallationJsonFilePath" - Example for reference:
.\tools\CmfDeploy.exe installlicense --licenseId="CMF - CMFLAB_Development_v7.0.0_ED20230901" --parameters="C:\Users\Administrator\Downloads\installation 7.0.2.json"
- Command for reference:
-
You will be redirected to the Customer Portal and will need to log in with a User that has access to the provided License. What follows is a successful output example for this operation: