---
pdfexport: true
alias: tutorials-experiment-management-introduction
timetoread: true
tutorial: full
description: "Manage experiments within the Critical Manufacturing MES for optimized production runs"
---
# Introduction
The Experiment Management module allows you to define and execute controlled experiments on the shop floor. This MES capability supports the creation, execution, and tracking of a Design of Experiments (DoE), a structured methodology used to evaluate the impact of process variations under controlled conditions. In some engineering environments, a DoE may also be referred to as a Special Work Request (SWR).
A DoE is an applied statistical approach used to plan, conduct, analyze, and interpret controlled tests. These tests evaluate how changes to one or more process parameters affect a desired outcome and are commonly used when introducing new products, validating new processes, or optimizing existing ones.
Experiments may involve testing new processes, equipment, materials, instruments, or durable goods.
## Tutorial Overview
This document will guide you through the setup of Experiment Management functionalities. It will detail step by step the set of configurations and user interactions that are needed to create an **Experiment Definition**.
## Concepts
The main concepts related to the Experiment Management module are described in the table below:
| Term / Concept | Description |
| ------------------------- | ----------------------------------------------------------------------------------------------------------------------------------- |
| **Experiment Definition** | A structured definition of the specific variations to be applied to a Material or to specific Material Groups during an Experiment. |
| **Experiment** | The running Experiment based on an Experiment Definition. An Experiment always requires a Material. |
| **Objective** | A goal to be tested by the Experiment Definition, such as cost, yield or performance. |
| **Material Group** | A group of Sub-Materials that will be subject to some variations together. |
| **Step Material Groups** | The Steps where Material Groups will be subject to specific process deviations. |
| **Action** | A deviation to be applied for a Material or a Material Group at an Experiment Definition Step. |
| **Event** | The trigger for an Action. |
Table: Experiment Management main concepts
The Experiment Management object model is shown below:
```mermaid
graph TB
A1[Material] --- L1[Experiment]
L1 --- L2[Experiment Material]
L2 --- A2[Material]
L1 === Main[Experiment Definition]
L3[Experiment Definition Material Group] === Main
Main === L4[Experiment Definition Step]
Main === L7[Experiment Definition Objective]
L4 --- L5[Experiment Definition Step Material Group]
L5 --- L6[Experiment Definition Step Material Group Action]
Main --- A3[Flow]
Main -.- A4[Product]
Main -.- A5[Product Group]
classDef mermaid_title color:#000, fill:#fafafa, stroke:#fafafa, stroke-width:0x, font-size:100%, font-weight:200;
classDef mermaid_start color:#000, fill:#fafafa, stroke:#fafafa, color:#fafafa, stroke-width:0x, font-size:100%, visibility: hidden;
classDef mermaid_businessdata color:#000, fill:#65CDE8, stroke:#65CDE8, stroke-width:0px, font-size:100%;
classDef mermaid_nonbusinessdata color:#000, fill:#B7DEE8, stroke:#B7DEE8, stroke-width:0px, font-size:100%;
classDef mermaid_entity color:#000, fill:#FB9F53, stroke:#FB9F53, stroke-width:0px, font-size:100%;
classDef mermaid_entitylinked color:#000, fill:#FCD5B5, stroke:#FCD5B5, stroke-width:0px, font-size:100%;
classDef mermaid_context color:#000, fill:#B9CDE5, stroke:#B9CDE5, stroke-width:0px, font-size:100%;
classDef mermaid_optional color:#000, fill:#B7DEE8, stroke:#65CDE8, stroke-width:1px, font-size:100%, stroke-dasharray: 5 5;
class Main mermaid_entity
class A1,A2,A3,A4,A5,A6,A7,A8,A9,A10,A11,A12 mermaid_businessdata
class L1,L2,L3,L4,L5,L6,L7,L8,L9 mermaid_entitylinked
class C1,C2,C3,C4,C5,C6 mermaid_context
class N1,N2,N3,N4,N5,N6 mermaid_nonbusinessdata
click Main "../../userguide/business-data/experiment-definition"
click L1 "../../userguide/business-data/experiment"
click A1 "../../userguide/business-data/material"
click A2 "../../userguide/business-data/material"
click A3 "../../userguide/business-data/flow"
click A4 "../../userguide/business-data/product"
click A5 "../../userguide/business-data/product-group"
```
## Experiment Management Lifecycle
There are essentially two core objects that make up the Experiment Management module, as shown in the image below. The Experiment Definition (shown in blue) is a template from which Experiments can be created. The Experiment (shown in green) is the actual running Experiment and that must have a Material associated with it. The Experiment Definition is a versioned object that follows the normal lifecycle of a versioned object.
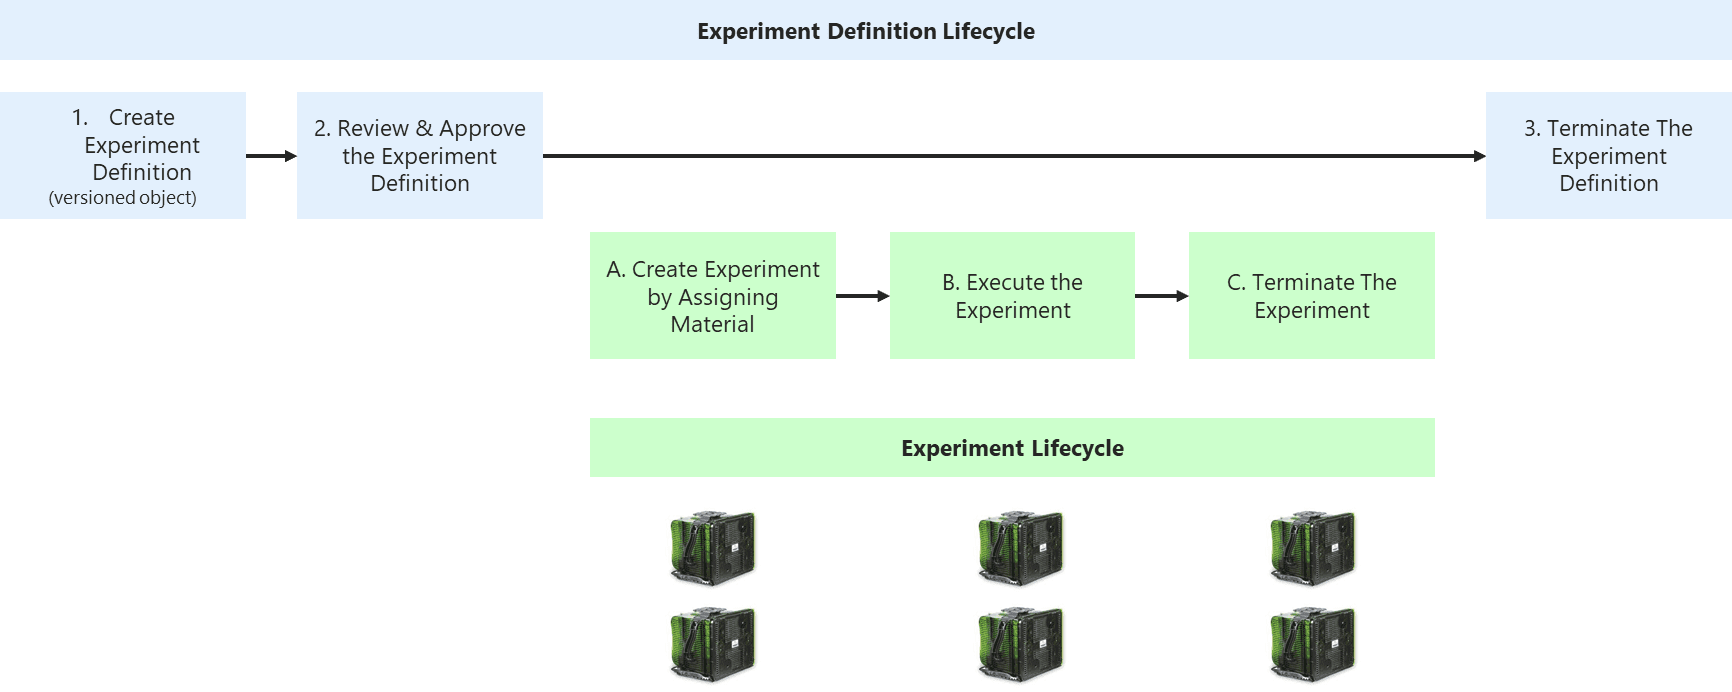
The Experiment object that represents the running Experiment Definition instance and that always requires a Material follows the lifecycle as shown in the image below and described in the table immediately after:
```mermaid
graph TD
Start -->|"Assign Material
(Material is assigned)"| A1[Created]
A1 -->|"Move Next
(Material reaches the first Step of the Experiment Definition)"| A2[In Progress]
A2 -->|"Move Next
(Material reaches the last Step of the Experiment Definition)"| A3[Completed]
A3 -->|"Close Experiment
(Experiment is closed manually or automatically)"| A4[Closed]
classDef mermaid_title color:#000, fill:#fafafa, stroke:#fafafa, stroke-width:0x, font-size:100%, font-weight:200;
classDef mermaid_start color:#000, fill:#fafafa, stroke:#fafafa, color:#fafafa, stroke-width:0x, font-size:100%, visibility: hidden;
classDef mermaid_businessdata color:#000, fill:#65CDE8, stroke:#65CDE8, stroke-width:0px, font-size:100%;
classDef mermaid_nonbusinessdata color:#000, fill:#B7DEE8, stroke:#B7DEE8, stroke-width:0px, font-size:100%;
classDef mermaid_entity color:#000, fill:#FB9F53, stroke:#FB9F53, stroke-width:0px, font-size:100%;
classDef mermaid_entitylinked color:#000, fill:#FCD5B5, stroke:#FCD5B5, stroke-width:0px, font-size:100%;
classDef mermaid_context color:#000, fill:#B9CDE5, stroke:#B9CDE5, stroke-width:0px, font-size:100%;
classDef mermaid_optional color:#000, fill:#B7DEE8, stroke:#65CDE8, stroke-width:1px, font-size:100%, stroke-dasharray: 5 5;
class Main mermaid_entity
class Start mermaid_start
class A1,A2,A3,A4,A5,A6,A7,A8,A9,A10,A11,A12 mermaid_businessdata
class L1,L2,L3,L4,L5,L6 mermaid_entitylinked
class C1,C2,C3,C4,C5,C6 mermaid_context
class N1,N2,N3,N4,N5,N6 mermaid_nonbusinessdata
```
| State | Description |
| -------------- | ------------------------------------------------------------------------------------------------------------------------------------------------------------------------------------------------------------------------------------------------------------------------------------------------------------ |
| **Created** | This is the default state when an Experiment is created by assigning a Material to it. There are several restrictions regarding which Materials can be assigned to a particular Experiment Definition such as the Product, the Flow, the Type, the Form as well as the number and form of the Sub-Materials. |
| **InProgress** | When the Material reaches the first Step defined in the Experiment Definition it becomes InProgress. |
| **Completed** | When the Material is moved out of the last Experiment Definition Step, it becomes Completed. |
| **Closed** | When the user marks the Experiment as closed, the Experiment is closed. Typically, the Experiment results are recorded before the Experiment is closed. |
Table: Experiment object lifecycle
!!! info
An Experiment Definition can be configured to automatically close the Experiment after the last Experiment Step.
During execution, there are four important events that the Experiment Management module considers when carrying out actions. These are described in the table below:
| Event | Description |
| ------------- | --------------------------------------------------------------------------------------- |
| **Queued** | Triggered when the Material or Material Group arrives at the Step. |
| **Track-In** | Triggered when the Material is being Tracked-In. |
| **Track-Out** | Triggered when the Material is being Tracked-Out. |
| **Processed** | Triggered after the Material has been Tracked-Out (but not yet moved to the next Step). |
Table: Experiment management events
Any Experiment Definition Action must always be associated with one of the four events. The execution of the Experiment by the system is shown in the image below:
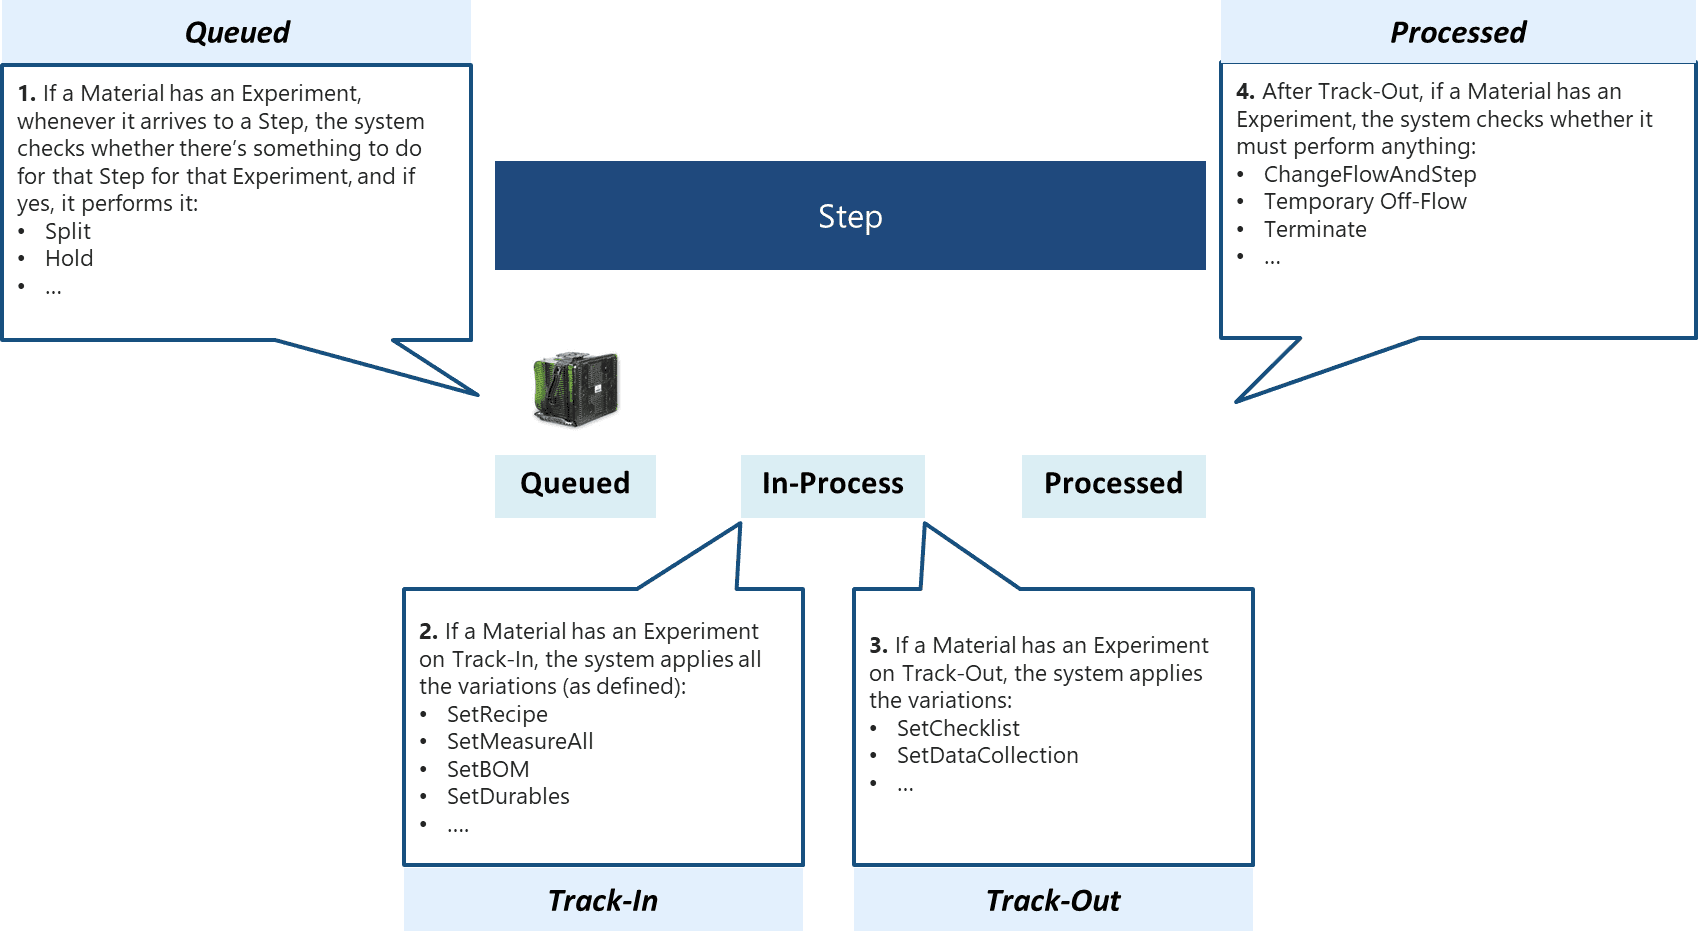
Some actions require that a split takes place before the action is performed. All splits are defined per Experiment Definition Step Material Group and will be evaluated and performed when the Material arrives at the Experiment Definition Step.
!!! note
At every Experiment Definition Step, there must be one Material Group that is not Split, that is, its Split Type must be **None**.
| Split Type | Description |
| ------------ | ---------------------------------------------------------------------------------------------------------------------------------------------------------------------------------------------------------------------------------------------------------------------------------------------------------------------------------------------------------------------------------------------------------------------------------------------------------------------------------------------------------------------------------------------------------------------------------------------------------------------------------------------------------------- |
| **None** | No split is performed. |
| **Logical** | The Material Group is logically split in the system automatically, even though physically it will remain together. There are three types of physical splits:
- For Current Step - a temporary split where the Material Group is merged back at the end of the current Step (in state Processed).
- For Multiple Steps - a temporary split where the Material Group is merged back at another Step further ahead in the Flow. In this case, it is necessary to provide a merge point, that is, the merge Flow Path. And also the merge state.
- Permanent - in this case, the Material Group is split permanently and will not be merged back again. |
| **Physical** | The Material Group is split logically and physically. There are three types of physical splits:
- For Current Step - a temporary split where the Material Group is merged back at the end of the current Step (in state Processed).
- For Multiple Steps - a temporary split where the Material Group is merged back at another Step further ahead in the Flow. In this case, it is necessary to provide a merge point, that is, the merge Flow Path. And also the merge state.
- Permanent - in this case, the Material Group is split permanently and will not be merged back again. |
Table: Experiment Material Group split types
## Demo Scenarios
An **Experiment** consists of well-defined process variations, such as a different Recipe or different BOM, intended to test the effect of that change, which is typically made under a specific control group (set of lot sub-materials).
In this tutorial, we're going to explore two different experiments:
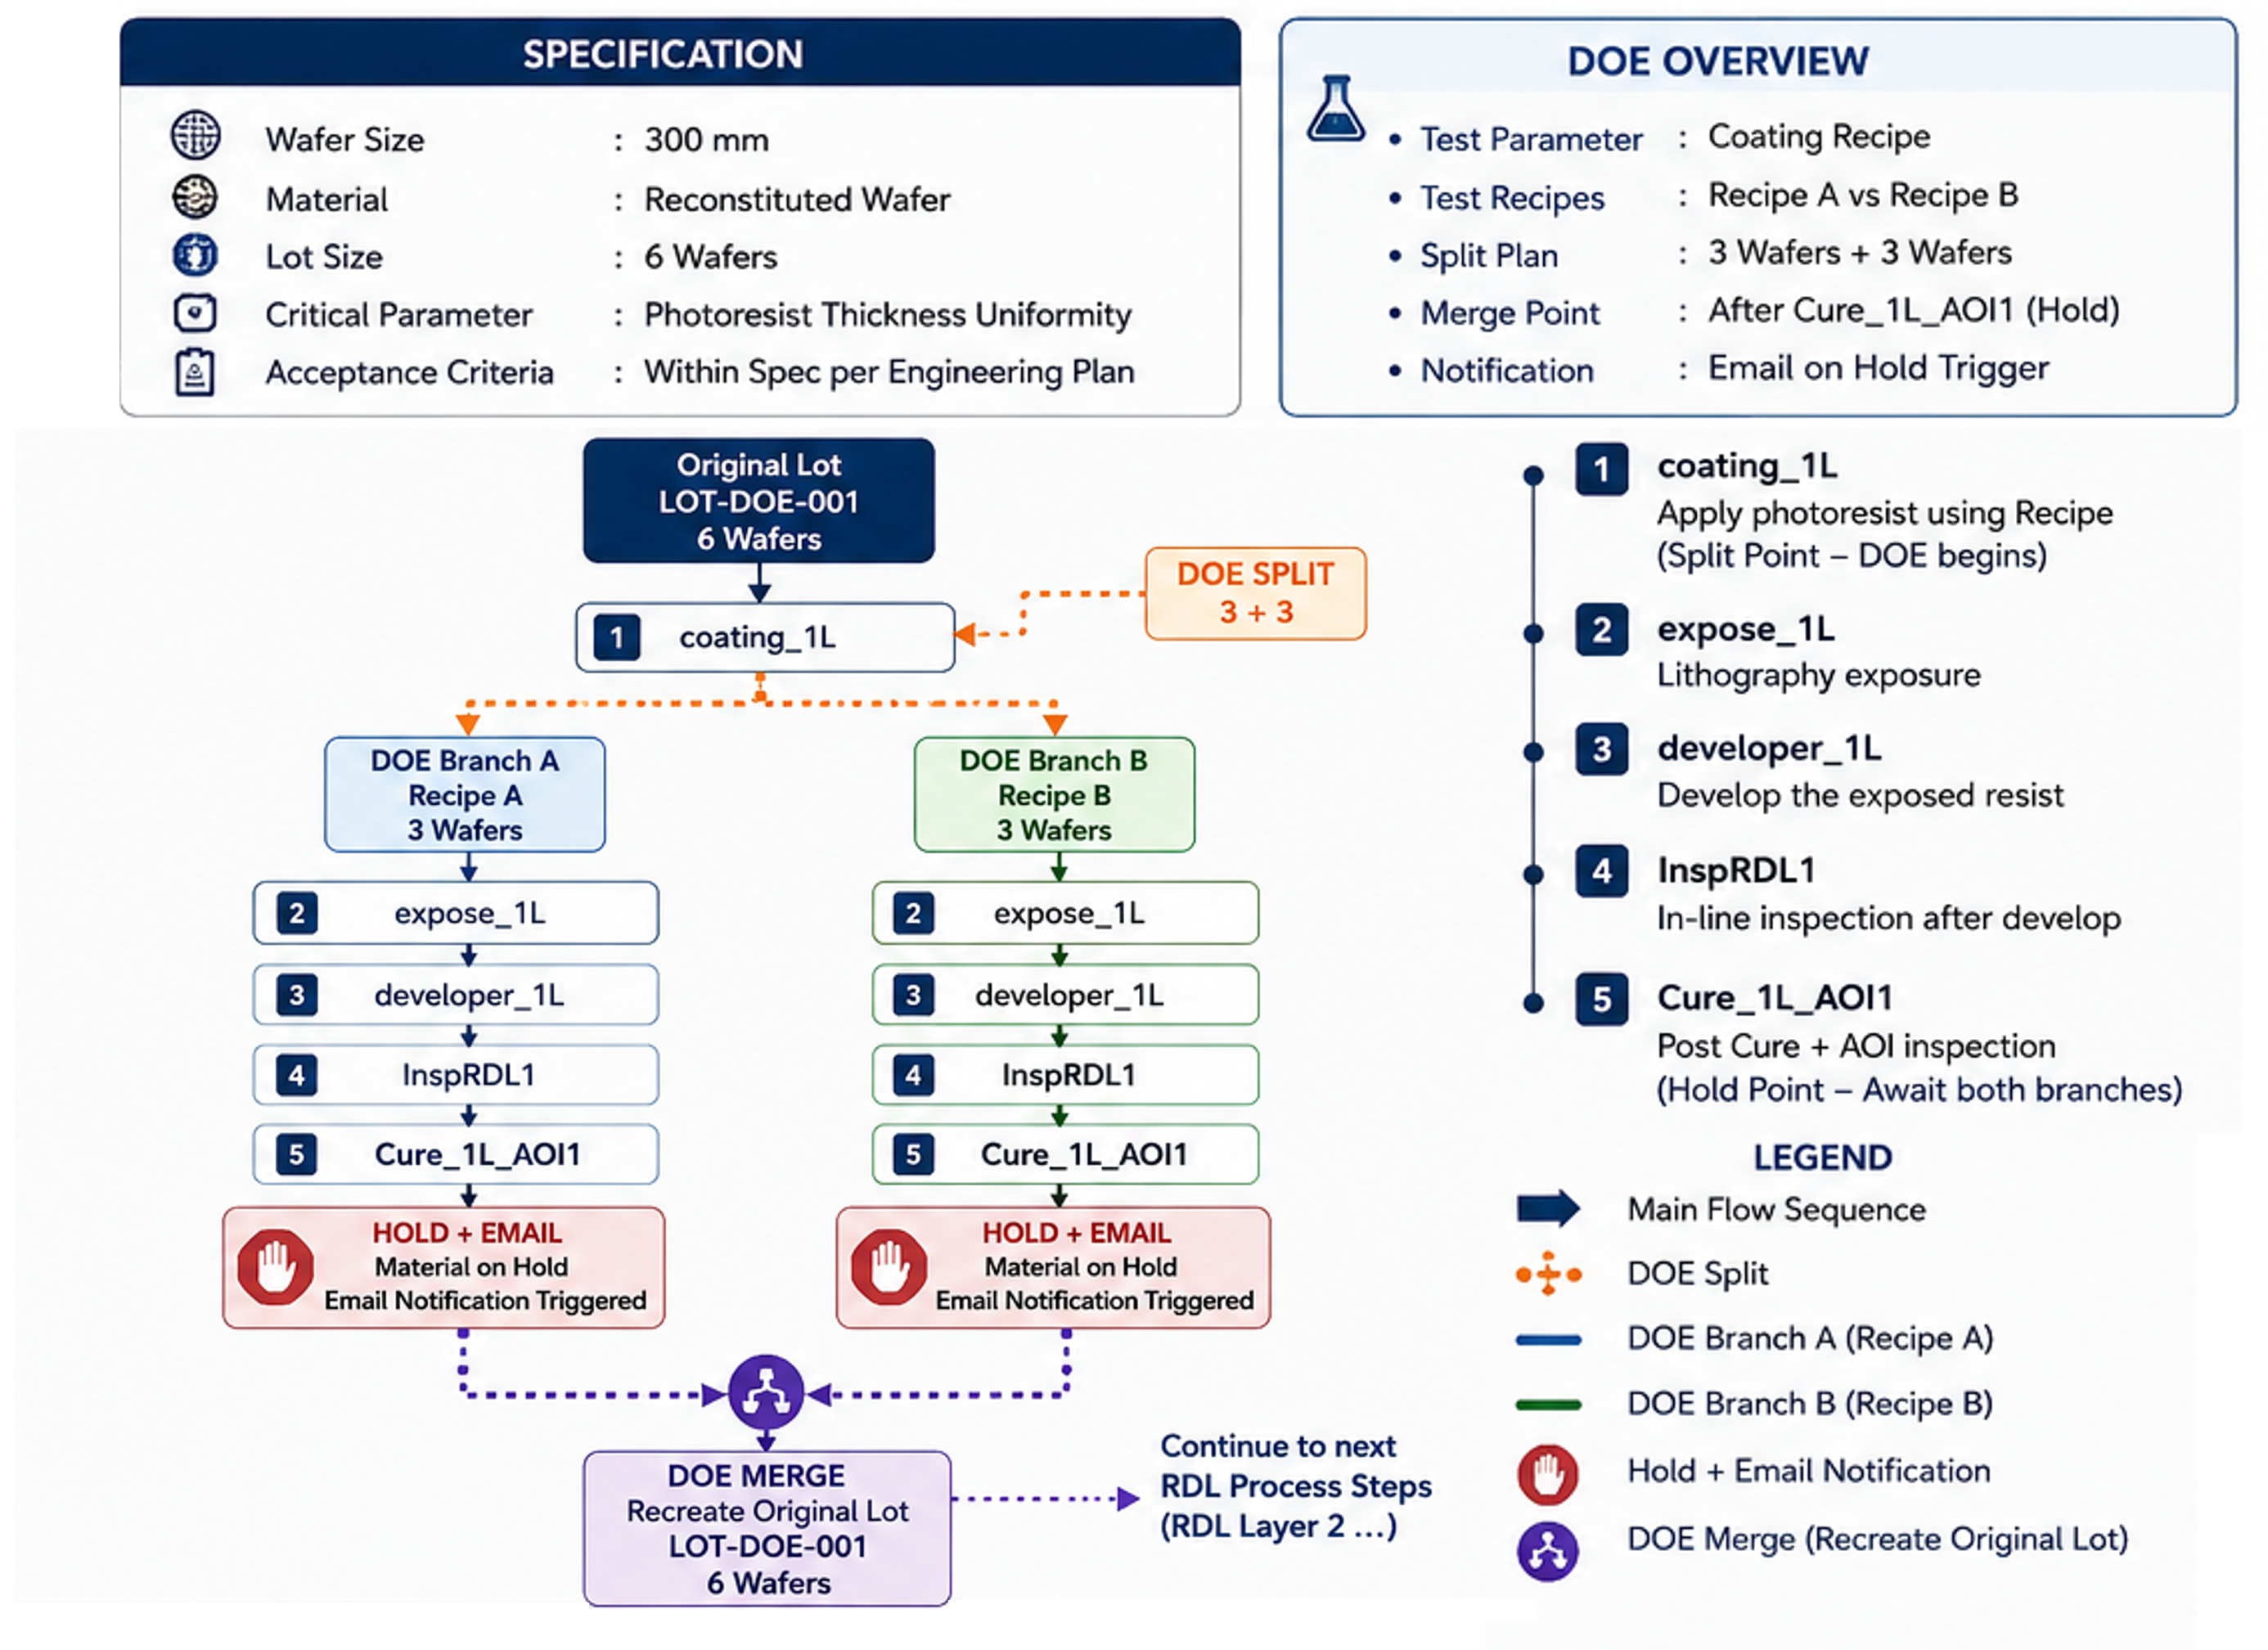
- First, we will explore a conventional experiment in which a lot composed of multiple sub-materials undergoes a recipe test and is split at an experiment step. Each resulting split follows a similar experiment flow and is merged back into the original lot after the experiment results have been captured.
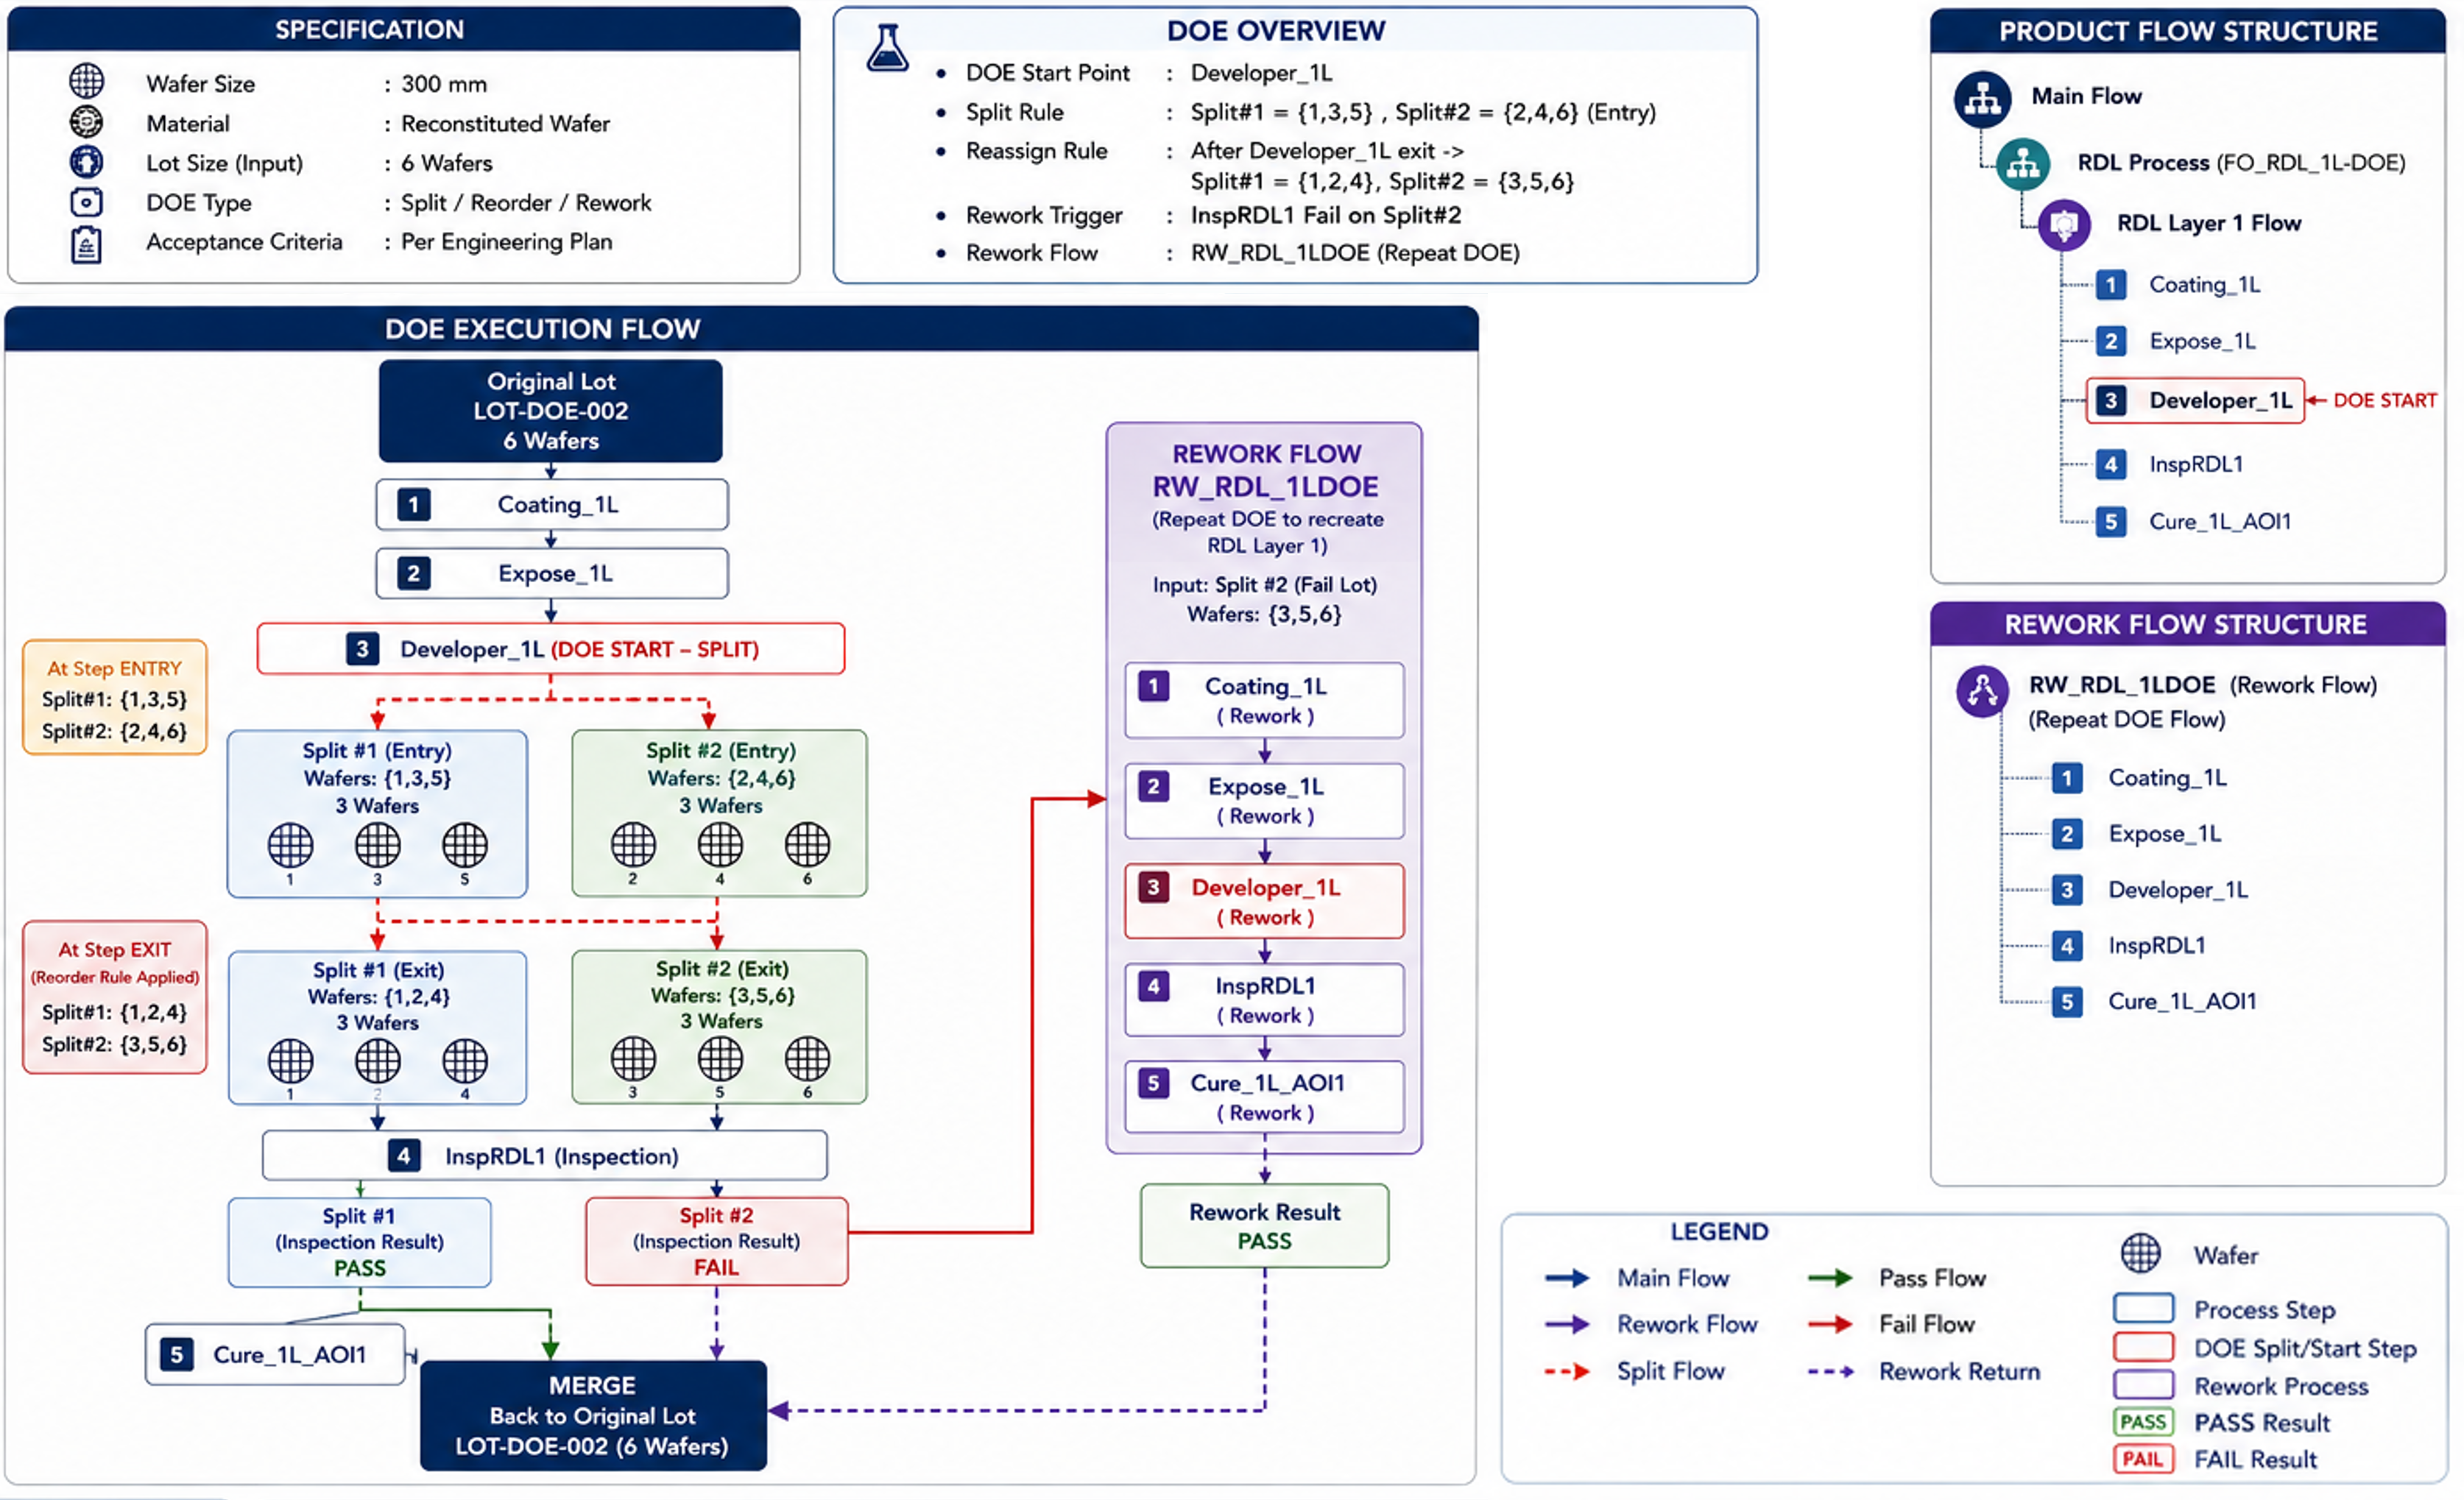
- Second, we're going to explore a more demanding scenario where MES will track different entry and exit material groups that will be under process in a specific Experiment Definition Step and some of the experiment splits will be deviated from its original flow.
### Simple Scenario: Coating Recipe Test Exploring Containment Actions
In this DoE, the lot will undergo recipe tests for engineering purposes. The process will start with a split action in the first step where the resulting splits will be tested with two different recipes. Both lots will proceed independently through the process flow until the final step, where they will be placed under containment. Once released, they will be merged back into the original lot.
### Advanced Scenario: Developer Recipe Test Exploring Mixed Control Groups
In this second DoE example, the lot will undergo recipe tests, but the control samples that result from the Material Group splits after the recipe tests will consist of a specific wafer from each tested lot. Only one of the control groups will undergo inspection and rework processes, while the other will continue through the standard flow until the final process step, where both groups will be merged.
!!! tip
To continue learning, see [[tutorials-experiment-management-configuring-experiment-definition]].