---
alias: tutorials-checklist-items
glightbox: false
to_be_reviewed: Line 261 regarding US Maintenance Management Reusable Spare Parts
description: "The documentation outlines how to create and configure Checklist items, including data definitions, instructions, diagrams, and parameters for various activity"
---
# Checklist Items
For each **Checklist** item, you may define:
* **General Data** - define the item's name, activity type, tracking type, and other key settings that determine how the item will be executed.
* **Instructions** - provide detailed instructions or guidance for completing the item.
* **Diagram** - attach a supporting diagram to aid in the performance of the **Checklist** item.
* **Parameters** - for activities categorized as manual tasks or requiring signatures, you may specify measurable parameters for evaluation.
* **Signatures** - for items requiring a signature, configure the specific signature criteria to validate the item.
* **Document** - if you include a valid Documentation URL in the General Data, it will be accessible in the Document tab.
* **Data Collection Parameters** - if a **Data Collection** is linked to the Checklist, specify which parameters should be measured.
* **BOM Products** - if a **BOM** is linked to a **Checklist**, define a list of **BOM Products** relevant to the item.
Let's take a closer look at each.
## General Data
The first step in configuring a **Checklist** item is to define its General Data, which includes essential details about its purpose and behavior. Here are the key properties:
* **Name** of the **Checklist** item.
* **Type** (optional) - the values are taken from the lookup table [[checklisttype-lt]].
* **Documentation URL** (optional) - a valid URL will be displayed in a separate tab named **Document** and can also be opened in a new tab for an easier viewing experience.
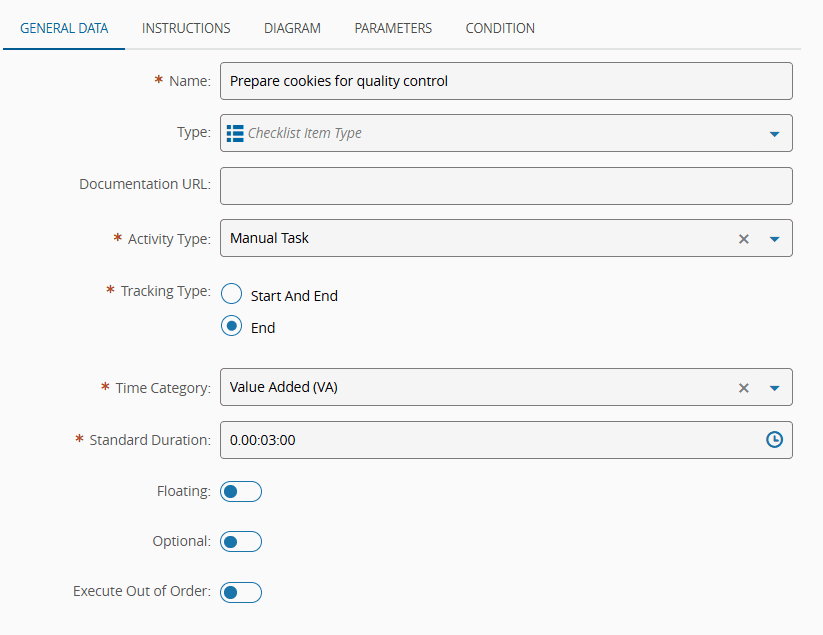
### Activity Type
* **Manual Task** - a manual procedure from which additional parameters can be collected.
* **Manual Action** - a **Rule** that is triggered manually.
!!! note
Manual Actions cannot be applied to a **Checklist** that is in the Immediate mode.
The **Checklist** item with this Activity Type must be the last one.
* **Automatic Action** - a **Rule** that is triggered automatically.
!!! note
Automatic Actions cannot be applied to a **Checklist** that is in the Immediate mode.
If the **Checklist** item with this Activity Type is not the first item to be performed, you must save the **Checklist** instance before the system can automatically execute the associated **Rule**.
* For **Manual and Automatic Actions**, specify the corresponding **Rule**.
!!! warning
The selected **Rule** must return a dictionary with a key named `Result`.
* **Signature** - an item that needs to be signed with a username and password.
=== "Automatic Action :core-static-automaticaction-sm:"

=== "Manual Action :core-static-manualaction-sm:"
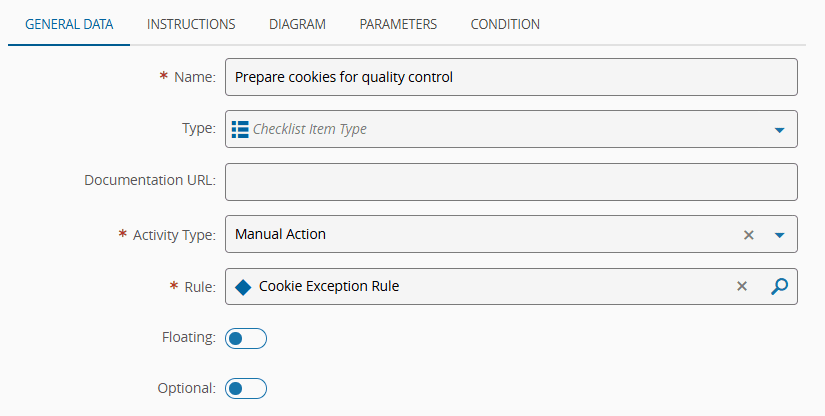
=== "Manual Task :core-static-manualtask-sm:"
=== "Signature :core-static-signature-sm:"

### Tracking Type
* **Start And End** - the start and the end need to be captured.
* **End** - captures only the completion of the task.
### Floating, Optional, and Execute Out of Order
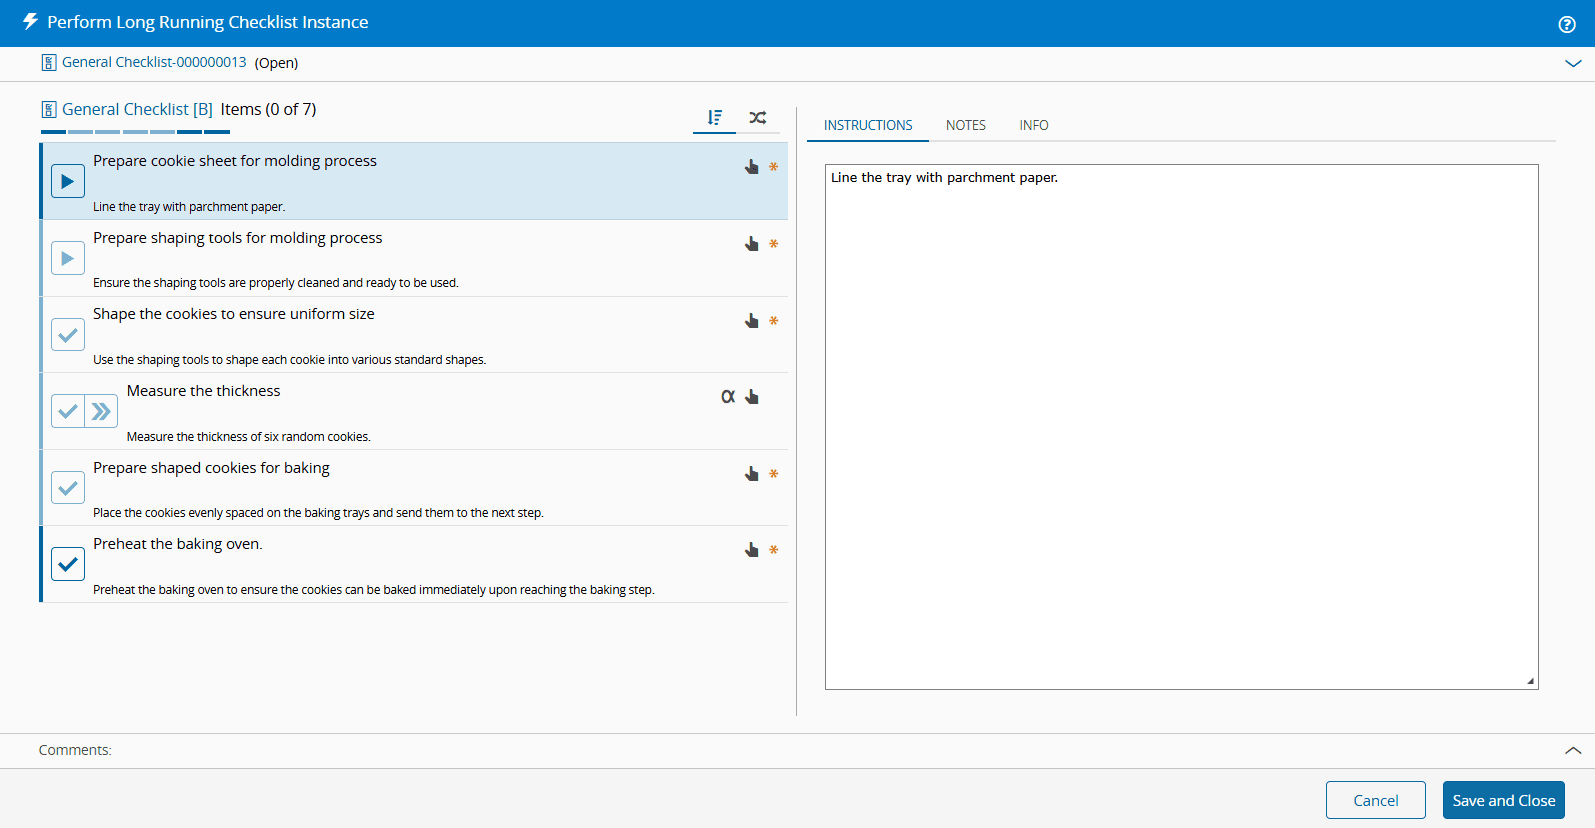
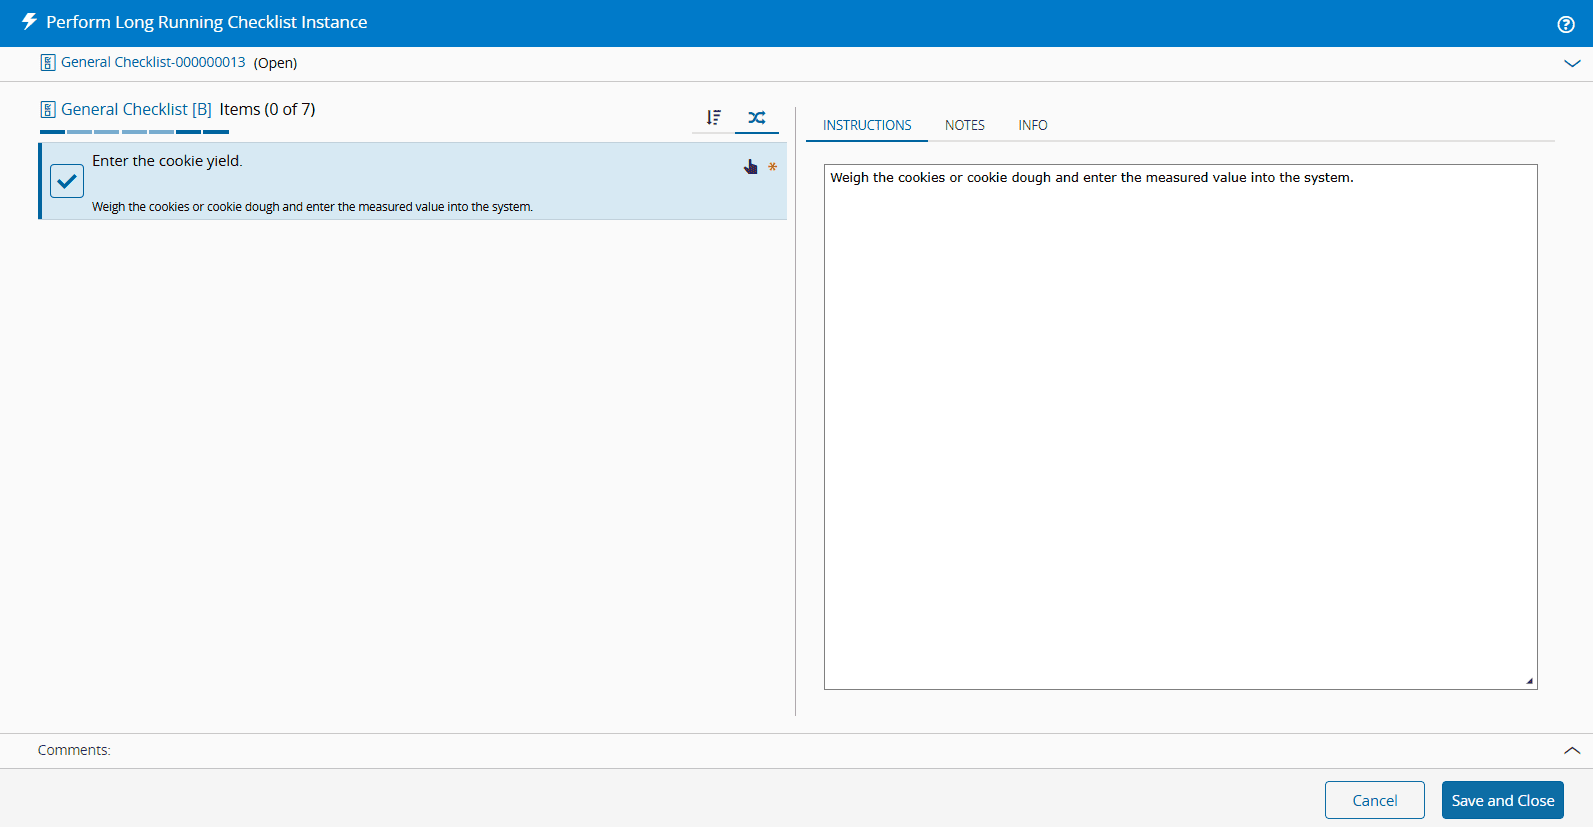
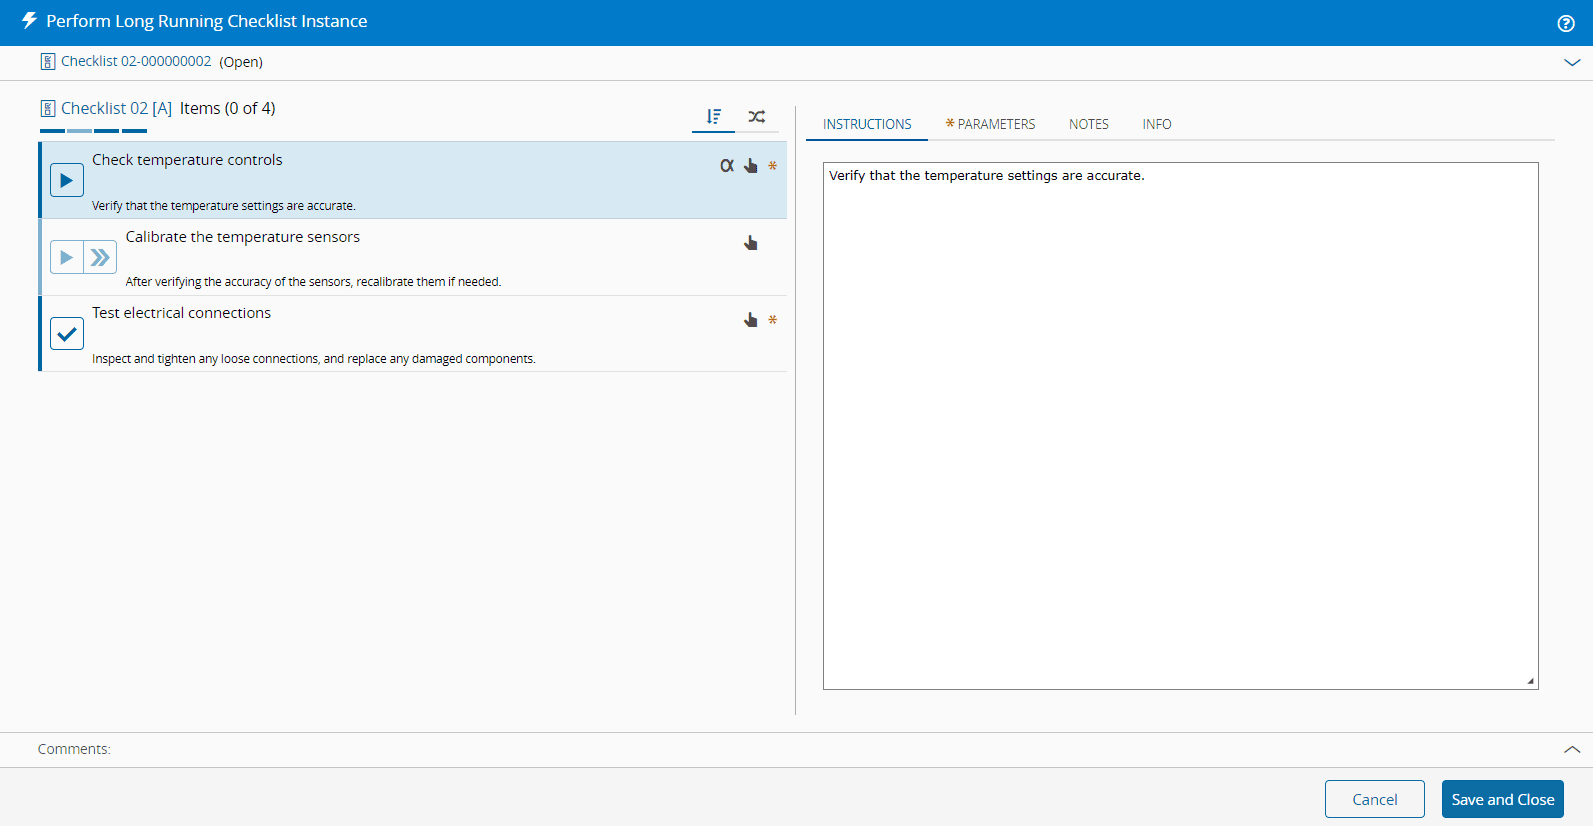
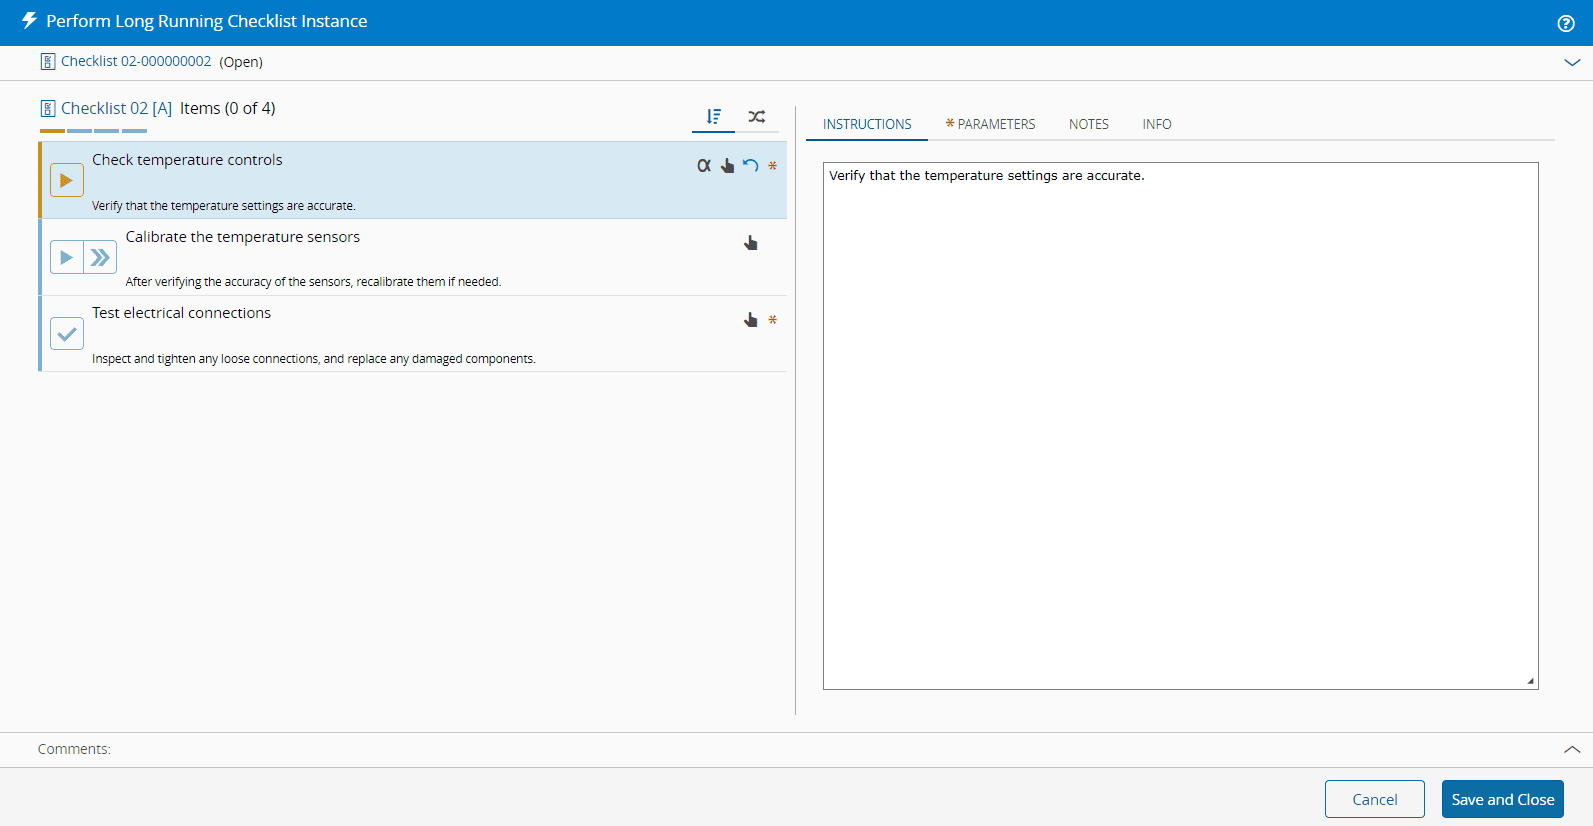
* **Floating** - these items can be performed at any time, while non-floating items must follow a specific sequence. They appear under the :core-static-sequential-sm: tab in the **Perform** wizard shown below.
* **Optional** - these items can be skipped if needed. They are easily identified by the :core-static-accept-sm::core-static-skip-sm:
icons to the left of the **Checklist item**.
* **Executed Out of Order** (available for Manual Tasks only) - if set to `true`, these items can be performed in any order.
=== "Sequential Checklist Items :core-static-sequential-sm:"
=== "Floating Checklist Items :core-static-float-sm:"
The key distinction between **Execute Out of Order** and **Floating Checklist** items lies in how they are displayed and managed during execution.
**Execute Out of Order** items still appear within the sequential flow of the overall **Checklist**. While they are part of the sequence, you have the flexibility to choose when to perform them, allowing for non-linear execution. However, they remain visible alongside the other **Checklist items** in the sequential view, as displayed in the images above.
**Floating Checklist** items, on the other hand, are completely separated from the sequential flow. They are displayed in a distinct, dedicated view, separate from the rest of the **Checklist**, as seen in the images above.
When performing a **Checklist** instance, only one item can be executed at a time. This applies to both **Sequential** and **Execute Out of Order** items. If multiple items are selectable, it indicates the presence of **Execute Out of Order Checklist** items. In the image below, the third item is the **Execute Out of Order** one. Regardless, once you begin executing an item, you must complete and finalize it before moving on to the next.
=== "Multiple Selectable Checklist items"
=== "Executing Checklist item"
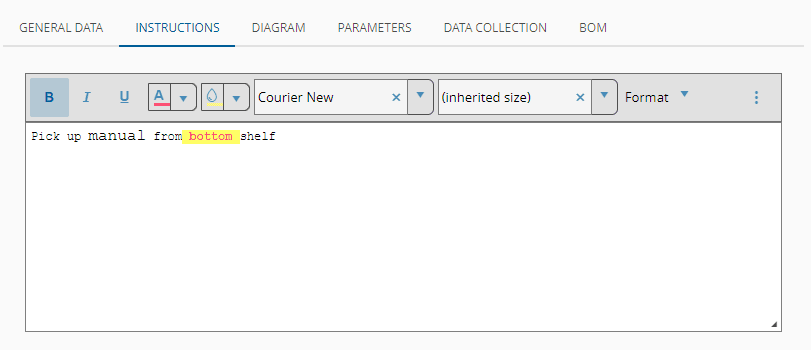
## Instructions
You can add rich-text formatted instructions for each **Checklist** item. These instructions will guide users through the process.
!!! info
The maximum instruction size (in Megabytes) is defined in the configuration entry: `/Cmf/System/Configuration/Checklist/MaxInstructionSize`.
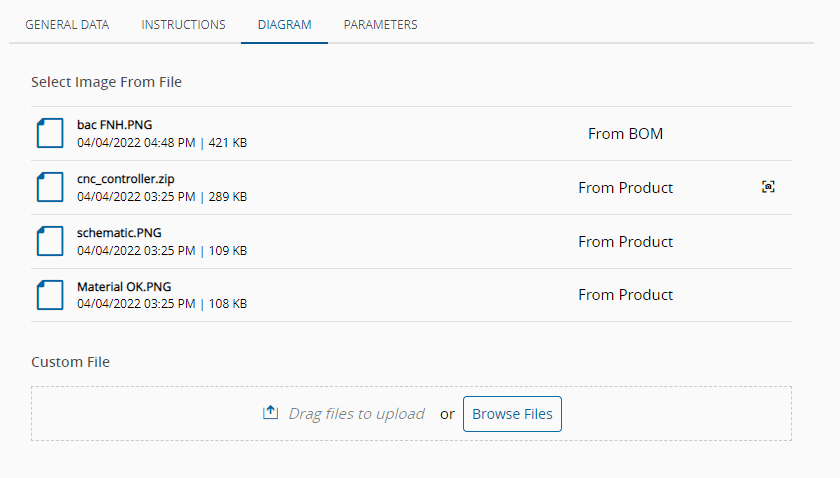
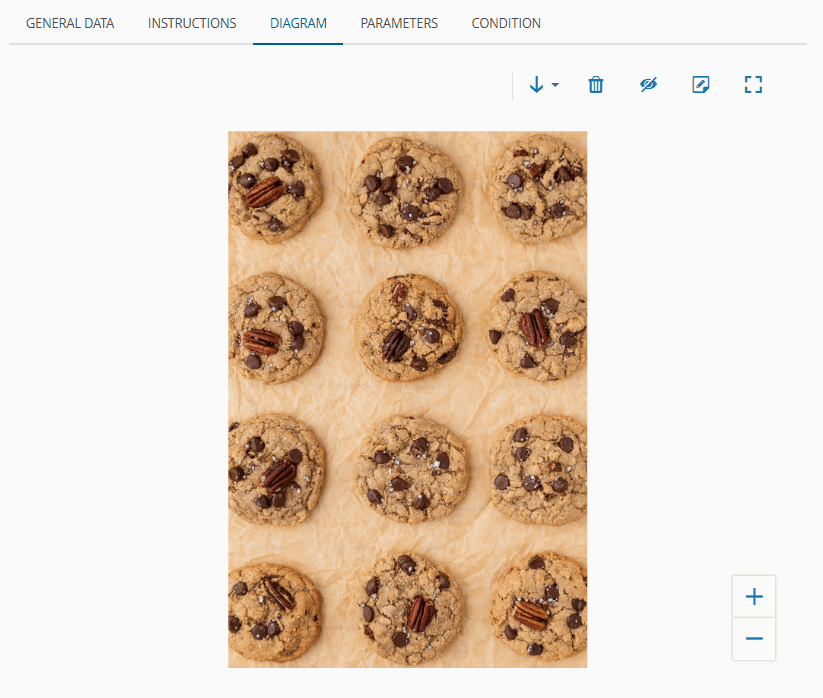
## Diagram
You can add a diagram to illustrate specific procedures associated with a **Checklist** item. In the **Diagram** tab, you can upload an image and annotate it using the built-in tools. In this tab, you also have direct access to images, diagrams, and documents associated with the **Product** and **BOM** linked to the **Checklist**.
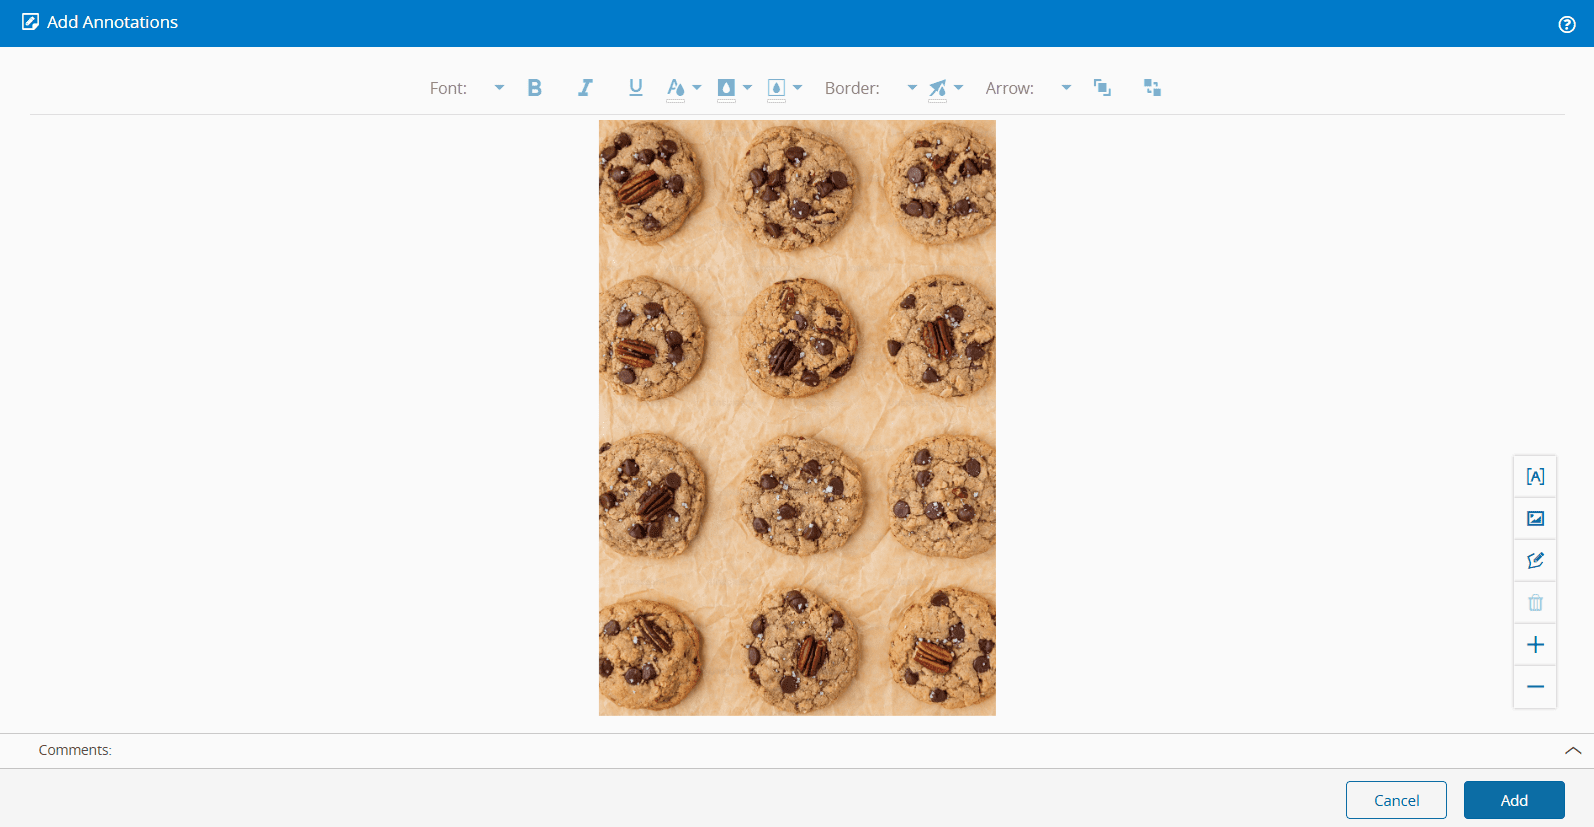
After uploading a file, you can annotate the diagram directly over it, using the **Add Annotations** within the same tab.
At the bottom right corner you have controls that add different types of annotations to the image:
* **Text boxes** - allows you to add text and an arrow indicating a specific point in the drawing. To edit the text, simply double-click on the shape.
* **Polygons** - used for outlining specific areas in the diagram. Select the icon and select each point you want to join until the line is closed by selecting the original point.
* **Images** - upload additional images and position them within the diagram. To add an image, select the appropriate icon and use the file upload control accordingly (upload from a local file or from a web URL). Place the image where desired and select **Add** to save.
!!! note
The image can be resized and placed anywhere over the existing diagram.
=== "Textbox"
{% set video_id = 'ada8b1554af712fbded14192d1f40468' %}
{% include-markdown 'includes/cloudflare_stream.md' %}
=== "Polygon"
{% set video_id = 'f7ce52d705da07eb1e61442621955c2d' %}
{% include-markdown 'includes/cloudflare_stream.md' %}
=== "Image"
{% set video_id = '8db17b5514c4b6cb8998e678bb91507d' %}
{% include-markdown 'includes/cloudflare_stream.md' %}
On top of the image you have several controls that provide easy tools for annotation and editing.
To change the font, background or line colors and border widths for any annotation, select the desired effect using the tools on top of the image and then select the annotation you want to edit.
{% set video_id = '67350b3f723d84718b420e536a5ff966' %}
{% include-markdown 'includes/cloudflare_stream.md' %}
If you want to remove any annotation, select it and select :material-trash-can::
{% set video_id = '4a11dcedb1690610e6472a44ba41f904' %}
{% include-markdown 'includes/cloudflare_stream.md' %}
In the main **Diagram** tab, select :material-eye: to toggle the visibility of the annotations:
{% set video_id = 'a5d974bb84d644d0338130292b31aa89' %}
{% include-markdown 'includes/cloudflare_stream.md' %}
If you want to download the diagram, select :material-download:. You can also decide to download the diagram with the annotations. In this case, a new image file will be created by flattening the layers of the main image with the annotations created on top. To remove the diagram, select :material-trash-can:.
{% set video_id = '5bbcf7161a97c0f68c98dff33334e780' %}
{% include-markdown 'includes/cloudflare_stream.md' %}
!!! info
You must save the Checklist in order to keep all the changes made to the diagram.
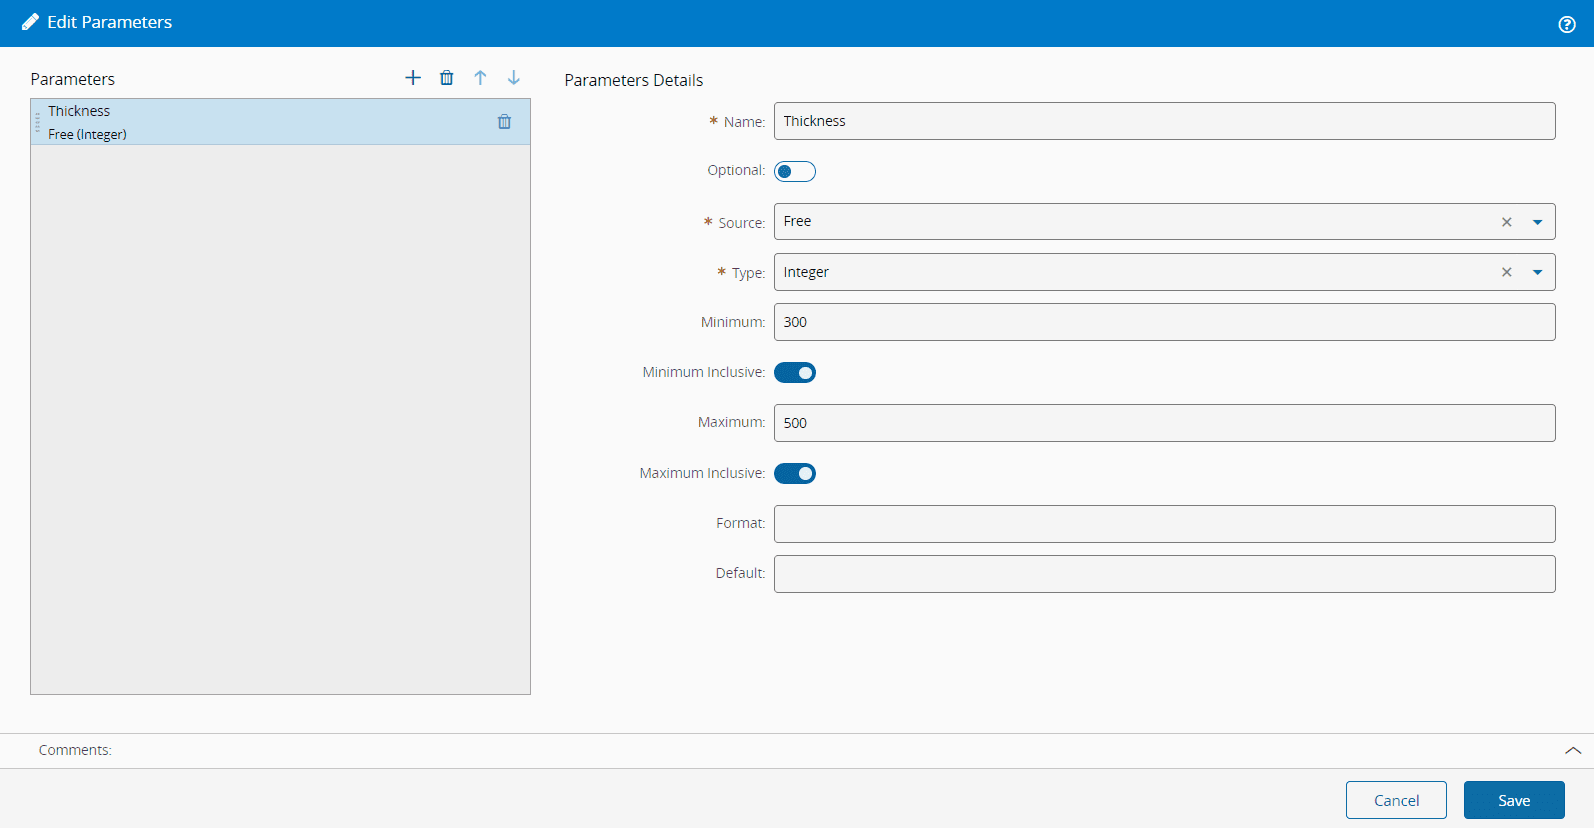
## Parameters
For Manual Tasks and Signatures, specify the desired **Parameters** and provide:
* The **Name**.
* Whether it is **Optional** or not.
* The **Source**, which can be Free, from a Lookup Table or from a Query. For more information, see [[user-guide-create-checklist#parameters]].
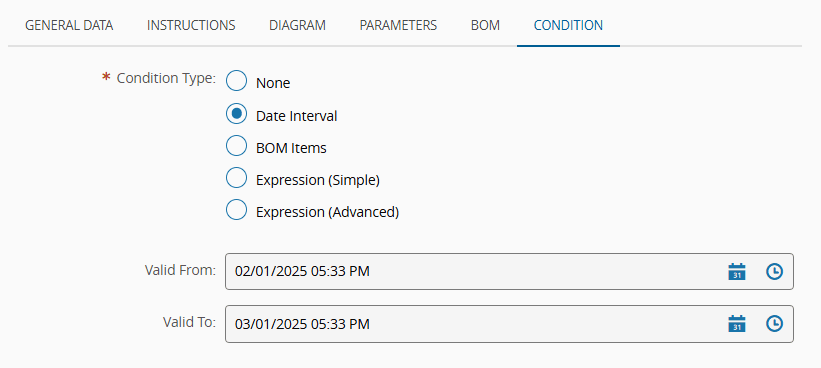
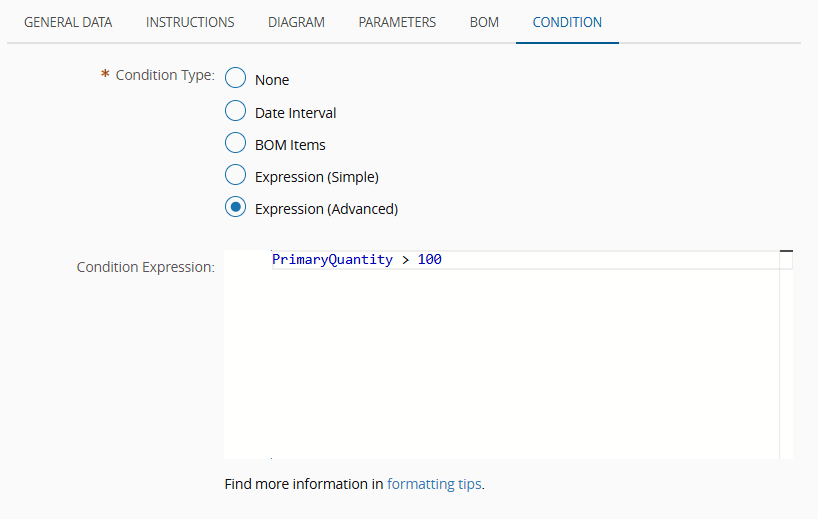
## Condition
For each **Checklist** item you may define a Condition, which could be:
* **None** - no restrictions will be added that will condition the execution of the **Checklist** item.
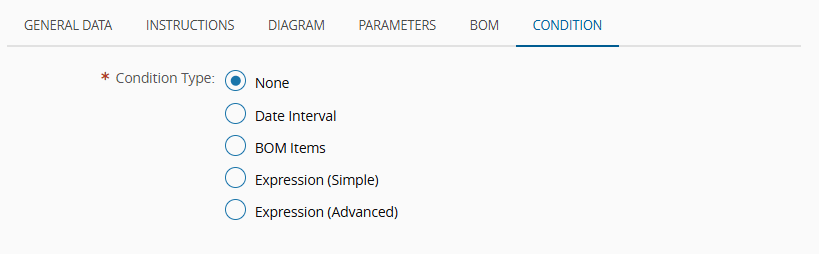
* **Date Interval** - if defined, you must enter the **Valid From** or **Valid To** date and time. If both are defined, the **Valid To** must be greater than the **Valid From**. In this case, the **Checklist** item will only be performed if the current date and time fall within this defined range.
* **BOM Items** - this option can only be selected if the scope is Material Tracking and it requires at least one **BOM** item to be associated with the **Checklist** item. If selected you must add at least one **BOM** item (see [[tutorials-creating-checklist#bom|BOM Products]]). In this case, the **Checklist** item will only be performed if it matches with the characteristics of the chosen **Material** or **Product**. For more information, see [[user-guide-preview-checklist#checklist-with-conditions|Checklist With Conditions]].

* **Expression (Simple)** - this option can only be selected if the scope is Material Tracking and it should reference a valid JSONata expression. This expression can reference **Product** Characteristics. You can select a **Product** or, if a **Product** is already associated with the **Checklist**, it will be pre-selected, and you will only be able to access characteristics defined for that **Product**. For more information, see [[user-guide-manage-product-characteristics|Product Characteristics]].
!!! note
The system validates only characteristic values defined in Lookup Tables, and autocomplete suggestions during condition editing are available only for characteristics linked to those Lookup Tables.

* **Expression (Advanced)** - this option can only be selected if the scope is Material Tracking and it should reference a valid JSONata expression. This expression can reference direct properties, attributes, and characteristics of the **Material**, as well as **Product** characteristics.
!!! info
Both Expression editors include an autocomplete feature that will suggest the characteristics available for the selected Product. In any case, the Checklist item will only be performed if it matches with the expression defined. You can preview the results by using the [[user-guide-preview-checklist#checklist-with-conditions]] functionality.
Here are some examples on how to use direct properties, attributes, and characteristics of the Material, as well as Product Characteristics:
* Material Primary Quantity is greater than 100 - `PrimaryQuantity > 100`
* Material name contains the value "Material A" - `$contains(Name, 'Material A')`
* Material Is Hot set to true or false - `IsHot = true` or `IsHot = false`
* Product default units are "Kg" - `Product.DefaultUnits = 'Kg'`
* Attribute 'RetailPrice' is greater than 100 - `Attributes.RetailPrice > 100`
* Material Characteristics 'Color' is equal to "Red" - `MaterialCharacteristics.Color = 'Red'`
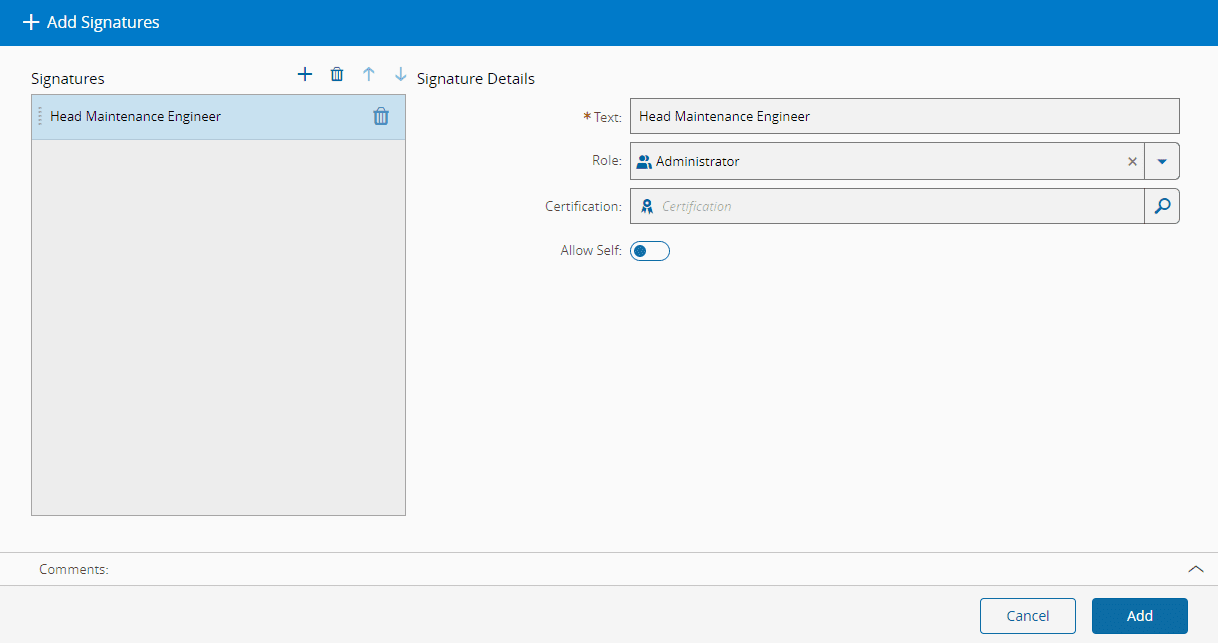
## Signatures
The **Signature** **Activity Type** will display a new tab called **Signatures** so that you can add the signatures that are allowed to sign the **Checklist** item.
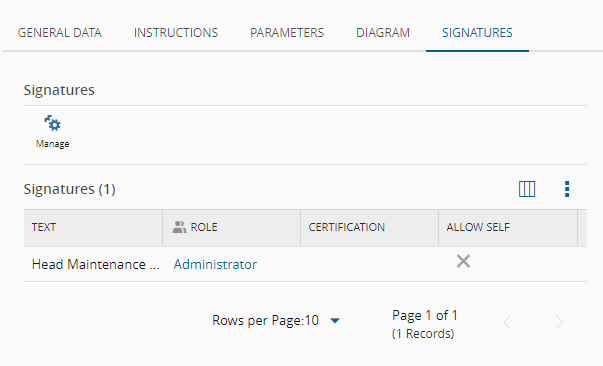
When adding a **Signature** you should provide the following information for each item:
* The **Text** to display as name for the signature.
* The **Role** associated with the signature (only users with this role will be able to sign the **Checklist** item).
* An optional **Certification** associated with the signature.
* Whether or not you can sign the **Checklist** item, **Allow Self**.
!!! warning
If the Security Portal is enabled for the instance of the Critical Manufacturing MES where Signature Activity Type Checklist items are created, the person who will sign the Checklist item must have a PIN.
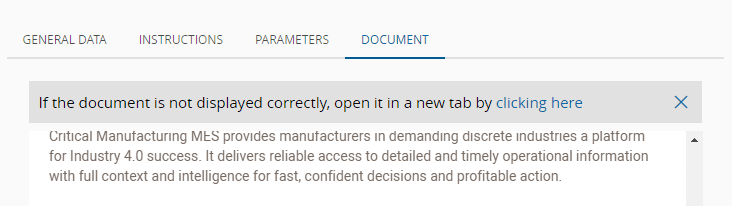
## Document
A valid **Documentation URL** will be displayed in a separate tab named **Document** and can also be opened in a new tab to enable an easier viewing experience:
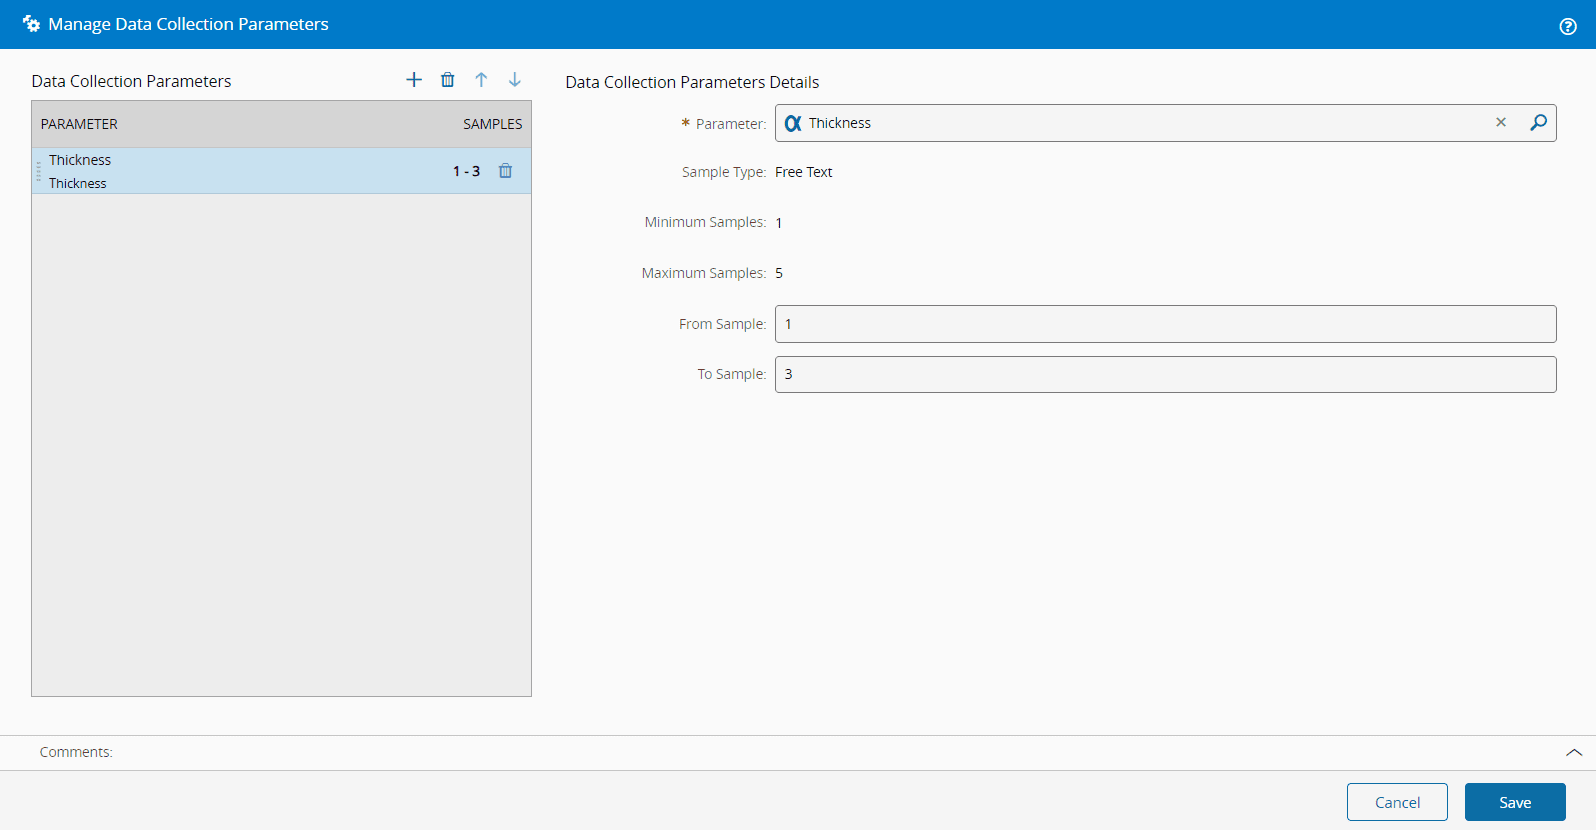
## Data Collection Parameters
If you assign a **Data Collection** to a **Checklist**, you can also define that some or all of the **Data Collection** parameters must be filled in when the **Checklist** is performed. You can edit the **Data Collection** parameters by selecting the Manage button in **Data Collection** tab. However, there are some restrictions to the parameters, as described in the [[tutorials-checklist-restrictions]] section of this tutorial.
!!! info
Data Collection parameters with calculation defined as `Rule` or `Expression` cannot be used in Checklists.
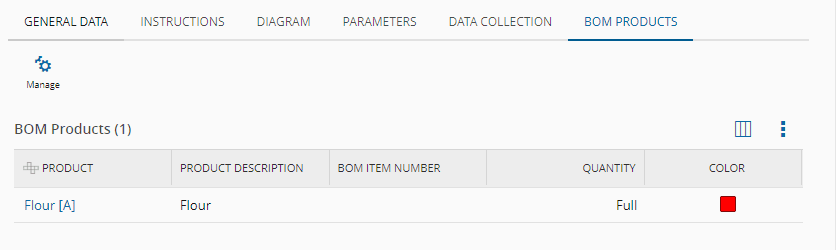
## BOM Products
If a **BOM** was defined, you can specify a list of **BOM Products** for the **Checklist** item and provide the following for each item:
* The **BOM** Product - from which the Product is retrieved.
* If the **Product** appears various times in the **BOM**, the BOM Item Number is also needed, and it must be unique for the same **Checklist** item.
* Optionally, a Quantity – if defined, it must be below or equal to the respective **BOM** item.
!!! note
If a quantity is not defined, it is assumed that the full quantity will be consumed.
* Optionally, a color to cross-check the **Product** in the diagram.
!!! note
The system indicates which BOM Products have already been used and in which quantities.
BOM Products for which the Product Type is Part and Part Type is Repairable must have the BOM Item Quantity equal to `1`.
Once the **Checklist** items have been created, you can proceed with one of the following options:
* **Save and Request Approval** - save the **Checklist** and submit it for approval to make it effective. For guidance on what to do next, see [[tutorials-open-a-checklist]].
* **Preview the Checklist** - verify how the **Checklist** will appear during execution. This option is available only for the Material Tracking and Maintenance Management scopes. For more information, see [[tutorials-creating-checklist#previewing-the-checklist|Preview a Checklist]].
!!! info
For further guidance on the next steps, see [[tutorials-creating-checklist]].