---
tags:
- printing integration
alias: tutorials-printingrealusecaseinteractions
timetoread: true
description: "This documentation outlines integrating third-party printing systems with Critical Manufacturing MES, covering setup, data context configuration, and rule customization"
---
# Real Use Case & User Interactions
## Printing Using a Third Party Printing System
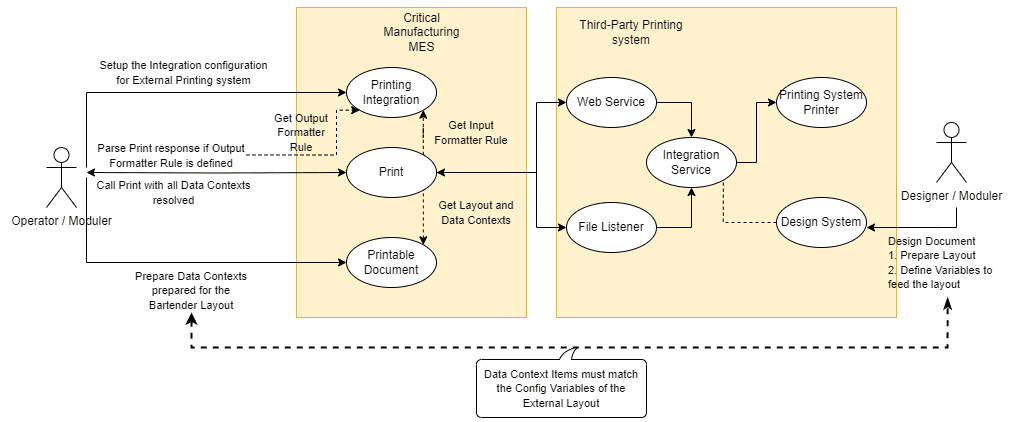
On the Critical Manufacturing MES side, it is necessary to:
* Set up a **Printing Integration** according to the external Printing System and the needed requirements.
* Create a **Printable Document** with an external layout file (optional) and the **Data Contexts** matching the variables defined in the external layout.
See the following Use Case diagram with the interactions between Critical Manufacturing MES and the Third Party Printing System, using BarTender as an example:
## User Interactions
The information below will guide you with the necessary operations and user interaction examples for a workable third-party integration.
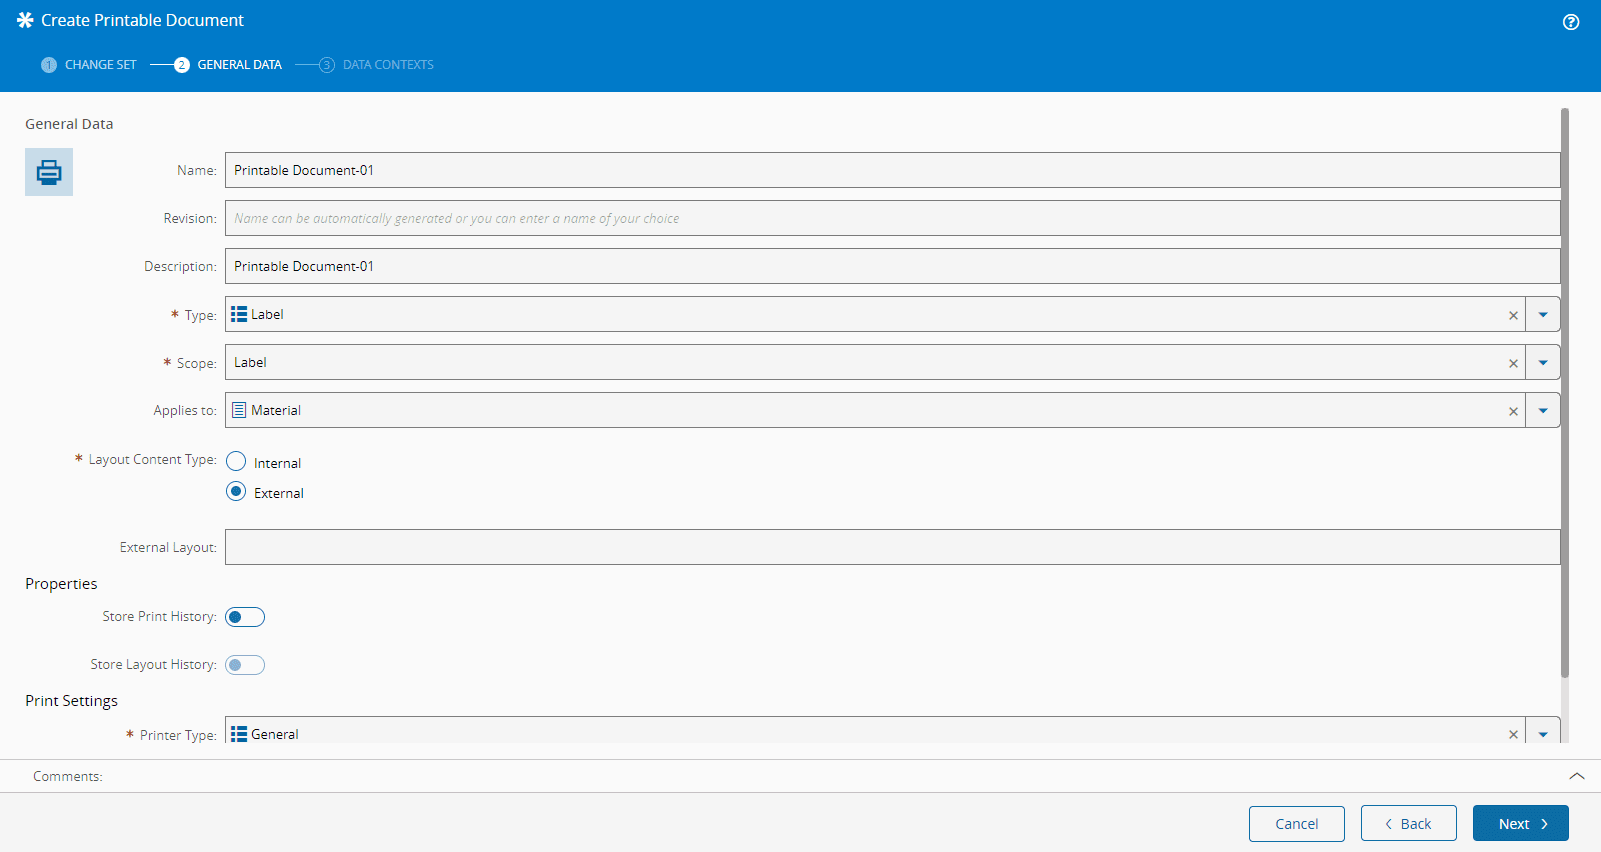
## Create a Printable Document Prepared for an External Printing System
The **Printable Document** must define if it is for an External printing system and optionally the External Layout.
### Steps
1. Create a **Printable Document** and set the property **Layout Content Type** to External.
!!! note
If the property value is set to **Internal**, the usual internal printing system is used.
2. As the **Layout Content Type** is External, you can optionally define the property **External Layout** with the name of an external label template or file.
3. Specify the **Scope**, and because we have the **Layout Content Type** as External, it cannot be Lot Traveler.
4. Specify the **Data Contexts** - they will be used to send the data to the third-party system.
For more information, see [[user-guide-printable-document-index]].
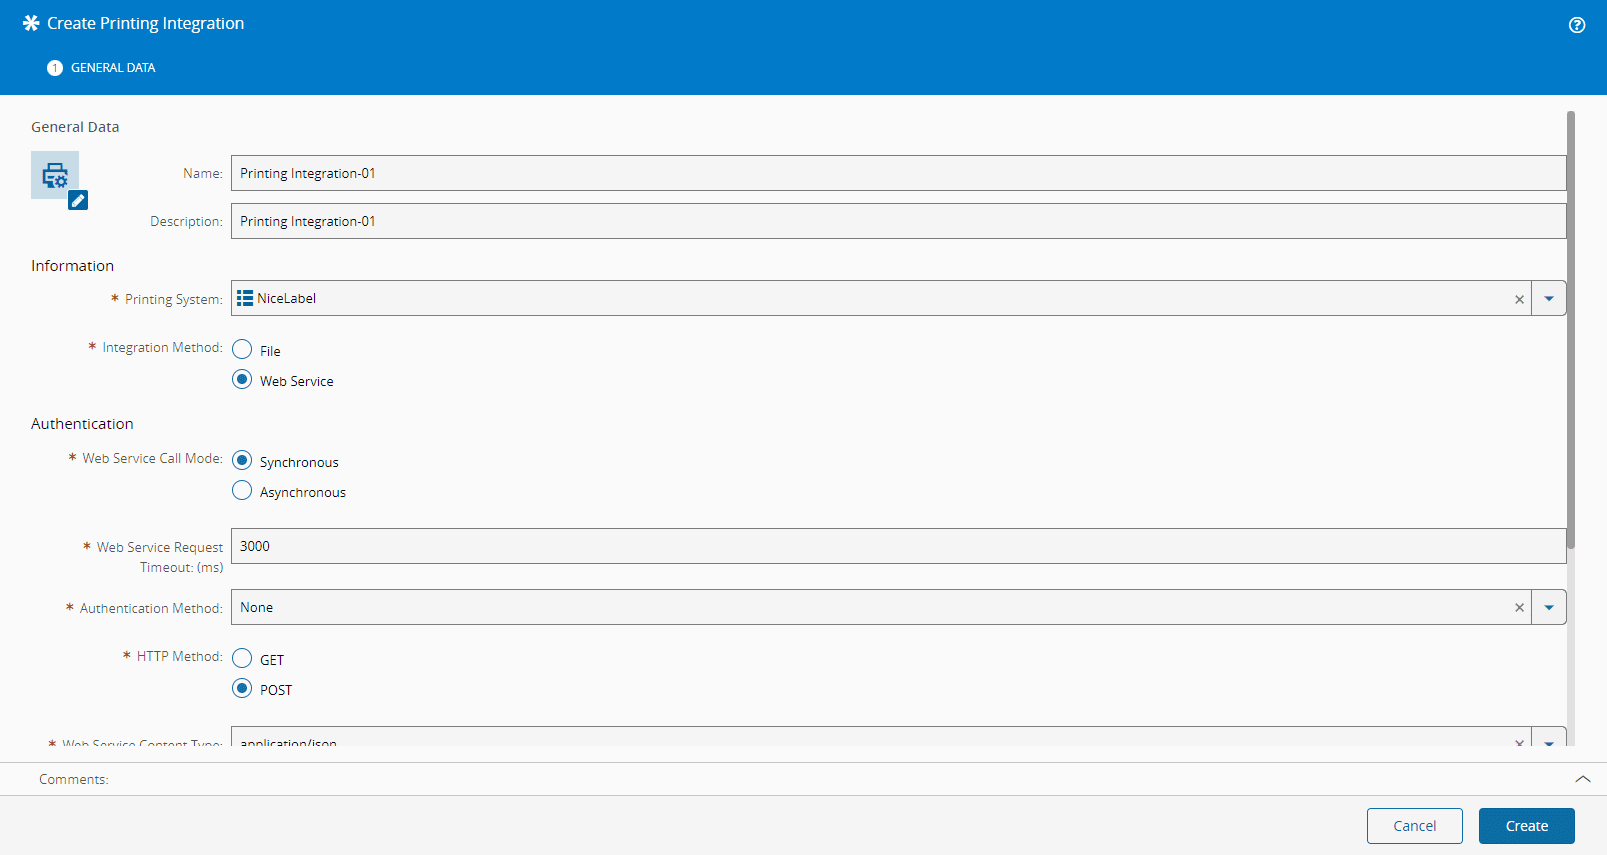
## Create a Printing Integration
The **Printing Integration** entity, in the **Administration** menu, contains all the necessary information for third-party label printing integration.
### Steps
1. Specify the [[printingsystem-lt]] Lookup Table, which is pre-populated with **BarTender** and **NiceLabel**.
2. Specify the **Integration Method** - File or Web Service (default).
3. If the **Integration Method** is **File**, you must specify the following:
* File Format: CSV or XML.
* CSV Delimiter - if File Format is CSV.
* URL - must be well formed.
* SSL Verify (defaults to `False`).
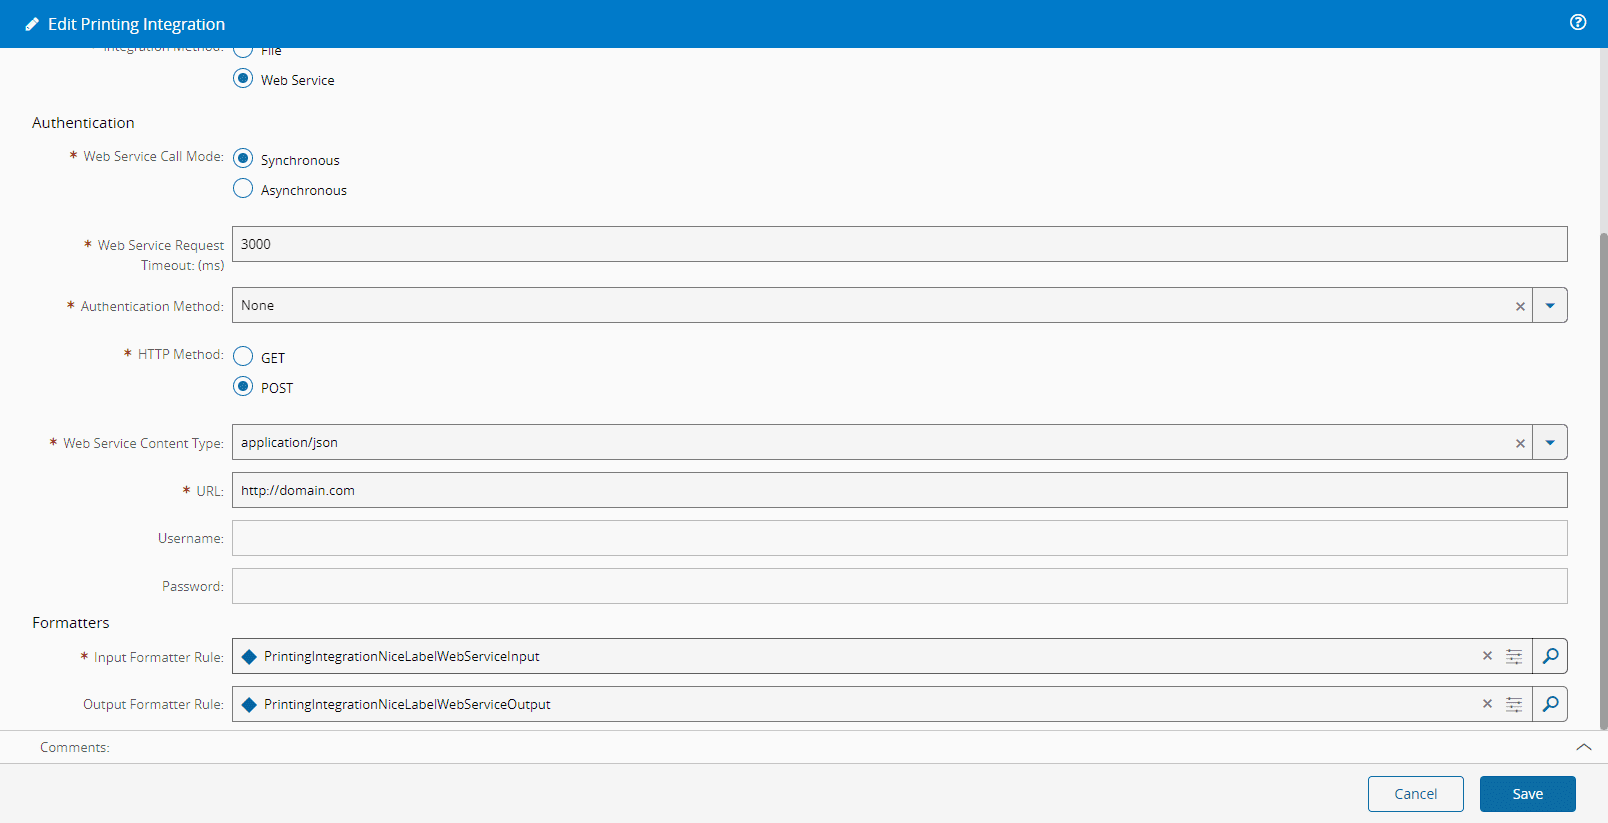
4. If the **Integration Method** is **Web Service**, you must specify the following:
* Web Service Call Mode - Synchronous or Asynchronous.
* Web Service Request Timeout (defaults to 3000 milliseconds) - if Web Service Call Mode is Synchronous.
* Authentication Method - None or Basic Authentication.
* HTTP Method - GET or POST.
* Web Service Content Type - if HTTP Method is POST.
* URL - must be well formed.
* Username - if Authentication Method is different from `None`.
* Password - if Authentication Method is different from `None`.
5. Specify the **Input Formatter**.
For more information, see [[administration-createprintingintegration]].
## Printer Resolution Configuration
For the Printer Resolution, the [[printertypeprinterscontext-st]] smart table will be used, which has a specific column for **Printing Integration** information.
### Steps
1. Specify the **Printing Integration**.
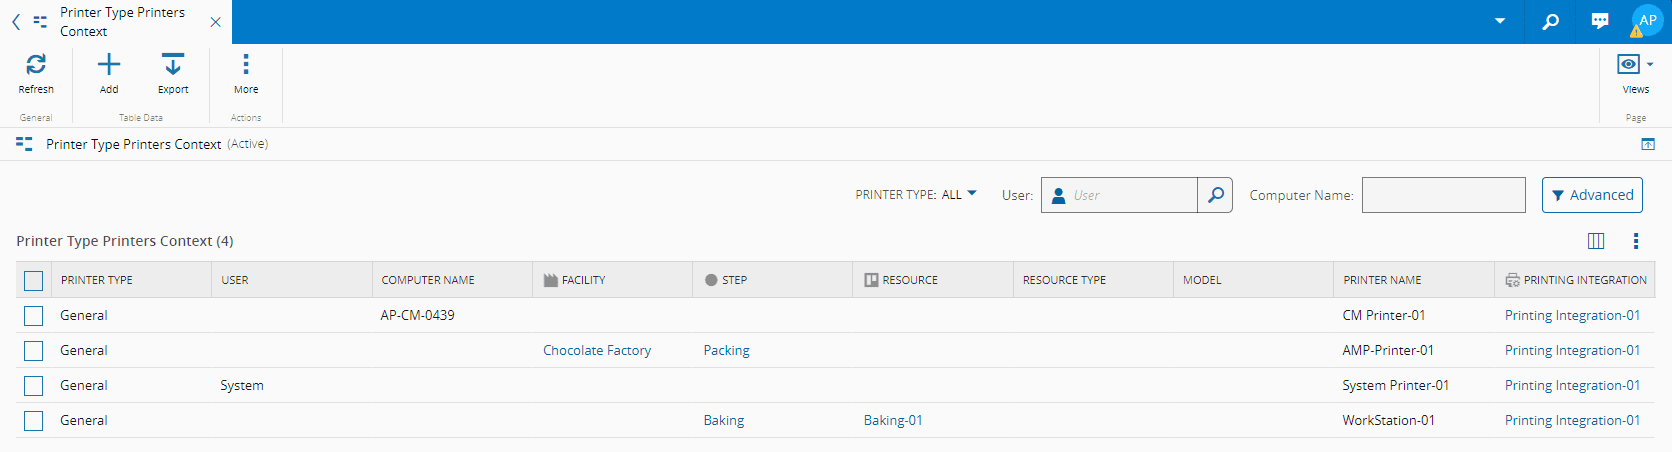
!!! note
Entries that have the same **Printer Name** must have the same **Printing Integration** (value can be `Null`).
Entries that have a different **Printer Name** can have the same **Printing Integration** or not (value can be `Null`).
## System Integration Rules Customization
All **Rules** that have **Printing Integration** as their **Scope** receive the following information as input:
* Printing Integration
* Context - JSON string with the evaluated items
* Layout - string
* Printer - string
* Number Of Copies - integer
The output of these **Rules** is always a string with the required information. You can extend the behavior of the **Rules** shipped with CM MES to provide out-of-the-box integration with BarTender and NiceLabel or create a new **Rule**.
### Steps
1. Create a **DEE Action** that is prepared to receive, parse, and transform the resolved **Data Contexts** of the **Printable Document**.
2. Create a **Rule** that has **Printing Integration** as its **Scope** and associate it with the created **DEE Action**.
3. Edit the **Printing Integration** and associate the created **Rule** to it.
!!! info
As an example, here are the standard out-of-the-box **Rules** for BarTender and NiceLabel:
• PrintingIntegrationBarTenderFileInput
• PrintingIntegrationBarTenderWebServiceInput
• PrintingIntegrationBarTenderWebServiceOutput
• PrintingIntegrationNiceLabelFileInput
• PrintingIntegrationNiceLabelWebServiceInput
• PrintingIntegrationNiceLabelWebServiceOutput
The convention used here for **Rule** naming is: `PrintingIntegration{PrintingSystem}{File/WebService}{Input/Output}`.
!!! note
The **Output** rules can only be used for **Synchronous Web Service**.
For more information, see [[tutorials-printingintegrationdeeactions]].