---
pdfexport: true
alias: tutorials-factoryautomationtransport
timetoread: true
tutorial: full
description: "The documentation guides you through creating a factory automation scenario involving material replenishment, using Fleet Managers and AGVs to move"
---
# Factory Automation Transport
The goal of this tutorial is introduce one of the more common scenarios of the use of the Factory Automation module, which is the coordination of Fleet Managers. Out of the box, Factory Automation already provides support for the use and implementation of this scenario.
!!! note
This tutorial will assume the user already has some familiarity with Factory Automation and has finished the tutorial for Factory Automation and all tutorials for Connect IoT.
!!! note
During this tutorial, the **Automation Manager** will run in console mode to highlight the most important events as they take place.
## Overview
In this example, we will model a machine that will have a dependency to one fleet manager, which will be responsible for feeding raw materials to the machine.
This example is focused on showing how Factory Automation module behaves, so details about the MES model used and custom logic in MES are purely for demonstration purposes and do not serve as examples to be replicated on productive environments.
## Overview of MES Model
In this example, the goal will be to have a material that symbolizes a batch of cookies being processed in a **Resource** that will be an Oven, with a `Resource LoadPort` to receive the container dock/undock and a feeder for the raw material coal. It will also require a `Resource LoadPort` that will be the AGV.
!!! note
Some details, for example, on lookup table names are omitted feel free to add the names that make more sense to your model.
### Creating a Simple MES model
1. Create a **Calendar**
2. Create a **Facility**
3. Create an **Area**
4. Create a **Step** - `Oven`
5. Create a **Flow** with the **Step** - `Oven`
6. Create a **Resource** - `Oven`
7. Create a **Service** that will link the **Resource** `Oven` to the **Step** `Oven`
8. Create a **Step** - `Coal Feed`
9. Create a **Flow** for the **Step** - `Coal Feed`
10. Create a **Resource Consumable Feed** - `Coal Feeder`
11. Create a **Service** that links the **Resource** `Coal Feeder` with the **Step** `Coal Feed`
12. In the `Oven` **Resource**, Manage Consumable Feeds and add the `Coal Feeder`
13. Create a **Resource** LoadPort - `Coal LoadPort`
14. Add **Resource** - `Coal LoadPort` as **SubResource** of the **Resource** - `Oven`
At the end of these steps, the system will have a **Resource** - `Oven` with a **Resource** LoadPort - `Coal LoadPort` and a **Resource** Consumable Feed - `Coal Feeder`. It will also have the necessary flows, steps and the services to link them both.
### Creating Materials
1. Create a **Product** - `Cookies`
1. With the `Default Start Flow Path` the **Flow** for the **Step** - `Oven`
2. Create a **Product** - `Coal`
1. With the `Default Start Flow Path`the **Flow** for the **Step** - `Coal`
3. Create a **Material** - `CookieBatch`
1. With **Product** - `Cookie` and `Quantity` - `100`
4. Create a **Material** - `Material Coal`
1. With the **Product** - `Coal` and `Quantity` - `100`
5. Create a **Container** - `CoalContainer001`
6. Manage Positions of the **Container** and add to the `CoalContainer001` the **Material** `Material Coal`
7. Create **BOM** - `BOM Cookies`
1. BOM Item
1. **Product** - `Coal`
1. Quantity - `0.3` and `Source Step` - `Coal Feed`
8. In the **Step** - `Oven` add the BOM Context with the `BOM Cookies` and `Assembly Type` - `Automatic at Track In` (this assembly type will consume automatically according to the **BOM** when the **Material** is tracked in a **Resource**)
The model now has a **Material** - `CookieBatch` ready to be dispatched to the **Resource** - `Oven`. The `Oven` has an empty LoadPort and an empty Feeder.
## Use Case - Raw Material Replenishing
### Overview
The use case of the replenishing will consist on checking if there is any material in the consumable feed when the material is dispatched. If there is no material in the feeder, request material from the fleet manager of the raw materials. This a very simple use case, since in real scenarios typically there needs to be more resolution on when to refill and what product will refill which consumable feed.
After the job is created, the fleet manager will assign a robot to the job created. It will then pick the **Container** - `CoalContainer001` with the **Material** - `Material Coal`. Next step it will dock the **Container** in the load port and then attach the material to the `Coal Feeder`. The last step will be for the robot to finish the job, by returning to a default position.
### Request Material
This is the first step in the replenishing lifecycle. We will create a `DEE Action`, that is appended on the **Post** of the **Dispatch Materials** to create a new request material job.
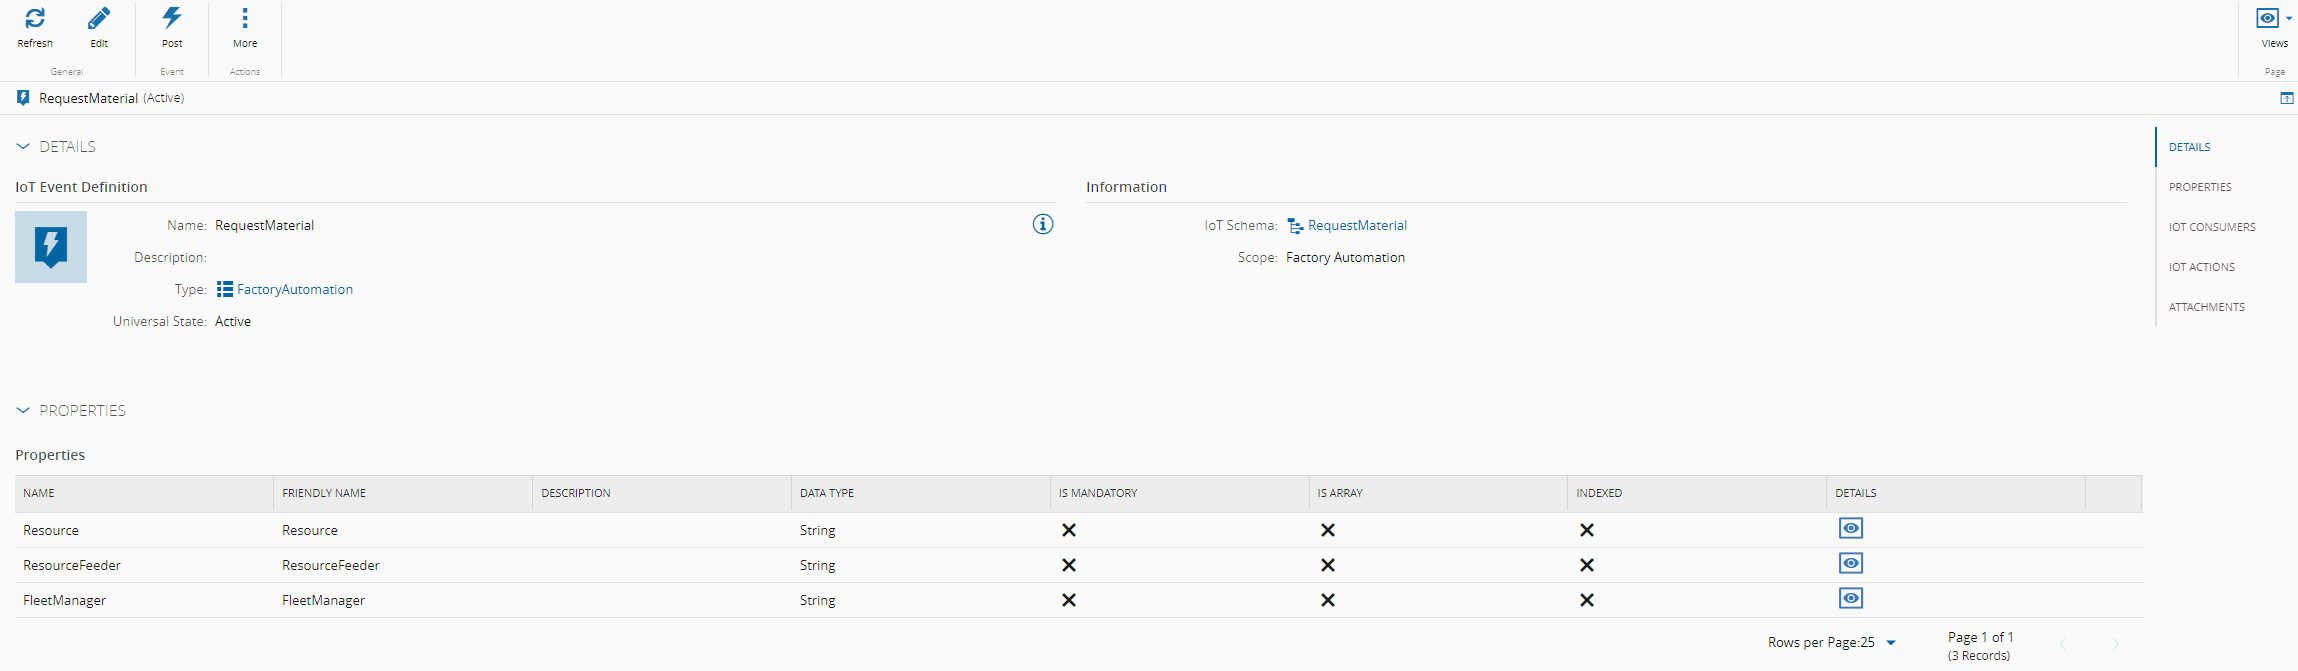
#### Create Request Material - IoTEventDefinition
Create an **IoT Event Definition** - `Request Material` to define the structure of the job. It will have the Scope set to `Factory Automation` and the properties `FleetManager`, `Resource` and `ResourceFeeder` all defined as string. Notice that here is where we will define all the context the job requires to be able to execute. The required context to execute will depend on the particular case that is being addressed.
#### Create a DEE Action - Check If Materials On Feeder On Dispatch
**DEE Actions** are the mechanism in the MES where we can add customization hooks to default system functionality. These hooks can be on the beginning of the execution `Pre` or in the end `Post`. In this particular case, we will append in the `Post` of the service `DispatchMaterials`.
!!! note
It's a good practice to add a prefix for DEEs that are not system made to make it distinguishable (i.e Custom).
1. Go to `Administration > DEE Actions`
2. Select `New`
3. Give as Name `CheckIfMaterialsOnFeedOnDispatch`, for now the classification and action group is not important
The DEE code is split between two important sections: the **condition phase** and the **execution phase**. Only if the condition phase returns with true, will the execution phase be invoked. In the history of an action (i.e TrackIn) in the MES, it will be explicit if a DEE was evaluated and eventually if it was executed. For more information on DEEs, see [DEE Actions](../../../userguide/administration/dee_actions.md).
The context of the DEE is present on the Inputs dictionary. This context will depend on to what service the DEE is appended. The system provides helpful information on what is in the context by expanding the left pane after adding the action group.
Let's add the Action Group to our DEE.
1. Go to the `Details` tab
2. select `Add` on the Action Group
3. Search for `MaterialManagement.MaterialManagementOrchestration.DispatchMaterials.Post`. If the action group is not present:
1. Go to `Administration > DEE Actions`
2. Select the Settings (three vertical dots) next to the `Action Groups`
3. Select `Add new Action Group`
4. Give as `Name` - `MaterialManagement.MaterialManagementOrchestration.DispatchMaterials.Post`
5. Select `Create`
4. Check it and select `Add`
In order to find the action group where we want to append our DEE, you can consult the [API documentation](https://developer.criticalmanufacturing.com/api), or analyze the history whenever the action that you are interested is executed and it will be apparent what are multiple sub-actions that you can append your business logic. Note also that in the DEE in the code view, in the right pane it `Input Parameters`, it will now show all available parameters.
Starting on the code for the `Test Condition Code`. We want to validate that the Inputs that we are interested are correct, to validate we should process and then pass that value to our DEE context.
TestCondition Code:
```csharp
///
/// Summary text: Request Material if Feeder has no consumables
/// Actions groups:
/// * MaterialManagement.MaterialManagementOrchestration.DispatchMaterials.Post
/// Depends On:
/// Is Dependency For:
/// Exceptions:
///
var serviceProvider = (IServiceProvider)Input["ServiceProvider"];
var utilitiesDEEContext = serviceProvider.GetService();
// Validate input
if (Input["DispatchMaterialsInput"] is not DispatchMaterialsInput dispatchMaterialsInput)
{
throw new ArgumentNullCmfException("DispatchMaterialsInput");
}
// Retrieve resource
var resource = dispatchMaterialsInput.Materials.FirstOrDefault().Value.Resource;
utilitiesDEEContext.SetContextParameter("CheckIfMaterialsOnFeedOnDispatch_Inputs", new Dictionary()
{
{ "CheckIfMaterialsOnFeedOnDispatch_Resource", resource },
});
return true;
```
Execution Code:
```csharp
// System
UseReference("", "System.Linq");
UseReference("", "System.Data");
// CMF
UseReference("Cmf.Navigo.BusinessOrchestration.dll", "Cmf.Navigo.BusinessOrchestration.MaterialManagement.InputObjects");
UseReference("Cmf.Navigo.BusinessOrchestration.dll", "Cmf.Navigo.BusinessOrchestration.Abstractions");
UseReference("Cmf.Foundation.BusinessObjects.dll", "Cmf.Foundation.BusinessOrchestration.DataPlatform.InputObjects");
UseReference("Cmf.Foundation.BusinessObjects.dll", "Cmf.Foundation.BusinessOrchestration.DataPlatform.OutputObjects");
UseReference("Cmf.Foundation.BusinessOrchestration.dll", "Cmf.Foundation.BusinessOrchestration.DataPlatform.Domain");
UseReference("Cmf.Foundation.BusinessOrchestration.dll", "Cmf.Foundation.BusinessOrchestration.Abstractions");
// Common
UseReference("Cmf.Common.CustomActionUtilities.dll", "Cmf.Common.CustomActionUtilities");
UseReference("Cmf.Common.CustomActionUtilities.dll", "Cmf.Common.CustomActionUtilities.Abstractions");
UseReference("Newtonsoft.Json.dll","Newtonsoft.Json");
var serviceProvider = (IServiceProvider)Input["ServiceProvider"];
var deeUtilities = serviceProvider.GetService();
var entityFactory = serviceProvider.GetService();
var inputs = deeUtilities.GetContextParameter("CheckIfMaterialsOnFeedOnDispatch_Inputs") as Dictionary;
var resource = inputs["CheckIfMaterialsOnFeedOnDispatch_Resource"] as IResource;
// Retrieve Consumable Feeders for the Table for Resource
INgpDataSet feedersResult = resource.GetConsumableFeeds(null, out _);
DataSet feedersList = NgpDataSet.ToDataSet(feedersResult);
IResourceCollection feeders = entityFactory.CreateCollection();
// Validate Resource has Feeders
if (feedersList.HasData())
{
// Iterate Consumable Feeders for the Resource and Retrieve the Entity values
foreach (DataRow dataRow in feedersList.Tables[0].Rows)
{
string subResourceName = dataRow["SubResourceTargetEntityName"].ToString();
if (!string.IsNullOrWhiteSpace(subResourceName))
{
IResource feeder = entityFactory.Create();
feeder.Name = subResourceName;
feeders.Add(feeder);
}
}
if (feeders.Any())
{
// Load Feeders of the Resource
feeders.Load();
// Load Relation between Resource Feeders and Materials
feeders.LoadRelations("MaterialResource");
// Retrieve empty feeders
feeders.Where(feeder => !feeder.RelationCollection.ContainsKey("MaterialResource")).ToList().ForEach(feeder => {
// Post a new Job if Feeder has no Consumables
// Will create the Request Material Job
var dataPlatform = serviceProvider.GetService();
AppProperties appProperties = new AppProperties()
{
ApplicationContext = "Transport Request from MES for Request Raw Material",
ApplicationName = "FleetManager-RawMaterial",
EventDefinition = "RequestMaterial",
EventTime = DateTime.Now
};
Dictionary dataToSend = new Dictionary();
dataToSend.Add("Resource", resource.Name);
dataToSend.Add("ResourceFeeder", feeder.Name);
dataToSend.Add("FleetManager", "FleetManager-RawMaterial");
PostEventInput postEventInput = new PostEventInput
{
AppProperties = appProperties,
Data = Newtonsoft.Json.Linq.JObject.Parse(JsonConvert.SerializeObject(dataToSend)),
};
PostEventOutput postEventOutput = dataPlatform.PostEvent(postEventInput);
});
}
}
```
The goal is to check if there are feeders without materials attached, then create a new request material job for each feeder without material.
Now we can dispatch the **Material** - `Cookie Batch` and see if there is any job created. In order to check the Job Queue:
1. Go to the `Automation` left pane
2. Select Factory Automation
3. Select `Views > IoT Events Queue`

A job has been created, but it has not been processed. This is expected as currently we have no Factory Automation worker running and processing jobs and we have no definition of what Factory Automation should do with the request material job.
#### Create a Factory Automation Worker
The Factory Automation worker will be responsible for consuming and executing jobs from the queue. The worker will have a limit on how many concurrent jobs can be executed at any given time. It is also important to understand that jobs assigned to a worker in case of the worker process failing will be invalidated. It is then a good practice to balance the amount of controllers with workers in your Factory Automation to mitigate risk.
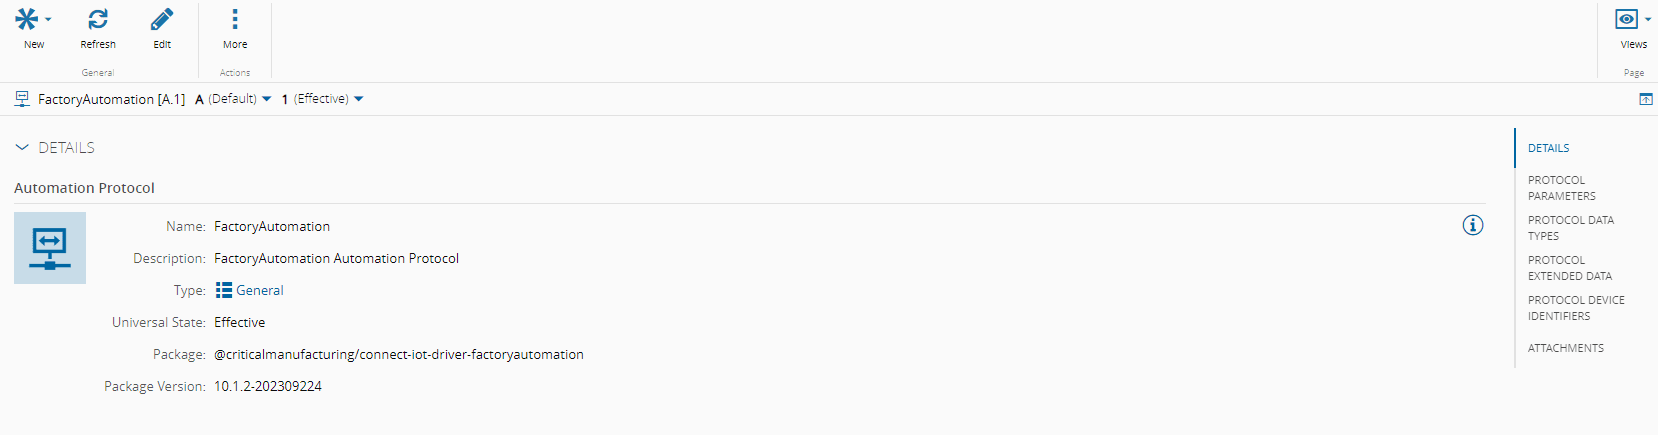
#### Create a Factory Automation - Protocol
1. Go to `Business Data > Automation Protocol`
2. Create `New`
3. Name `FactoryAutomation`
4. Select `Package` for the driver of Factory Automation
5. Select the version available
6. In the Parameters
1. Notice that the maximum concurrent jobs is of `10`
7. select `Next` and `Create`
#### Create a Factory Automation - Driver Definition
1. Go to `Business Data > Automation Driver Definition`
2. Create `New`
3. Name `FactoryAutomationWorker_DriverDefinition`
4. Select Automation Protocol `FactoryAutomation`
5. Entity Type **Resource**
6. select `Next` and `Create`
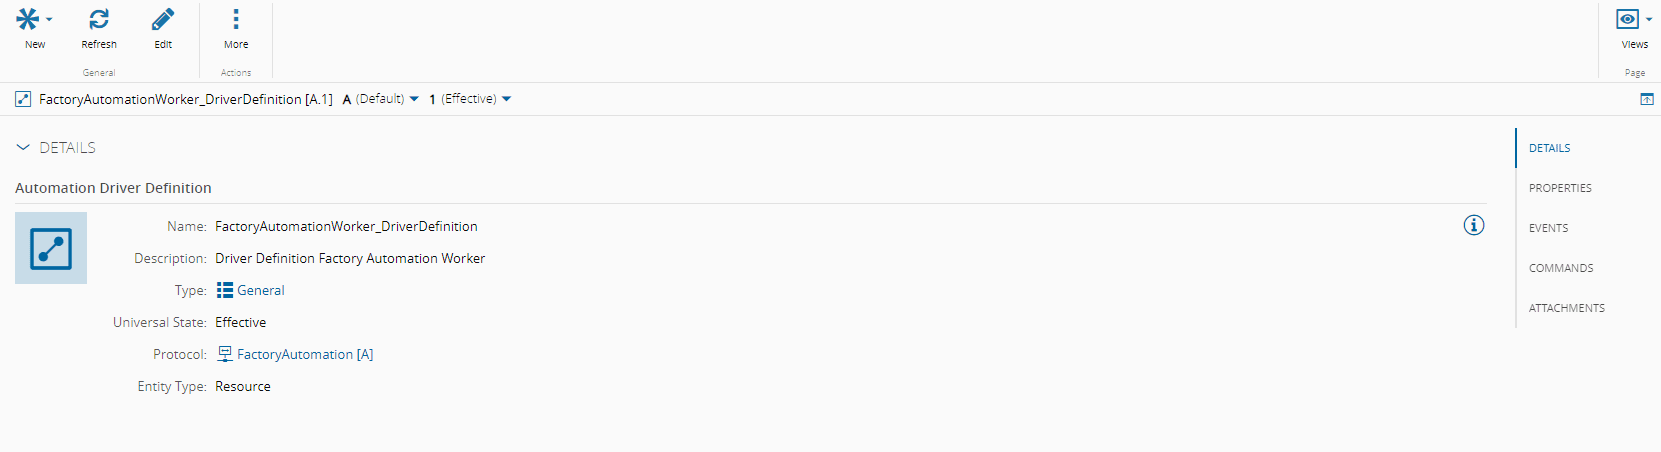
The Factory Automation driver is a particular case where it does not need any further definitions on the driver definition.
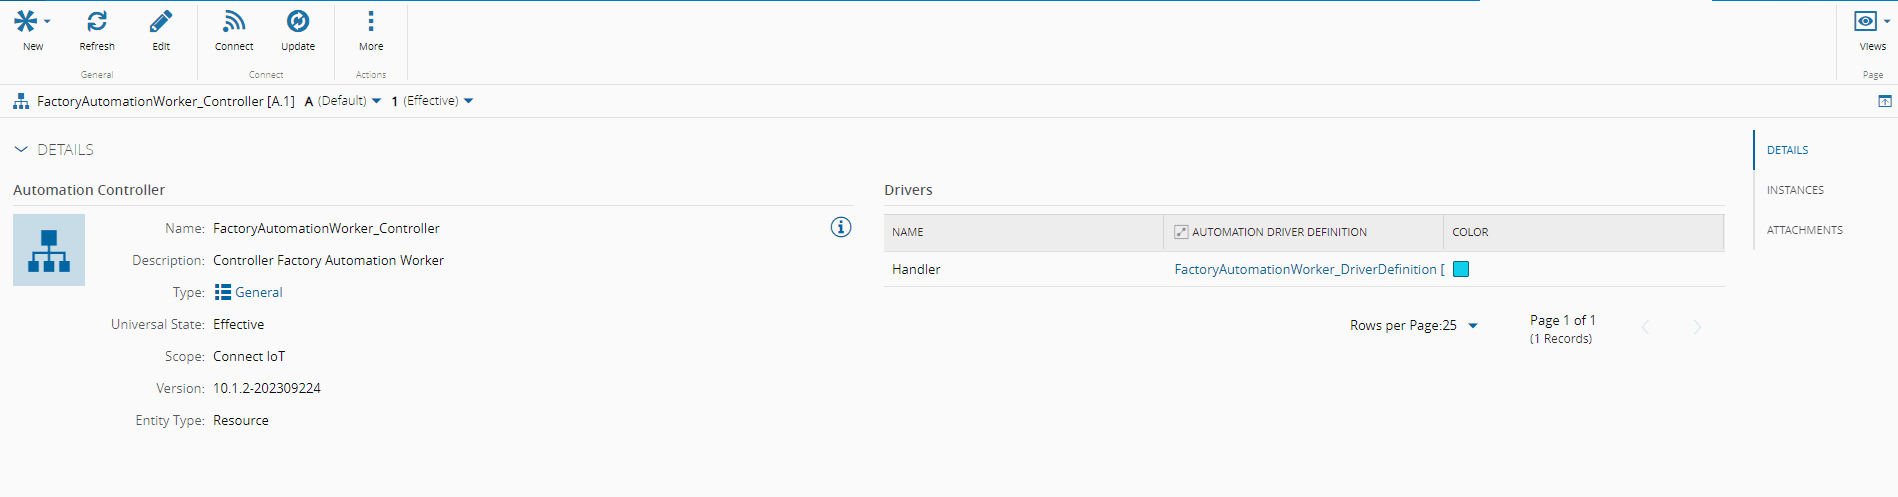
#### Create a Factory Automation - Controller
1. Go to `Business Data > Automation Controller`
2. Create `New`
3. Name `FactoryAutomationWorker_Controller`
4. Select Version
5. Entity Type **Resource**
6. Add Driver Definition
1. Name `Handler`
2. Driver Definition - `FactoryAutomationWorker_DriverDefinition`
7. select `Next` and `Create`
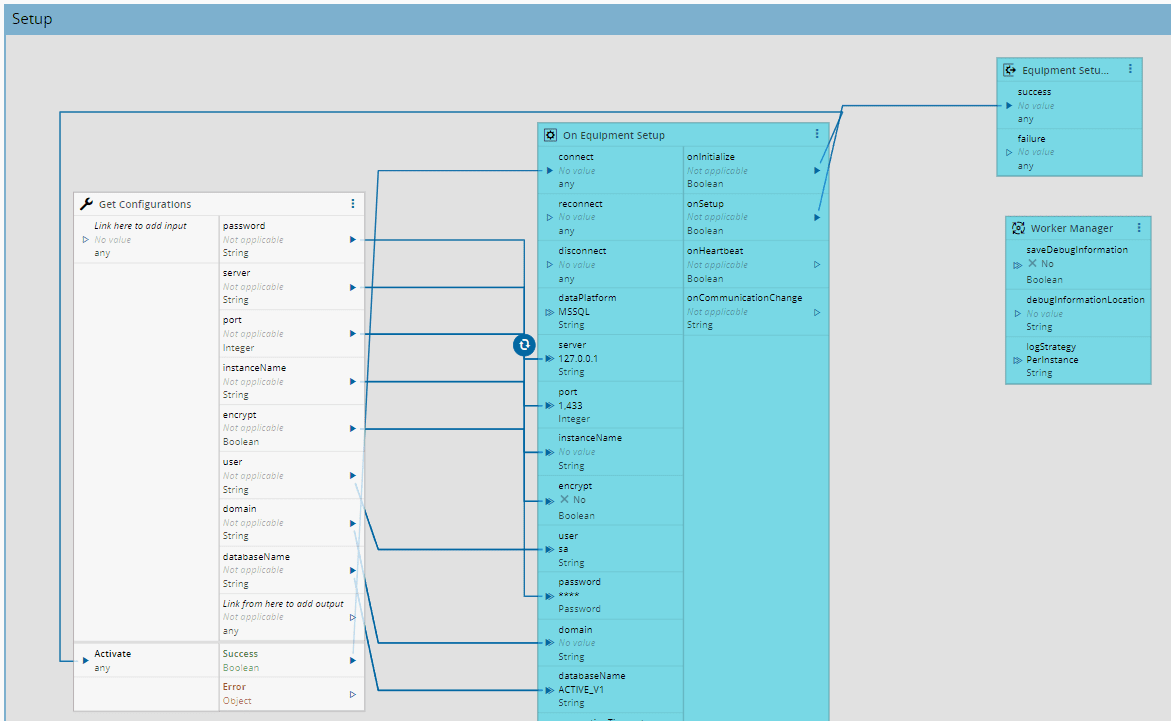
Factory Automation requires access to the database, the recommended way to store passwords in the system is by using secure strings in the `Configuration Entries`. For the tutorial either add directly in the settings the configurations of your database or create configuration entries for each setting and populate them in the configurations. For more information, go to the [Get Configurations](../../../userguide/automation/reference/tasks/core/workflow/actions/task_getconfigurations.md) task.
#### Create a Factory Automation - Controller Instance
1. Create a **Resource** `FactoryAutomationWorker` with ProcessingType `Component`
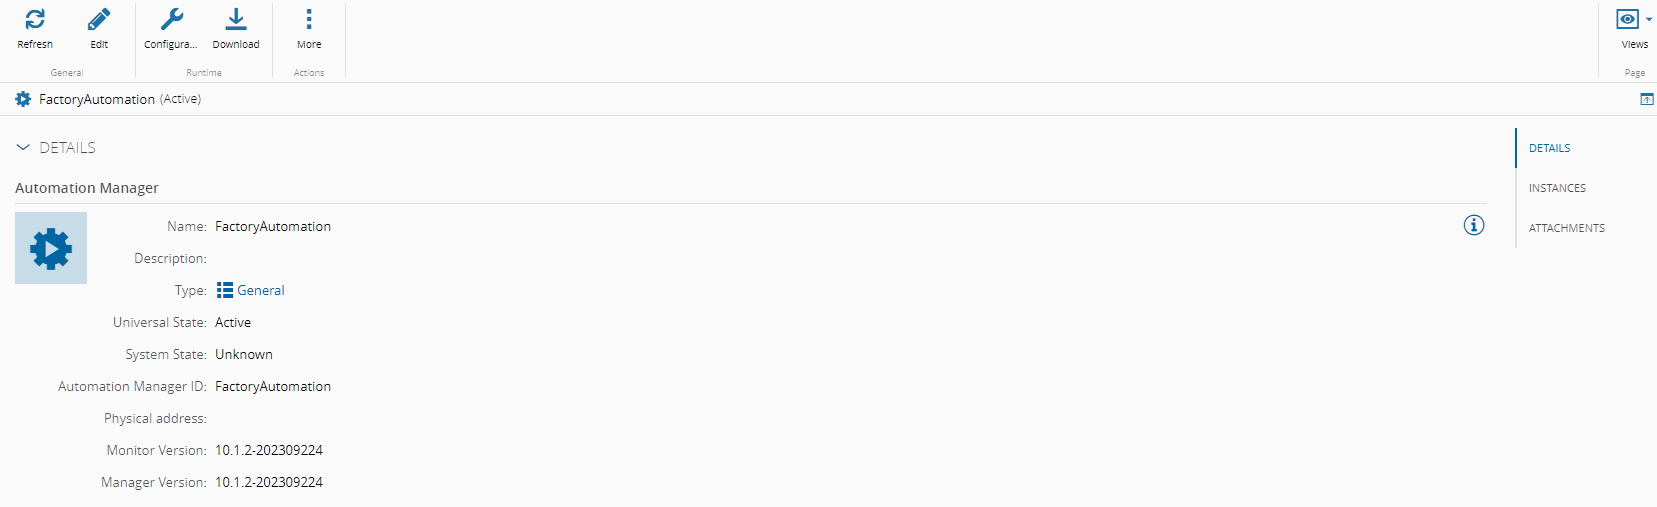
1. Go to `Business Data > Automation Manager`
1. Create `New`
1. Name `FactoryAutomation`
1. Logical Address `FactoryAutomation`
1. Select Version
1. Go to `Business Data > Automation Controller > FactoryAutomationWorker_Controller`
1. select `Connect`
1. Select the **Resource** `FactoryAutomationWorker` and **Automation Manager** `FactoryAutomation`
1. In the Drivers also select the **Resource** `FactoryAutomationWorker`
1. Go to `Business Data > Automation Manager > FactoryAutomation`
1. Click `Download`
1. Run the **Automation Manager**
1. Unzip the **Automation Manager**
1. Go to `scripts`
1. Run `StartConsole.bat`
In the MES system we can see that the Factory Automation Worker is `Communicating` and that our job is now on the `Job List`.


In the `Job List`, let's stop the job for now, as we still need the workflow for the job itself. Select the Job and select `Stop`.
#### Request Material - Create Job Workflow - Main
1. Go to `Business Data > Automation Controller`
2. Create `New`
3. Select Scope `FactoryAutomation`
4. Add IoTEventDefinition `RequestMaterial`
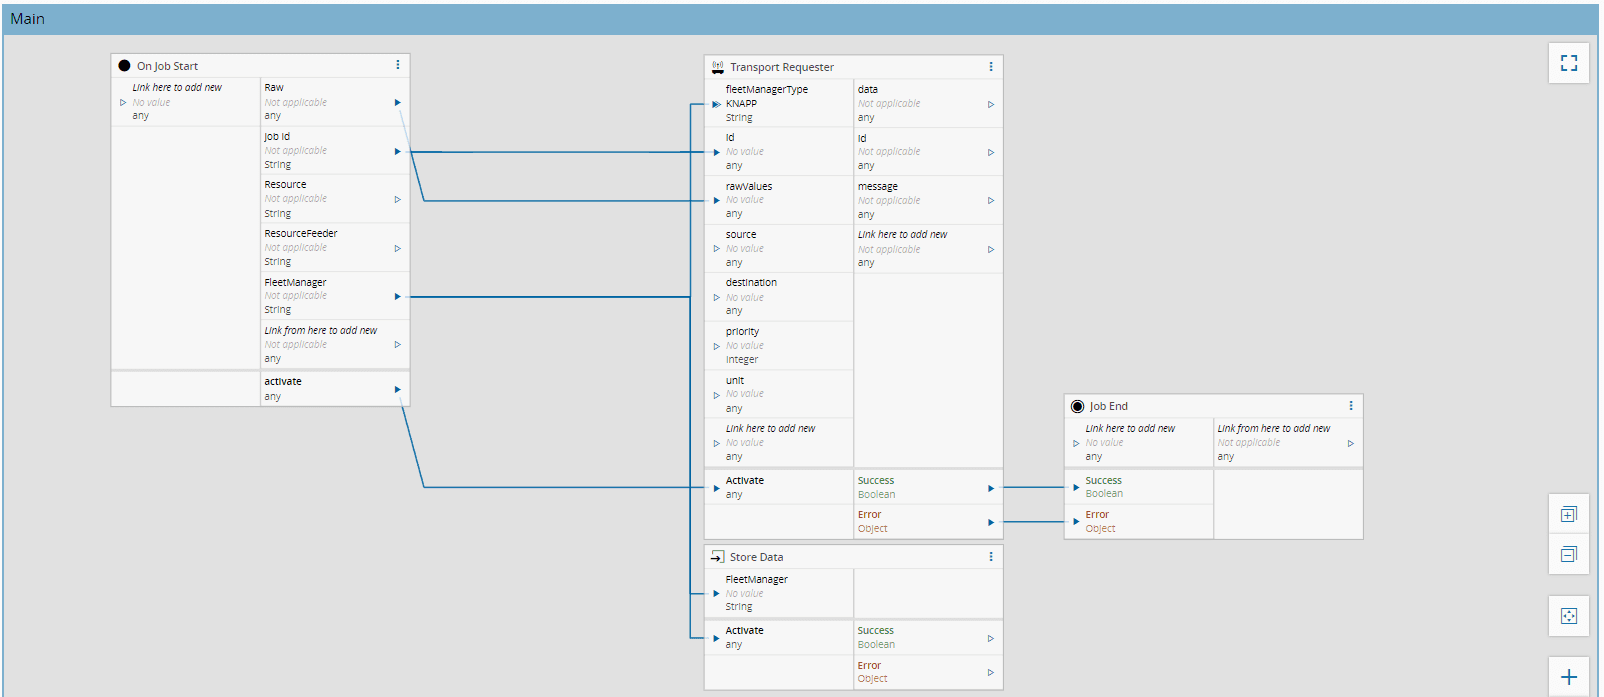
The workflow for a job must have a **start** and an **end**. The workflow created by default will already place the tasks `On Job Start` and `JobEnd` to signal this requirement. The job is agnostic to any particular driver and does not communicate to a machine but serves as a lifecycle of actions. The first action that we will perform is notifying whomever is serving the fleet manager.
The `Transport Requester` task will provide the beginning and the end of the transport. It will notify the listener of the new job and will wait for a `Transport Reply` to notify it that the job has finished. We will drag and drop the `Transport Requester` this task will passthrough the job context and give the success or error of the job. We will also store the FleetManager of the job.
!!! note
In the scope of this tutorial we will have just the beginning of the transport as a `Transport Requester` and then receive information that comes to the fleet manager for the rest of the lifecycle, but depending on your scenario, you can have as much bi-directional communication as needed.
!!! note
In order for the jobs to be restartable, you can add a [Checkpoint](../../../userguide/automation/reference/tasks/fa/task_fa_checkpoint.md) task, with the job context.
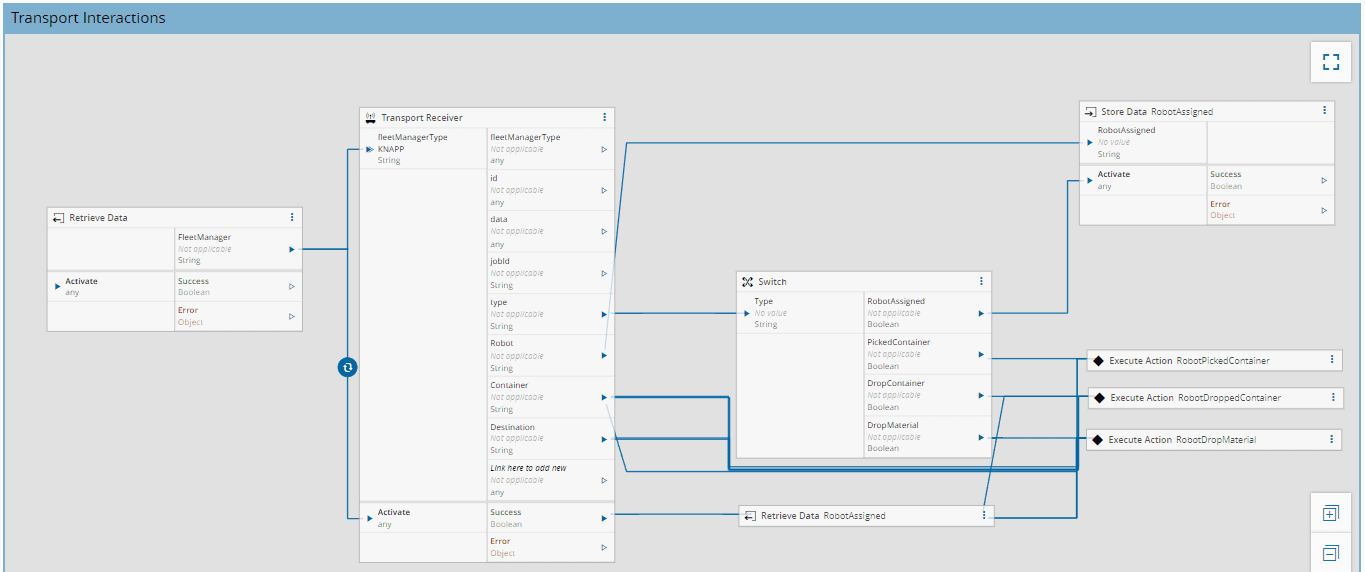
#### Request Material - Create Job Workflow - Transport Interactions
There are four different actions in the job lifecycle that apply to this use case:
1. `Robot Assigned` - when the fleet manager assigns a robot
2. `Picked Container` - when the robot picks a filled container
3. `Drop Container` - when the robot docks a container
4. `Drop Material` - when the material is attached to the feeder
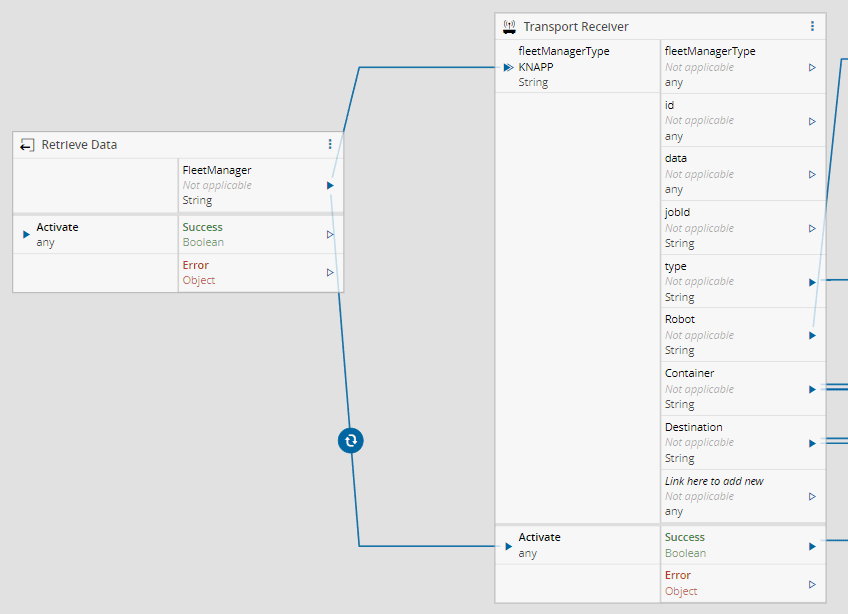
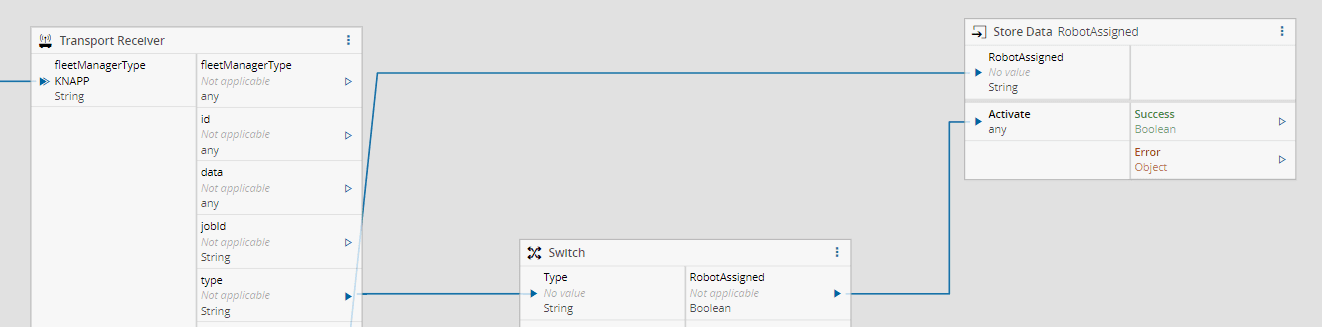
Factory Automation provides an easy way to have touch points between the fleet manager and the job execution with the task `Transport Receiver`. Using the `Transport Receiver` with command `Status Update` and the flag `Include Id in Command` as `true`, we receive information and parse it as outputs, for only our job. The `Status Update` will be a notification, whereas an `Interaction` will register a callback. The interactions are dependent on the fleet manager, so we will have to activate the receiver only when we know the fleet manager, this is why we stored the fleet manager in the `Main` workflow. We will also want to store which robot is being used in the job execution so we can pass along that context for the other actions.
!!! note
The flag `Include Id in Command` is very important. If the flag is set as `false` it means it will be a broadcast to all. If the flag is `true` and the context is inside a controller of `scope` - Factory Automation, it will not be mandatory to provide an id, it will inherit it from the job context. If, like the images in this tutorial the `id` or the setting is not available, it means you are currently in a version that does not support this feature and the controller will have to manage this mechanism.
1. Create new page `Transport Interactions`
2. Use the `Retrieve Data`
1. Settings
1. Trigger on Store - `true`
2. Outputs
1. Add
1. Name - `FleetManager`
2. Identifier - `FleetManager`
3. Type - `String`
3. Drag and Drop the `Transport Receiver` task
1. Settings
1. Auto-Activate - `False`
2. Command - `Status Update`
2. Outputs
1. Name - Robot with type `String`
2. Name - Container with type `String`
3. Name - Destination with type `String`
4. Link the `Retrieve Data` output `FleetManager` to the input `FleetManagerType` and to the `Activate`
5. Now use the `Switch` task to control the flow by type
1. Input
1. Name `Type`
2. Type - `String`
2. Outputs (the settings pattern is the same for all outputs)
1. RobotAssigned
1. Equals - `RobotAssigned`
2. Type - `Boolean`
3. Value - `true`
2. PickedContainer
3. DropContainer
4. DropMaterial
Now depending on the type of interaction, the job will perform different actions.
For the `RobotAssigned`, the job will persist internally that information.
1. Use the `Store Data` task to store the RobotAssigned
1. Settings
1. Working Mode - `StoreOnActive`
2. Inputs
1. Add
1. Name - `RobotAssigned`
2. Identifier - `RobotAssigned`
3. Type - `String`
4. Storage - `Temporary`
1. Link the `Robot` output from the task `Transport Receiver` to the input `Robot Assigned` of the `Store Data` task
1. Link the `RobotAssigned` output from the task `Switch` to the input `Activate` of the `Store Data` task
For the next actions we will require integration with the MES.
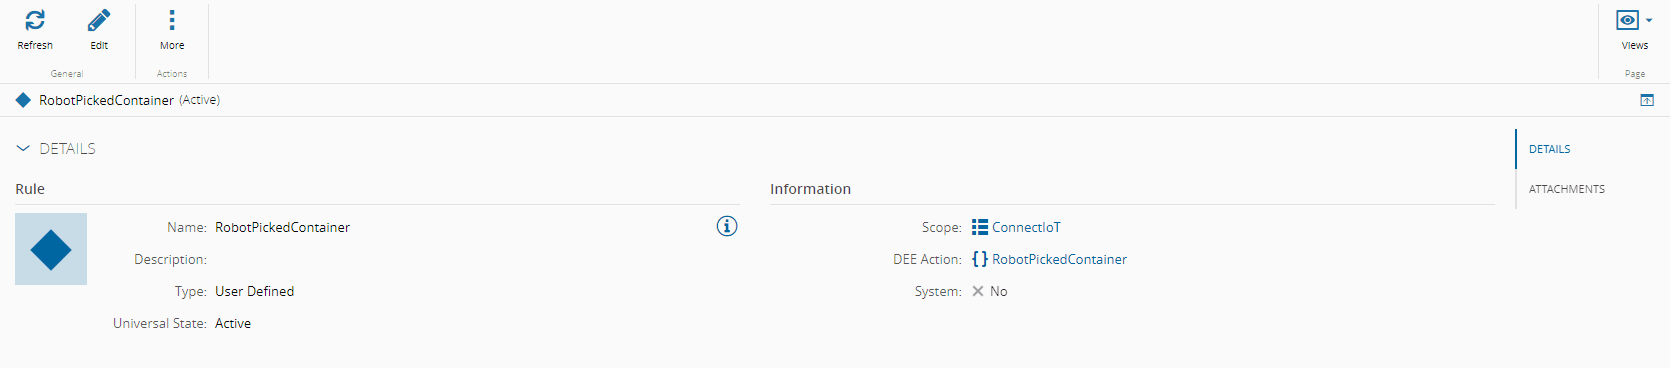
#### Create a DEE Action - RobotPickedContainer
The `DEE Action` will be responsible for docking the container selected by the fleet manager in the AGV.
!!! note
It's a good practice to add a prefix for DEEs that are not system made to differentiate (i.e Custom).
1. Go to `Administration > DEE Actions`
2. Select `New`
3. Give as Name `RobotPickedContainer`
4. Classification `ConnectIoT`
In this case we will not require an action group, this DEE will not be appended to a system service but will be execute directly via a business **Rule**.
Execution Code:
```csharp
var serviceProvider = (IServiceProvider)Input["ServiceProvider"];
var entityFactory = serviceProvider.GetService();
IContainer container = entityFactory.Create();
container.Name = Input["Container"] as string;
IResource robot = entityFactory.Create();
robot.Name = Input["Robot"] as string;
container.Load();
// Load the relation between the Container and the Materials in the Container
container.LoadRelations("MaterialContainer");
robot.Load();
// Validate: Only Pick filled containers
if(!container.ContainerMaterials.Any()) {
throw new Exception("Container must have Materials");
}
// If container is docked, undock it
if(container.ResourceAssociationType == ContainerResourceAssociationType.DockedContainer){
container.Undock();
}
// Dock on Robot
container.Dock(robot);
```
The code is very simple, we validate the container has materials and then dock it in the robot. If the container is already docker somewhere else, we will undock it.
Create a **Rule** to encapsulate the DEE Action:
1. Go to `Business Data > Rule`
2. Create `New`
3. Name - `RobotPickedContainer`
4. Scope - `ConnectIoT`
5. DEE Action - `RobotPickedContainer`
6. select `Create`
#### Create a DEE Action - RobotDroppedContainer
The `DEE Action` will be responsible for undocking the container of the AGV and docking to the load port of the resource. This DEE Action is very similar to what was done previously, nevertheless it was decided to not merge both to provide clear different hooks. This means that if any further logic is needed we already have entry points available
1. Go to `Administration > DEE Actions`
2. Select `New`
3. Give as Name `RobotDroppedContainer`
4. Classification `ConnectIoT`
In this case we will not require an action group, this DEE will not be appended to a system service but will be execute directly via a business **Rule**.
Execution Code:
```csharp
var serviceProvider = (IServiceProvider)Input["ServiceProvider"];
var entityFactory = serviceProvider.GetService();
IContainer container = entityFactory.Create();
container.Name = Input["Container"] as string;
IResource robot = entityFactory.Create();
robot.Name = Input["Robot"] as string;
IResource destinationResource = entityFactory.Create();
destinationResource.Name = Input["Destination"] as string;
container.Load();
// Load the relation between the Container and the Materials in the Container
container.LoadRelations("MaterialContainer");
destinationResource.Load();
// Validate: Only Drop filled containers
if(!container.ContainerMaterials.Any()) {
throw new Exception("Container must have Materials");
}
// Undock from Robot
if(container.ResourceAssociationType == ContainerResourceAssociationType.DockedContainer) {
container.Undock();
}
// Dock on Load Port
container.Dock(destinationResource);
```
The code is analogous to the RobotPickedContainer, but it this case the container is moved from the robot in to the Resource Load Port.
Create a **Rule** to encapsulate the DEE Action:
1. Go to `Business Data > Rule`
2. Create `New`
1. Name - `RobotDroppedContainer`
2. Scope - `ConnectIoT`
3. DEE Action - `RobotDroppedContainer`
3. Select `Create`
#### Create a DEE Action - RobotDropMaterial
The DEE Action will be responsible for attaching the **Material** in the **Container** to the **Resource** Feeder of the main resource.
1. Go to `Administration > DEE Actions`
2. Select `New`
3. Give as Name `RobotDropMaterial`
4. Classification `ConnectIoT`
In this case we will not require an action group, this DEE will not be appended to a system service but will be execute directly via a business **Rule**.
Execution Code:
```csharp
var serviceProvider = (IServiceProvider)Input["ServiceProvider"];
var entityFactory = serviceProvider.GetService();
IContainer container = entityFactory.Create();
container.Name = Input["Container"] as string;
IResource robot = entityFactory.Create();
robot.Name = Input["Robot"] as string;
IResource destinationFeeder = entityFactory.Create();
destinationFeeder.Name = Input["Destination"] as string;
container.Load();
// Load the relation between the Container and the Materials in the Container
container.LoadRelations("MaterialContainer");
destinationFeeder.Load();
if(!container.ContainerMaterials.Any()) {
throw new Exception("Container must have Materials");
} else {
// Create Input for AttachConsumables
Dictionary materialsToAttach = new Dictionary();
foreach(var containerMaterial in container.ContainerMaterials) {
materialsToAttach.Add(containerMaterial.SourceEntity, new AttachConsumableParameters());
}
// Attach Container Materials to the Feeder
destinationFeeder.AttachConsumables(materialsToAttach);
}
```
The code is similar to what we saw in the other actions, but in this action we don't want to perform dock or undock, but we want to retrieve the **Materials** in the **Container** and attach them to the Resource Feeder.
Create a **Rule** to encapsulate the DEE Action:
1. Go to `Business Data > Rule`
2. Create `New`
3. Name - `RobotDropMaterial`
4. Scope - `ConnectIoT`
5. DEE Action - `RobotDropMaterial`
6. select `Create`
#### Request Material - Create Job Workflow - Transport Interactions - Actions
Now we can use the **DEE Actions** in the workflow of the Job. Going back to the workflow of the `Request Material` Controller in the page `Transport Interactions`.
1. Drag and drop task `Execute Action`
1. Description - `RobotPickedContainer`
2. Settings
1. Rule - `RobotPickedContainer`
3. Inputs
1. Add
1. Name - `Container`
2. Type - `String`
2. Add
1. Name - `Robot`
2. Type - `String`
2. Link the output **Container** of the `Transport Receiver` to the input **Container** of the `Execute Action` RobotPickedContainer
3. Link the output `Robot` of the `Retrieve Data` to the input `Robot` of the `Execute Action` RobotDroppedContainer
4. Link the output `PickedContainer` to the input `Activate` of the `Execute Action` RobotPickedContainer
5. Drag and drop task `Execute Action`
1. Description - `RobotDroppedContainer`
2. Settings
1. Rule - `RobotDroppedContainer`
3. Inputs
1. Add
1. Name - `Container`
2. Type - `String`
2. Add
1. Name - `Robot`
2. Type - `String`
3. Add
1. Name - `Destination`
2. Type - `String`
6. Link the output **Container** of the `Transport Receiver` to the input **Container** of the `Execute Action` RobotDroppedContainer
7. Link the output `Destination` of the `Transport Receiver` to the input **Container** of the `Execute Action` RobotDroppedContainer
8. Link the output `Robot` of the `Retrieve Data` to the input `Robot` of the `Execute Action` RobotDroppedContainer
9. Link the output `DroppedContainer` to the input `Activate` of the `Execute Action` RobotDroppedContainer
10. Drag and drop task `Execute Action`
1. Description - `RobotDropMaterial`
2. Settings
1. Rule - `RobotDropMaterial`
3. Inputs
1. Add
1. Name - `Container`
2. Type - `String`
2. Add
1. Name - `Robot`
2. Type - `String`
3. Add
1. Name - `Destination`
2. Type - `String`
11. Link the output **Container** of the `Transport Receiver` to the input **Container** of the `Execute Action` RobotDropMaterial
12. Link the output `Destination` of the `Transport Receiver` to the input **Container** of the `Execute Action` RobotDropMaterial
13. Link the output `Robot` of the `Retrieve Data` to the input `Robot` of the `Execute Action` RobotDropMaterial
14. Link the output `PickedContainer` to the input `Activate` of the `Execute Action` RobotDropMaterial
15. Use the `Store Data` task to store the RobotAssigned
1. Settings
1. Working Mode - `StoreOnActive`
2. Inputs
1. Add
1. Name - `RobotAssigned`
2. Identifier - `RobotAssigned`
3. Type - `String`
4. Storage - `Temporary`
16. Link the `Robot` output from the task `Transport Receiver` to the input `Robot Assigned` of the `Store Data` task
17. Link the `RobotAssigned` output from the task `Switch` to the input `Activate` of the `Store Data` task

#### Fleet-Manager - Raw Material
At this moment we have a consumer for the jobs and we have a workflow with the lifecycle of the job. Now we require the integration to the Fleet Manager. For this example we will assume that the fleet manager runs on `MQTT` and has the following topics:
1. Topic - `FleetManager.Robot.Assign`
1. Payload - `{"JobId":"","Robot":""}`
2. Topic - `FleetManager.Robot.PickContainer`
1. Payload - `{"JobId":"","Container":""}`
3. Topic - `FleetManager.Robot.DropContainer`
1. Payload - `{"JobId":"","Container":"","Destination":"\"}`
4. Topic - `FleetManager.Robot.PickContainer`
1. Payload - `{"JobId":"","Container":"","Destination":""}`
5. Topic - `FleetManager.Robot.ArrivedAtDestination`
1. Payload - `{"JobId":"","Container":""}`
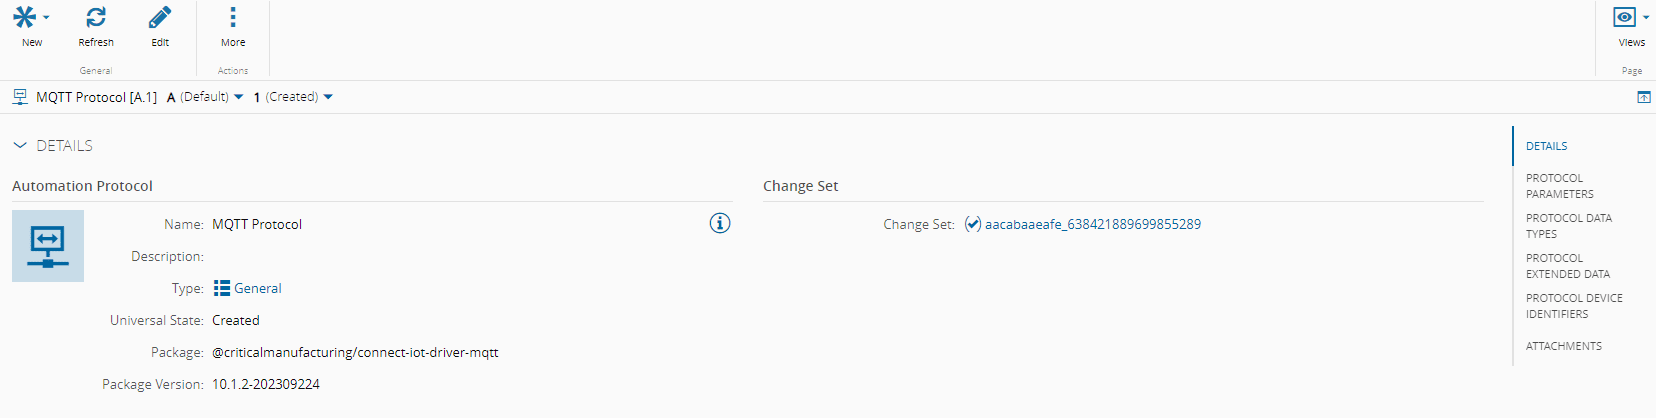
#### Fleet-Manager - Raw Material - Protocol
1. Go to `Business Data > Automation Protocol`
2. Create `New`
3. Name `MQTT Protocol`
4. Select `Package` for the driver of the mqtt driver
5. Select the version available
6. select `Next` and `Create`
#### Fleet-Manager - Raw Material - Driver Definition
1. Go to `Business Data > Automation DriverDefinition`
2. Create `New`
3. Name `Fleet-Manager-RawMaterial_DriverDefinition`
4. Select Automation Protocol `MQTT Protocol`
5. Entity Type **Resource**
6. select `Next`
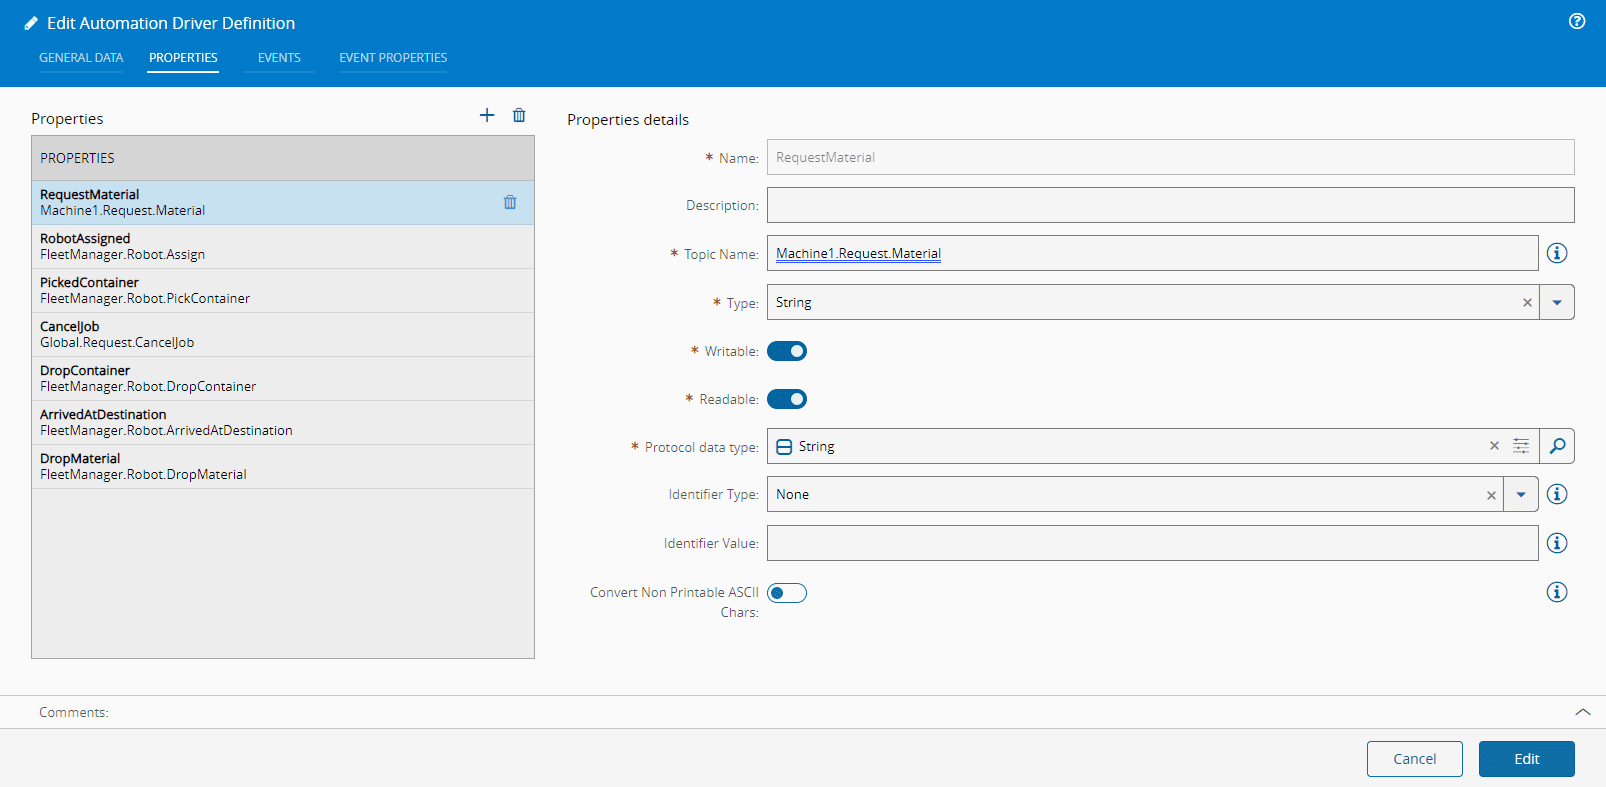
7. Add properties (all properties will have the same details, except the one's mentioned otherwise):
1. Name - `RequestMaterial`
1. Topic Name - `Machine1.Request.Material`
2. Type - `String`
3. Protocol Data Type - `String`
2. Name - `RobotAssigned`
1. Topic Name - `FleetManager.Robot.Assign`
3. Name - `PickedContainer`
1. Topic Name - `FleetManager.Robot.PickContainer`
4. Name - `DropContainer`
1. Topic Name - `FleetManager.Robot.DropContainer`
5. Name - `DropMaterial`
1. Topic Name - `FleetManager.Robot.DropMaterial`
6. Name - `ArrivedAtDestination`
1. Topic Name - `FleetManager.Robot.ArrivedAtDestination`
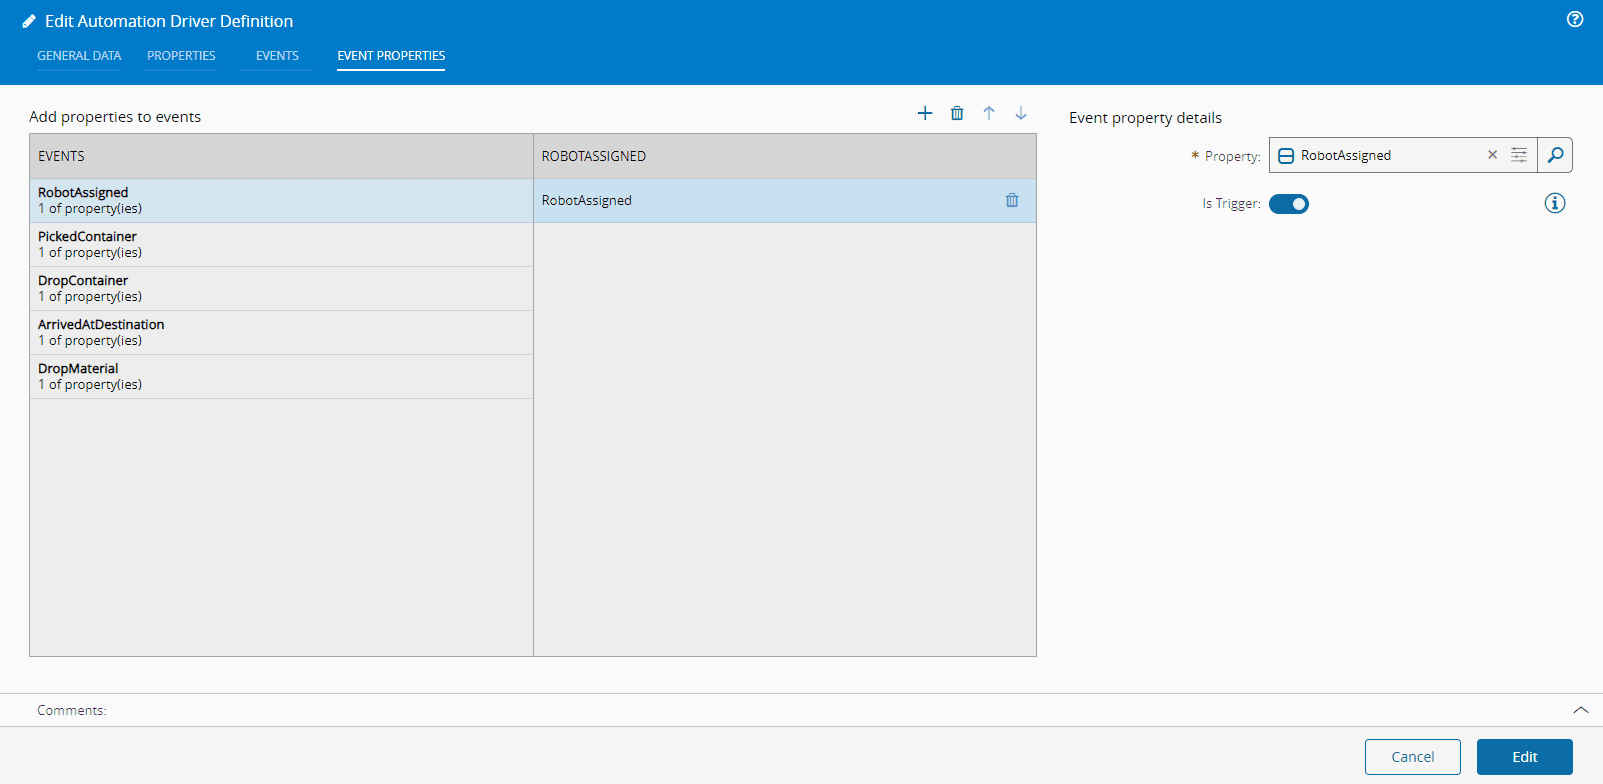
8. Add events
1. Name - `RobotAssigned`
2. Name - `PickedContainer`
3. Name - `DropContainer`
4. Name - `DropMaterial`
5. Name - `ArrivedAtDestination`
9. Add event properties with matching properties
#### Fleet-Manager - Raw Material - Controller
1. Go to `Business Data > Automation Controller`
1. Create `New`
1. Entity Type **Resource**
1. Add Driver Definition
1. Name `Handler`
2. Driver Definition - `FleetManager-RawMaterial_DriverDefinition`
1. Select `Next` and `Create`
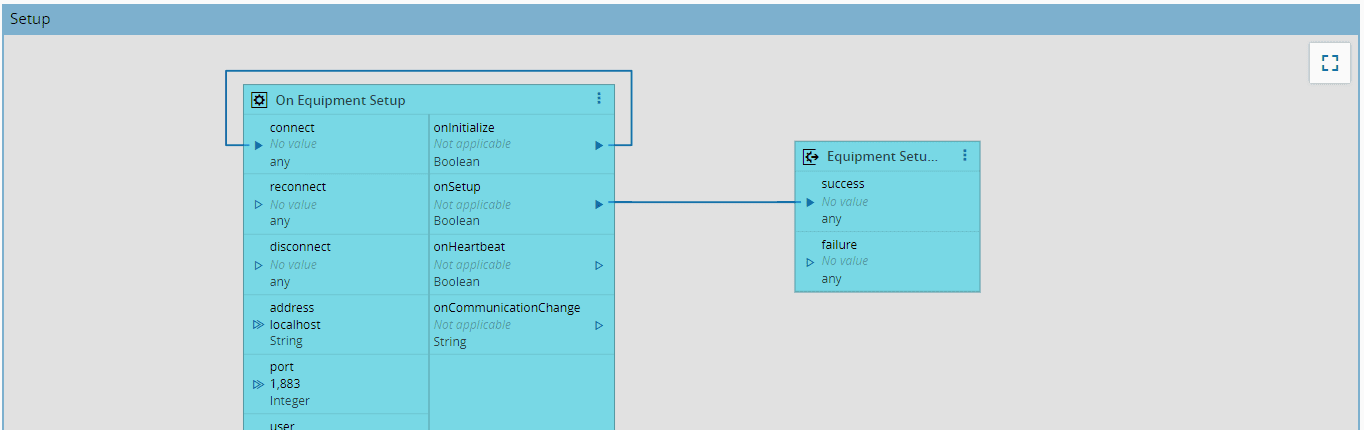
#### Fleet-Manager - Raw Material - Controller - Setup
Feel free to use also the `Get Configurations` task to control the settings of the `On Equipment Setup`. This is a simple case so for this case, let's add the address as localhost and keep the default settings.
#### Fleet-Manager - Raw Material - Controller - Request Material
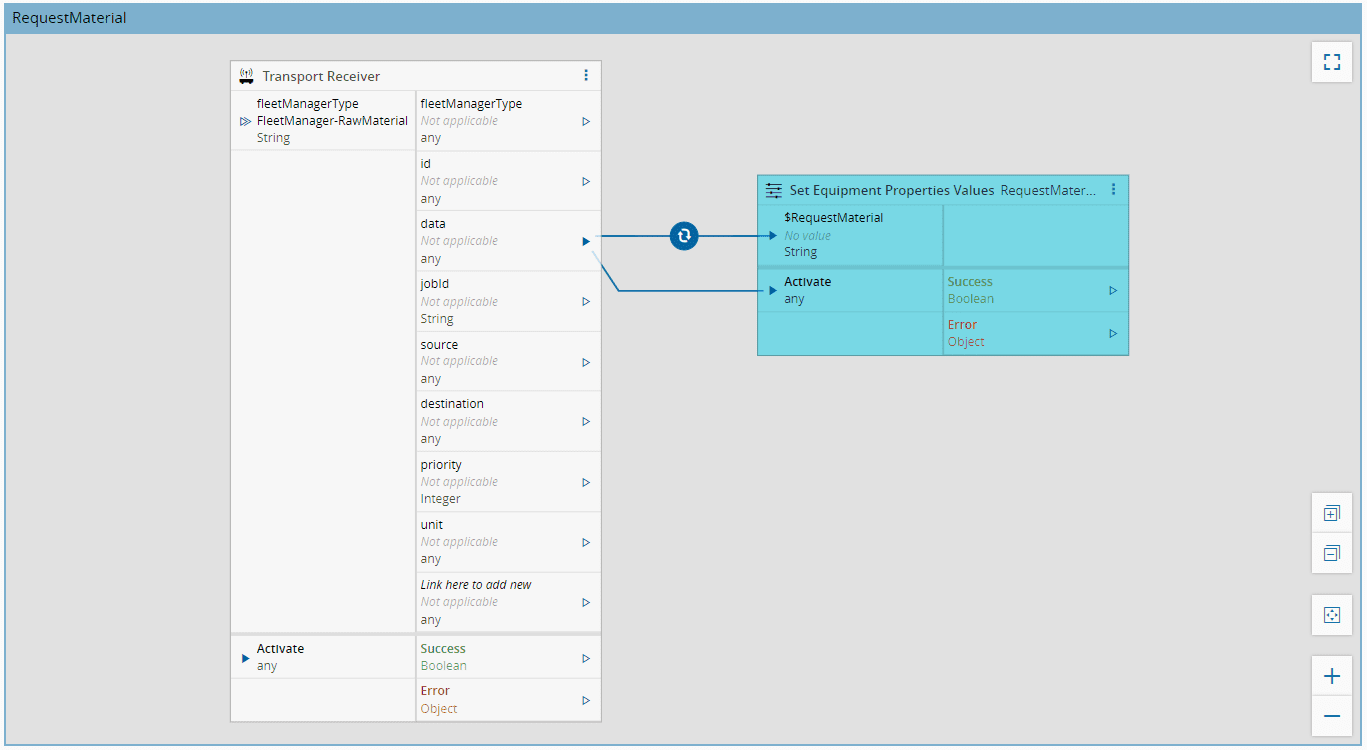
Create a new page `Request Material`. The first action in the fleet manager will be to notify the fleet manager of a request material. In this workflow we will add a `Transport Receiver` task for the fleet manager `FleetManager-RawMaterial` with command `Transportation`. This is the task that will be notified by the `Transport Requester` of the `Request Material` job. Then we will publish to an mqtt topic `Machine1.Request.Material` the required payload, this is mapped by executing the `Set Equipment Properties` task for the Automation Property `RequestMaterial`.
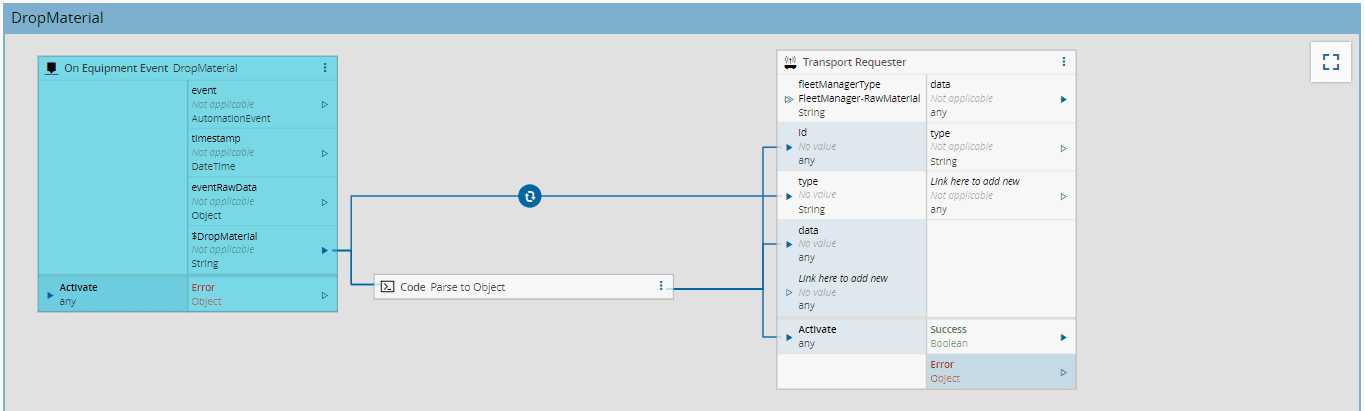
#### Fleet-Manager - Raw Material - Controller - RobotAssigned
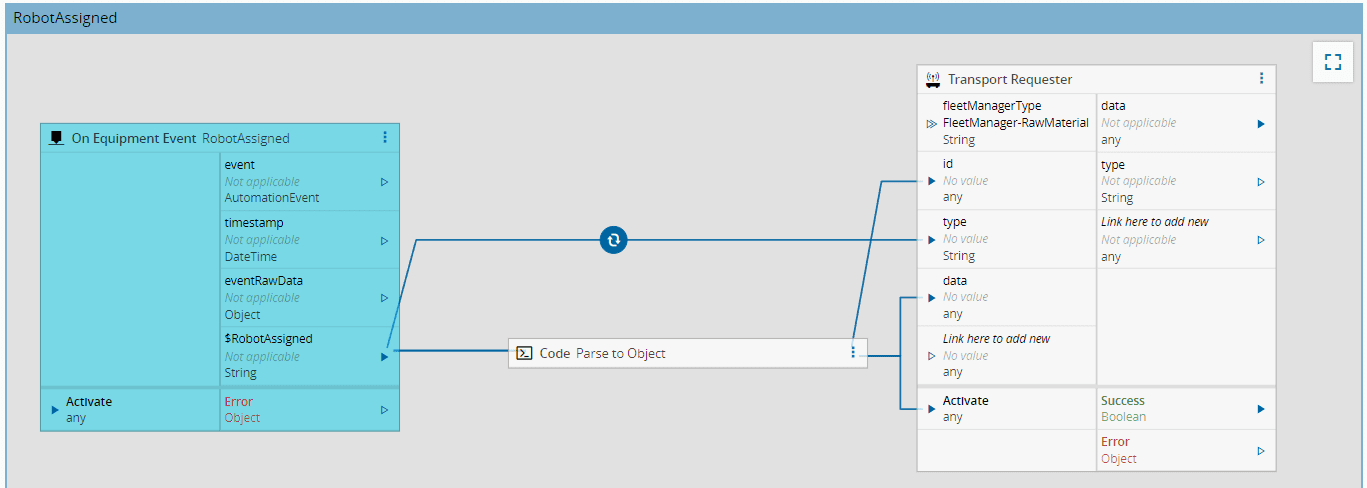
The next actions will follow a very similar pattern. Create a page `RobotAssigned` When we receive an `On Equipment Event` task for the Event `RobotAssigned` we will notify our job, using the `Transport Requester` task with command interaction. We want to just notify the job that is managing this lifecycle so add the flag `Include Id in Command` as `true` and we will have to fill the Id input. It will also be helpful to add a simple `Code` task, that will transform the string received into a JSON object. We will also apply an `AnyToConstant` converter connecting to the `type` input of the `Transport Requester` task, this converter will apply a string with value `RobotAssigned`. The type will be used in the job to interpret to do with the interaction.
!!! note
The flag `Include Id in Command` is very important. If the flag is set as `false` it means it will be a broadcast to all. If the task is `true` a job id must be provided. This is different than when we were in the context of the job, if we are in the context of `Connect IoT` we must provide the Id.
Content of the `Code` task:
```typescript
public async main(inputs: any, outputs: any): Promise {
const data = JSON.parse(inputs.Value);
outputs.jobId.emit(data["JobId"])
outputs.data.emit(JSON.parse(inputs.Value))
}
```
The code task will have the string input `Value` and the Output `jobId` and `data`. The `Success` output of the `Code` task will link to the `Activate` of the `Transport Requester`.
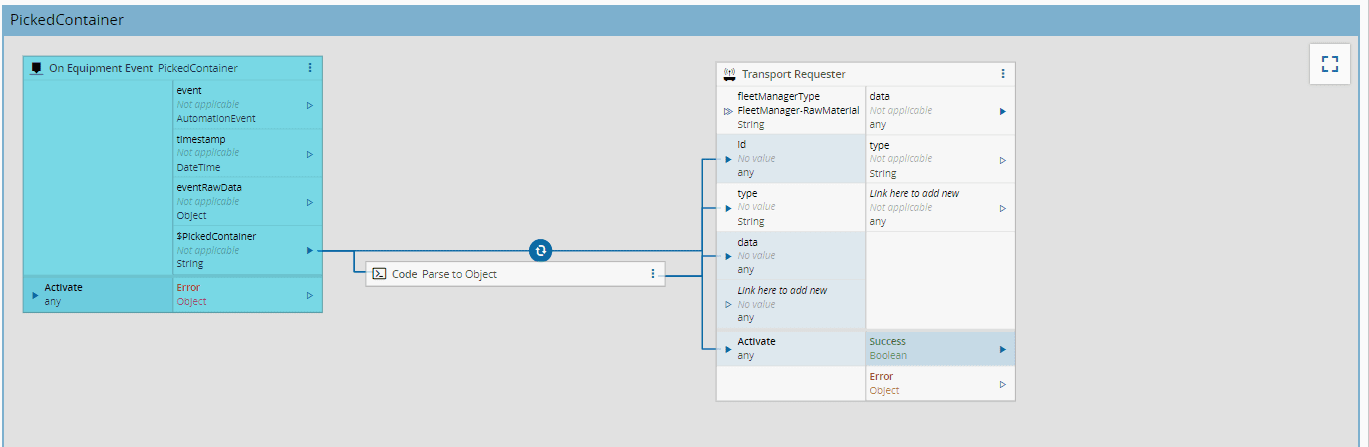
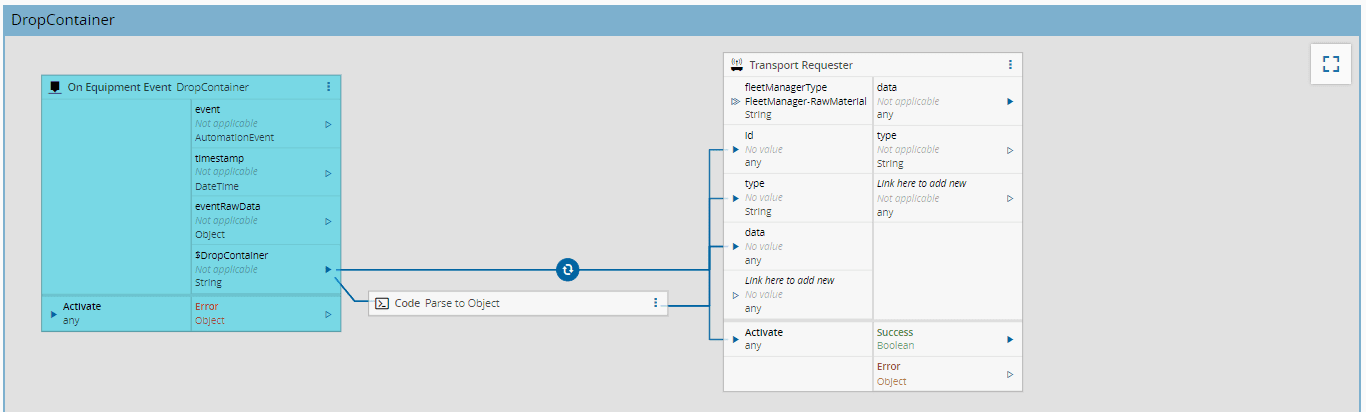
#### Fleet-Manager - Raw Material - Controller - Others
The next actions are defined in the same fashion, changing the event that triggers them and changing the converter `AnyToConstant` to feed the different types.
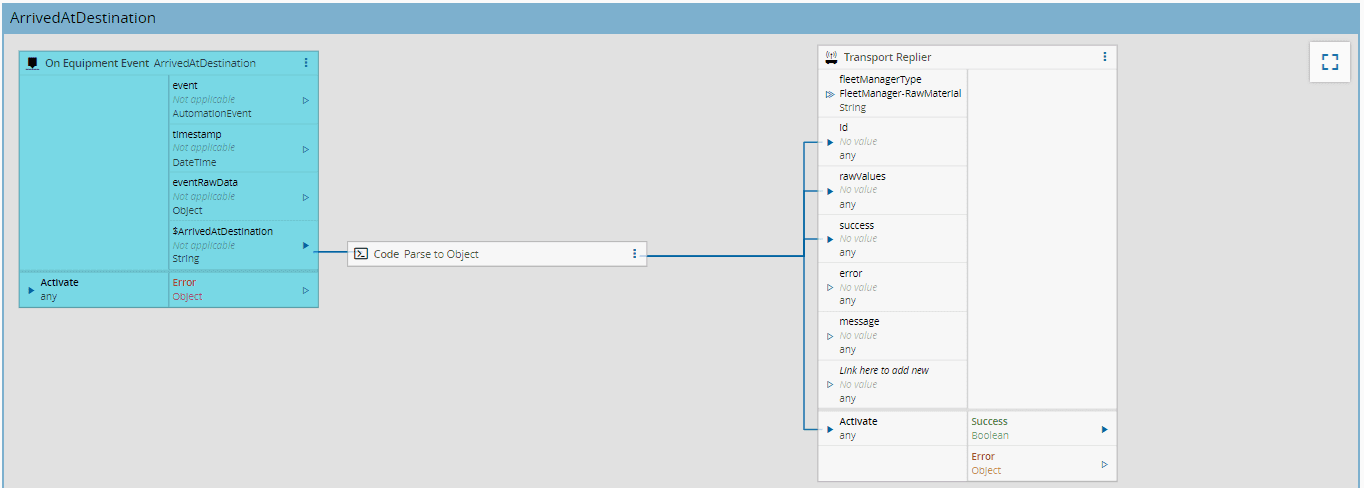
#### Fleet-Manager - Raw Material - Controller - Arrived At Destination
The event `ArrivedAtDestination` will mark the end of the job. It will no longer call an interaction, but will call a `Transport Replier`, this task will signal the end of the job to the `Transport Requester` task of the main job.
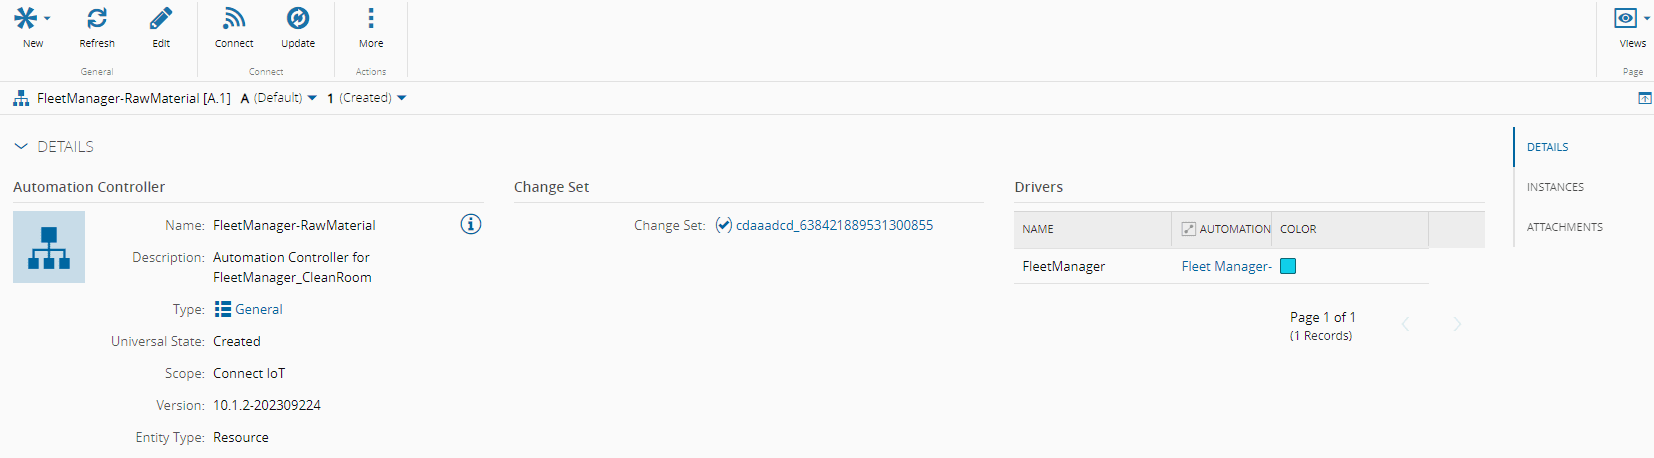
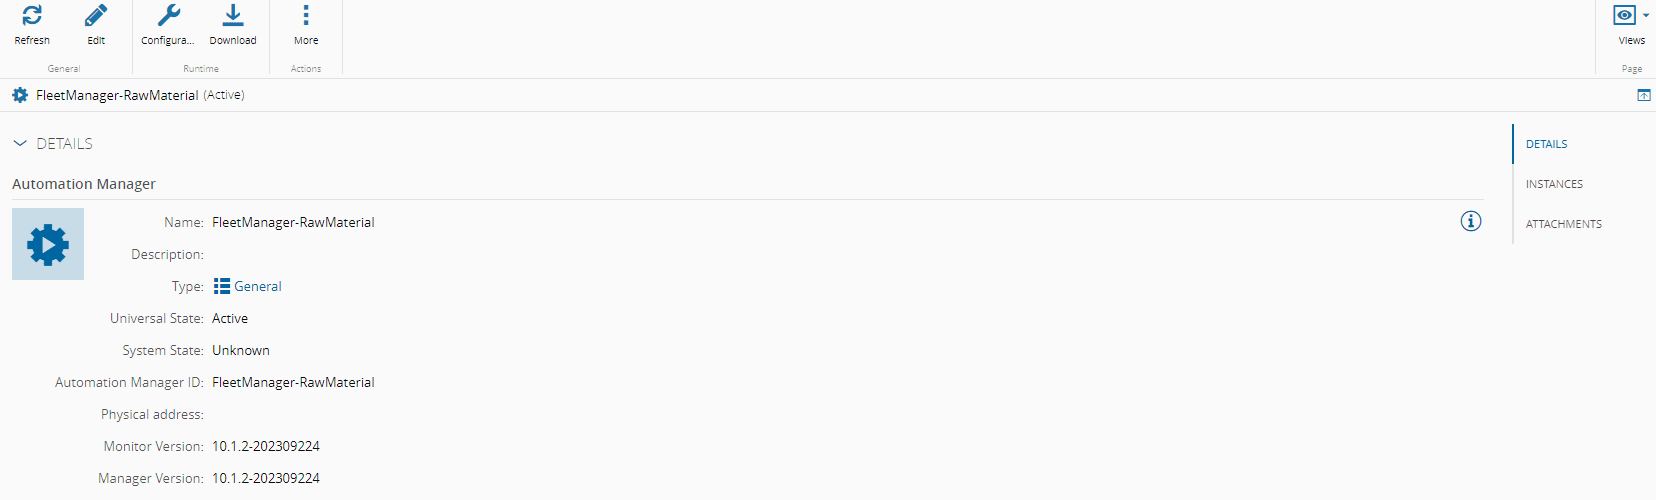
#### Fleet-Manager - Raw Material - Controller Instance
1. Create a Resource `FleetManager-RawMaterial` with ProcessingType `Component`
2. Go to `Business Data > Automation Manager`
3. Create `New`
4. Name `FleetManager-RawMaterial`
5. Logical Address `FleetManager-RawMaterial`
6. Select Version
7. Go to `Business Data > Automation Controller > FleetManager-RawMaterial_Controller`
8. Select `Connect`
9. Select Resource `FleetManager-RawMaterial` and Automation Manager `FleetManager-RawMaterial`
10. In the Drivers also select the Resource `FleetManager-RawMaterial`
11. Go to `Business Data > Automation Manager > FactoryAutomation`
12. Click `Download`
13. Run the Automation Manager
1. Unzip the Automation Manager
2. Go to scripts
3. Run StartConsole.bat
#### Start the MQTT Broker
For this implementation we will use an MQTT broker [Mosquitto](https://mosquitto.org/). Download and install mosquitto.
In order to start the broker with mosquitto, go to where mosquitto was installed.
!!! note
If the mosquitto was installed as a windows service you won't need to start a console for the mosquitto broker.
To start the broker open a powershell console:
```powershell
cd "C:\Program Files\mosquitto"
.\mosquitto.exe -v
```
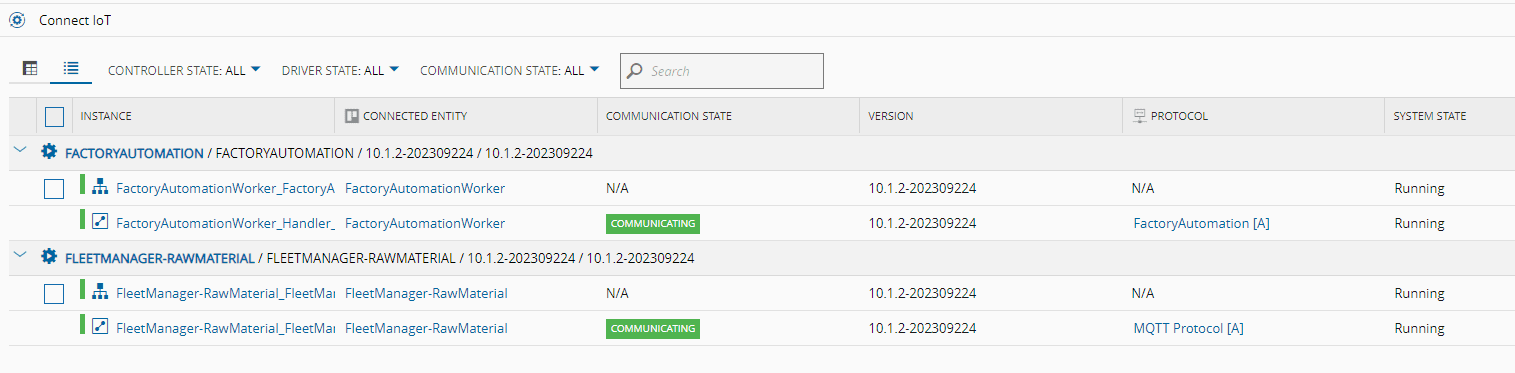
Now the system should have the fleet manager and the Factory Automation worker communicating.
### Executing a Job Lifecycle
All the components have been created so we can perform the full job lifecycle.
Let's subscribe to the topic where we will send the request material, so we can confirm that we will receive the correct payload:
```powershell
cd "C:\Program Files\mosquitto"
.\mosquitto_sub.exe -h localhost -t "Machine1.Request.Material"
```
Dispatch the **Material** - `Cookie Batch` to the `Oven` Resource. As we have seen previously a job will be created and will be processed.

Now we can see that the worker processed the job.
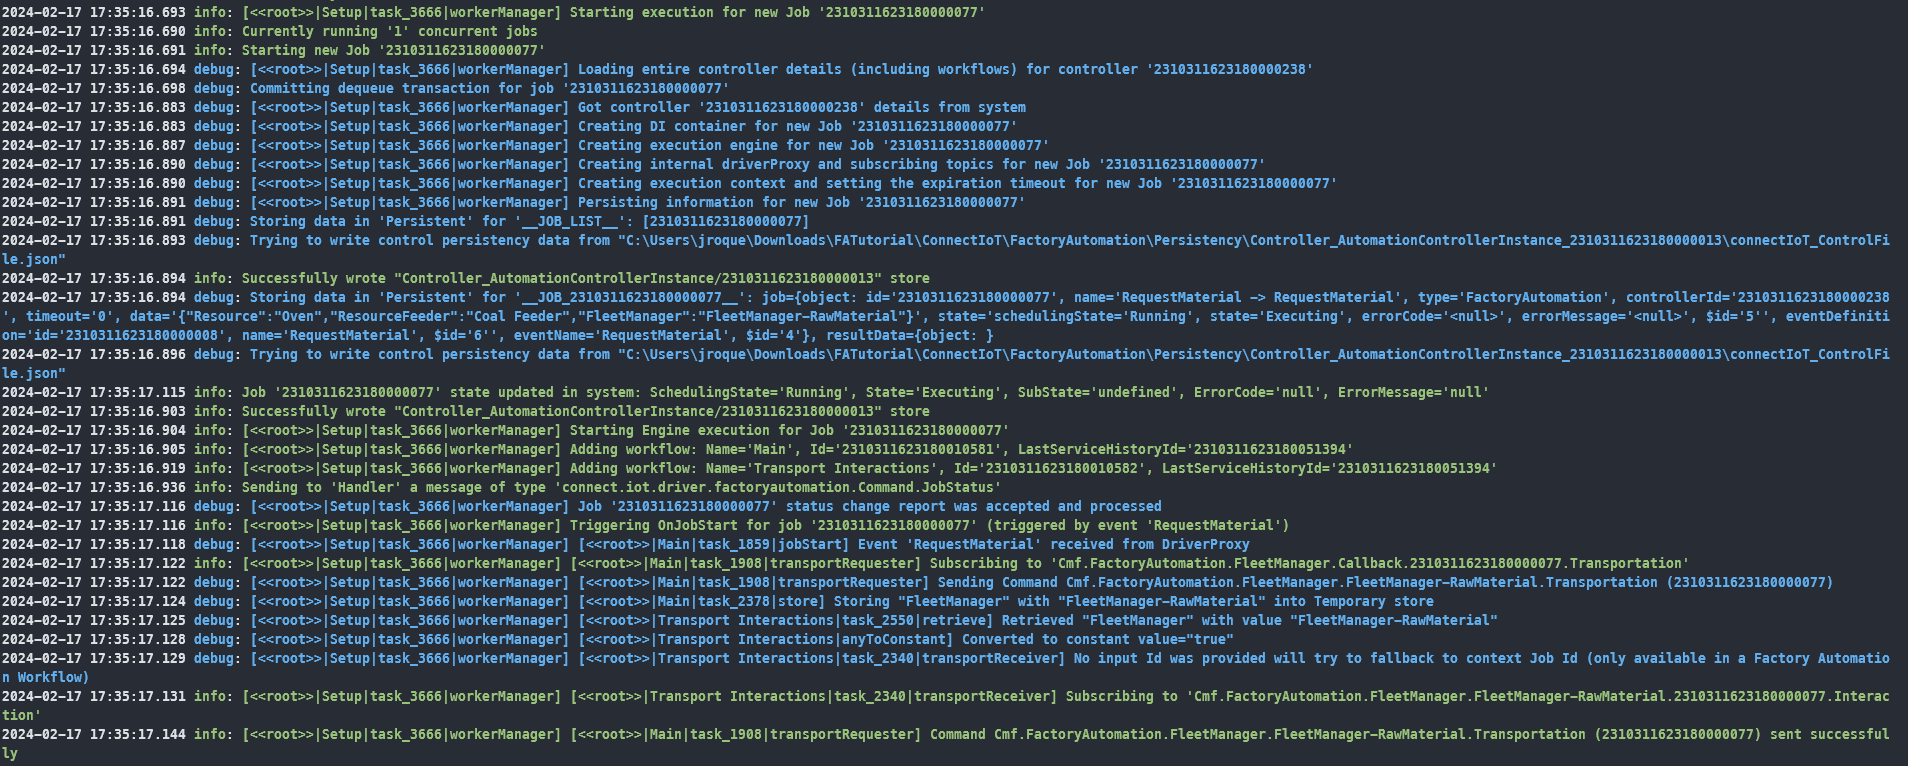
In the worker it logs that the message was sent successfully so let's see the fleet manager.

Lastly in the mqtt subscriber we will see that a message arrived as expected.

We have finished the request of the material to the fleet manager. In the next step, the fleet manager will reply with the assignment of a robot. In order to simulate this let´s use mosquitto. We will want to send a message to the topic of the robot assignment event `FleetManager.Robot.Assign` and the payload must have the jobId and the robot. We will use `AGV1` as the name of the robot to match what we created in the MES and the jobId we can see in the logs that it was `2310311623180000077`, in your case the job id may be different.
```powershell
cd "C:\Program Files\mosquitto"
.\mosquitto_pub.exe -h localhost -t "FleetManager.Robot.Assign" -m '{"JobId":"2310311623180000077","Robot":"AGV1"}'
```

Now the fleet manager will receive the event and forward it to the job.

In the job, it will store the information about the robot assigned.

The next action will be the robot picking a container, we will the container we created `CoalContainer001`.
```powershell
.\mosquitto_pub.exe -h localhost -t "FleetManager.Robot.PickContainer" -m '{"JobId":"2310311623180000077","Container":"CoalContainer001"}'
```
Now the fleet manager will receive the event and forward it to the job.

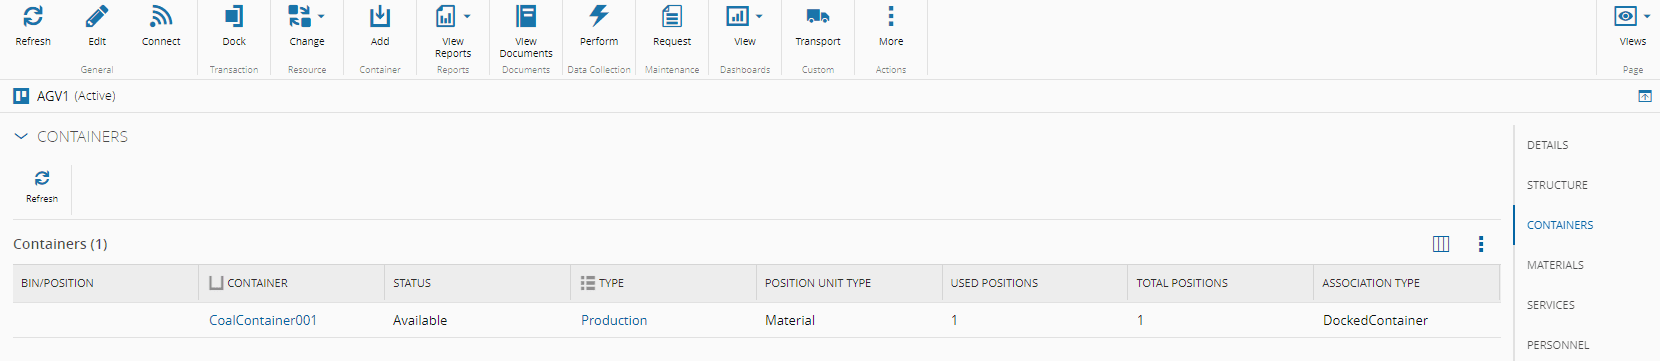
The worker will receive the message and invoke the execute action for the robot picked container.

In the MES we can now see that the Resource `AGV1` will now have a container docked.
In the next action the robot will drop the container in the load port of the Resource `Oven`.
```powershell
.\mosquitto_pub.exe -h localhost -t "FleetManager.Robot.DropContainer" -m '{"JobId":"2310311623180000077","Container":"CoalContainer001", "Destination":"Coal LoadPort"}'
```
The fleet manager will forward the message to the job.

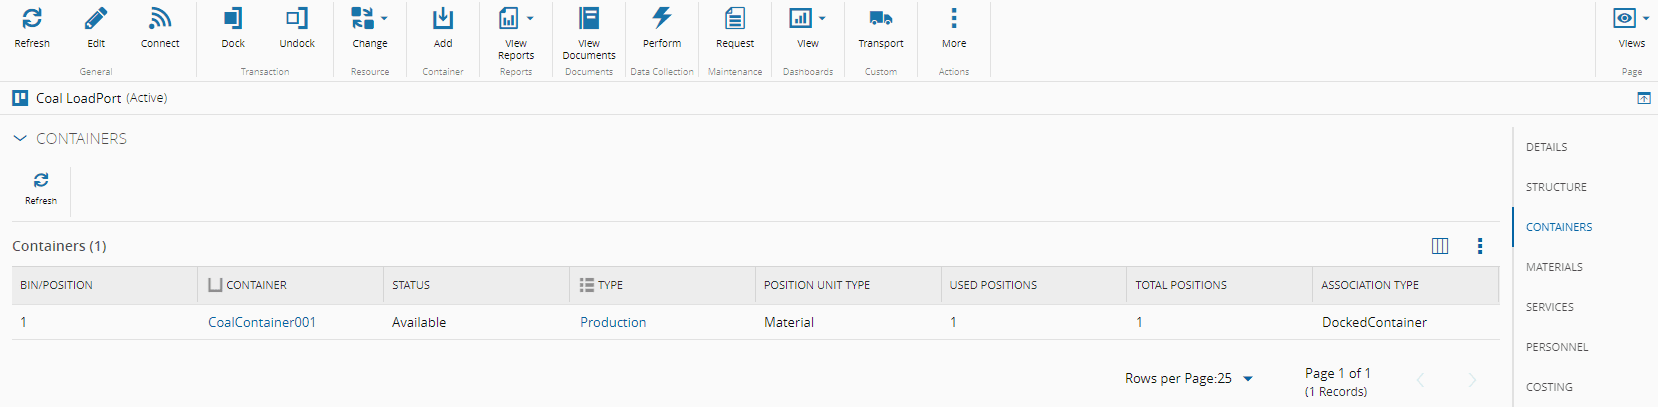
The worker will receive the message and invoke the execute action for the robot dropped container.

In the MES we can now see that the Resource `AGV1` will now have no docked and the container will now be at the Resource `Coal LoadPort`.
Now the robot will drop the material into the feeder Resource `Coal Feeder`.
```powershell
.\mosquitto_pub.exe -h localhost -t "FleetManager.Robot.DropMaterial" -m '{"JobId":"2310311623180000077","Container":"CoalContainer001", "Destination":"Coal Feeder"}'
```
The fleet manager will forward the message to the job.

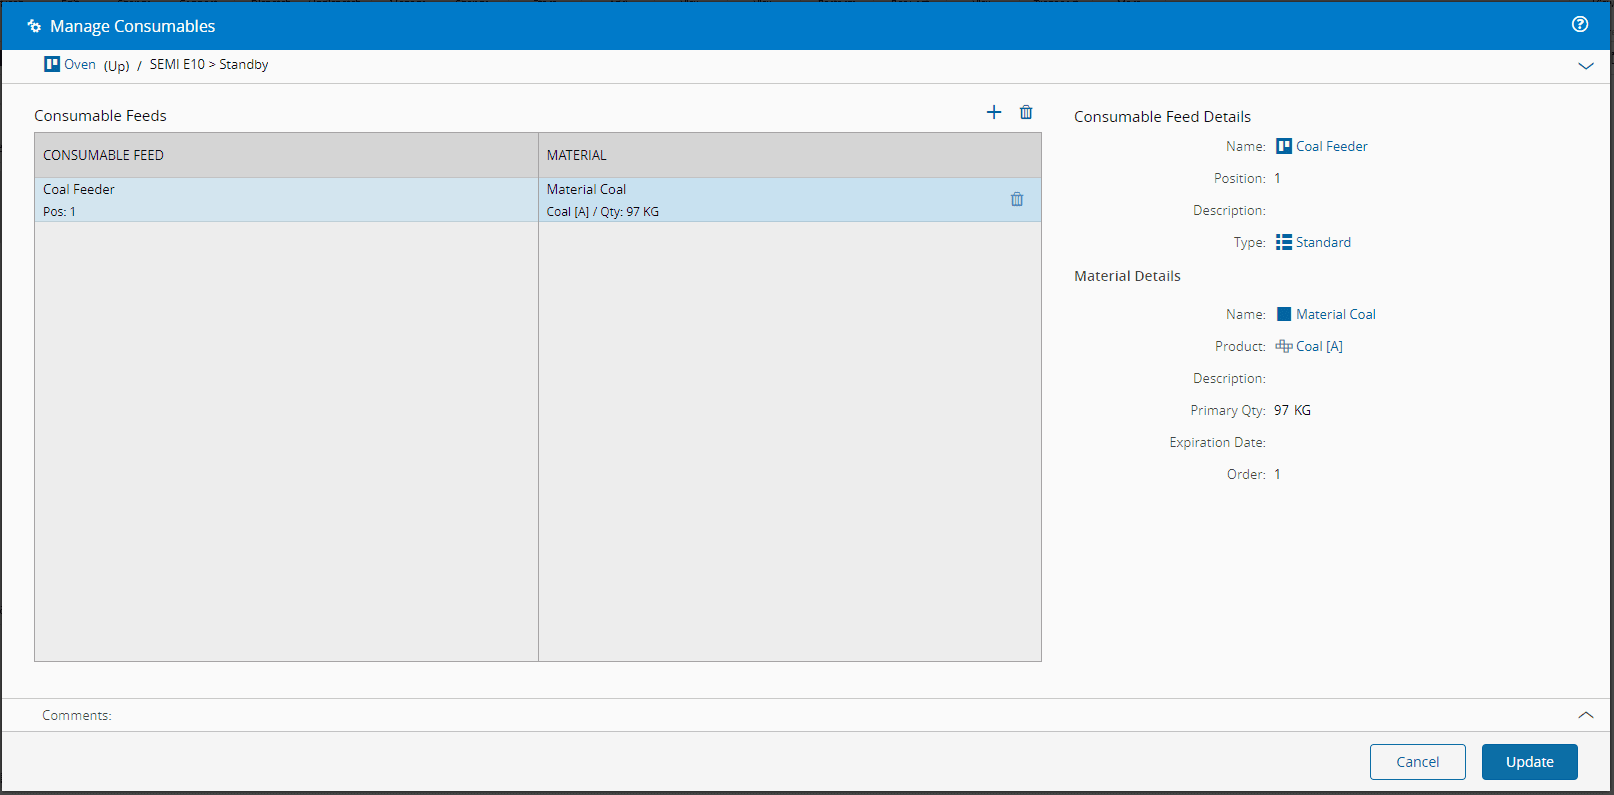
The worker will receive the message and invoke the execute action for the robot dropped material.

In the Resource `Oven` if we select `Manage Consumables` we can see that now we have a material in our consumable feed.
```powershell
.\mosquitto_pub.exe -h localhost -t "FleetManager.Robot.ArrivedAtDestination" -m '{"JobId":"2310311623180000077","Container":"CoalContainer001"}'
```
The fleet manager will forward the message to the job.

The job `Transport Requester` will be notified and emit outputs. This will signal the end of the job.

In the Factory Automation GUI we can now see that our job is `Processed`

### Handling Failures
In this tutorial we did not address error scenarios. If the job is canceled, you can use the `Transport Replier` task to signal the end of the job, but with the command `CancelTransportation`. If the job is in error, you can use the `Transport Replier` task with the command `Transportation`, but with the input error filled in. The error messages will then be visible in the Factory Automation GUI.
!!! info
More information on the [Factory Automation](../../../userguide/automation/monitoring/automation_factory_automation.md) section of the User Guide.