---
alias: tutorials-managing-batch-entity-page
title: Managing Batch from the Entity Page
glightbox: false
description: "Manage batch workflows from the Batch Entity page, including release, track-in, and track-out operations"
---
# Managing Batch from the Entity Page
Once a Batch is created, several operations can be performed, including [[user-guide-release-batch]], [[user-guide-unrelease-batch]], [[user-guide-track-in-batch]], [[user-guide-track-out-batch]], and more. This section outlines the standard batch management flow and addresses specific edge cases, all managed from the Batch Entity page.
## Standard Flow
### Release Batch
Managing a Batch begins with the Release Batch operation. Select the **Release Batch** button on the top ribbon to open a wizard where Batch Materials can be verified. If all details are correct, proceed by selecting the **Release Batch** button. Once released, the Batch and its associated Resource Job transition to the Queued state, while the Materials and Resource move to the Loaded state.
Following the release operation, three actions are available: [[user-guide-cancel-batch]], [[user-guide-unrelease-batch]], or [[user-guide-track-in-batch]]. The Cancel Batch option immediately terminates the batch and should be used only as a last resort, as shown in the diagram below.
```mermaid
graph TD
A1[Created] --> |Release
Batch| A2[Queued]
A1 --> |Cancel
Batch| C1[Canceled]
A2 --> |Unrelease
Batch| A1
A2 --> |Track-In
Batch| A4[In Process]
A4 --> |Abort
Batch| A2
A4 --> |Track-Out
Batch| A5[Processed]
A5 --> A6[Closed]
A2 --> |Cancel
Batch| C1
subgraph F1[" "]
F5[Edit Batch]
F2[Change Batch Resource]
F3[Manage Batch Materials]
F4[Manage Batch Containers]
end
A1 --> F1
F1 --> A1
classDef mermaid_title fill:#fafafa, stroke:#fafafa, stroke-width:0x, font-size:100%, font-weight:200;
classDef mermaid_start fill:#fafafa, stroke:#fafafa, color:#fafafa, stroke-width:0x, font-size:100%, visibility: hidden;
classDef mermaid_initial_state fill:#274b76, stroke-width:0px, color:#fafafa, font-size:100%;
classDef mermaid_final_state fill:#3ba192, stroke-width:0px, color:#fafafa, font-size:100%;
classDef mermaid_canceled_state fill:#b64234, stroke-width:0px, color:#fafafa, font-size:100%;
classDef mermaid_grey_state fill:#e1e3e6, stroke-width:0px, color:#fafafa, font-size:100%;
classDef mermaid_grey_s stroke-width:0px, color:#fafafa, font-size:100%;
class Title mermaid_title
class Start mermaid_start
class A2,A4,A1 mermaid_initial_state
class C1 mermaid_canceled_state
class A5,A6,F2,F3,F4,F5 mermaid_grey_state
class F1 mermaid_grey_s
linkStyle 4,5,6,8,9 color:#c3c5c7, stroke-width:1.5px, opacity:0.2;
```
!!! info
For more information, see [[user-guide-cancel-batch]].
### Unrelease Batch
If modifications are required while the Batch is in the Queued state, select **Unrelease Batch** from the top ribbon. Similarly as before, this action opens a wizard displaying the Batch Materials, and after confirming, the Batch and Resource Job revert to the Queued state, while Materials and Resources reset to the Unloaded state.
Changes can only be made when the Batch is in a Created state. In this state, is is possible to [[tutorials-managing-batch-entity-page#change-batch-resource|Change Batch Resource]], [[tutorials-managing-batch-entity-page#manage-batch-materials|Manage Batch Materials]], [[tutorials-managing-batch-entity-page#manage-batch-containers|Manage Batch Containers]], [[user-guide-edit-batch]], and [[user-guide-cancel-batch]] as shown in the diagram below.
```mermaid
graph TD
A1[Created] --> |Release
Batch| A2[Queued]
A1 --> |Cancel
Batch| C1[Canceled]
A2 --> |Unrelease
Batch| A1
A2 --> |Track-In
Batch| A4[In Process]
A4 --> |Abort
Batch| A2
A4 --> |Track-Out
Batch| A5[Processed]
A5 --> A6[Closed]
A2 --> |Cancel
Batch| C1
subgraph F1[" "]
F5[Edit Batch]
F2[Change Batch Resource]
F3[Manage Batch Materials]
F4[Manage Batch Containers]
end
A1 --> F1
F1 --> A1
classDef mermaid_title fill:#fafafa, stroke:#fafafa, stroke-width:0x, font-size:100%, font-weight:200;
classDef mermaid_start fill:#fafafa, stroke:#fafafa, color:#fafafa, stroke-width:0x, font-size:100%, visibility: hidden;
classDef mermaid_initial_state fill:#274b76, stroke-width:0px, color:#fafafa, font-size:100%;
classDef mermaid_final_state fill:#3ba192, stroke-width:0px, color:#fafafa, font-size:100%;
classDef mermaid_canceled_state fill:#b64234, stroke-width:0px, color:#fafafa, font-size:100%;
classDef mermaid_grey_state fill:#e1e3e6, stroke-width:0px, color:#fafafa, font-size:100%;
classDef mermaid_grey_s stroke-width:0px, color:#fafafa, font-size:100%;
class Title mermaid_title
class Start mermaid_start
class A2,A1,F2,F3,F4,F5 mermaid_initial_state
class C1 mermaid_canceled_state
class A5,A6,A4 mermaid_grey_state
class F1 mermaid_grey_s
linkStyle 0,3,4,5,6,7 color:#c3c5c7, stroke-width:1.5px, opacity:0.2;
```
### Track-In
To continue with Batch processing, use the **Track-In** button on the top ribbon. This opens the **Track-In Batch** wizard, displaying the Batch Material details. After selecting **Next**, the Resource Details are displayed and you can modify the Resource State. If no issues exist, leave it as Productive and complete the operation by selecting the **Track-In** button. This updates the Batch and Materials to In Process, while the Resource Job moves to Executing.
After Track-In, two options are available: [[user-guide-track-out-batch]] or [[user-guide-abort-batch]]. The Abort function resets the batch to Queued, allowing for changes via the [[user-guide-unrelease-batch]] operation if necessary, as display in the diagram below.
```mermaid
graph TD
A1[Created] --> |Release
Batch| A2[Queued]
A1 --> |Cancel
Batch| C1[Canceled]
A2 --> |Unrelease
Batch| A1
A2 --> |Track-In
Batch| A4[In Process]
A4 --> |Abort
Batch| A2
A4 --> |Track-Out
Batch| A5[Processed]
A5 --> A6[Closed]
A2 --> |Cancel
Batch| C1
subgraph F1[" "]
F5[Edit Batch]
F2[Change Batch Resource]
F3[Manage Batch Materials]
F4[Manage Batch Containers]
end
A1 --> F1
F1 --> A1
classDef mermaid_title fill:#fafafa, stroke:#fafafa, stroke-width:0x, font-size:100%, font-weight:200;
classDef mermaid_start fill:#fafafa, stroke:#fafafa, color:#fafafa, stroke-width:0x, font-size:100%, visibility: hidden;
classDef mermaid_initial_state fill:#274b76, stroke-width:0px, color:#fafafa, font-size:100%;
classDef mermaid_final_state fill:#3ba192, stroke-width:0px, color:#fafafa, font-size:100%;
classDef mermaid_canceled_state fill:#b64234, stroke-width:0px, color:#fafafa, font-size:100%;
classDef mermaid_grey_state fill:#e1e3e6, stroke-width:0px, color:#fafafa, font-size:100%;
classDef mermaid_grey_s stroke-width:0px, color:#fafafa, font-size:100%;
class Title mermaid_title
class Start mermaid_start
class A2,A4,A5 mermaid_initial_state
class F2,F3,F4,A1,C1,A6,F5 mermaid_grey_state
class F1 mermaid_grey_s
linkStyle 0,1,2,6,7,8,9 color:#c3c5c7, stroke-width:1.5px, opacity:0.2;
```
!!! info
For more information, see [[user-guide-abort-batch]].
### Track-Out
Complete the process with the Track-Out operation by selecting the **Track-Out** button on the top ribbon. The **Track-Out Batch** wizard appears, displaying the Batch Materials. After selecting **Next**, the Resource Details are displayed and, if need, you can modify the Resource State. If everything is correct, keep it as Productive and complete the operation by selecting the **Track-Out** button. At this point, the Batch transitions to Closed (as shown in the diagram below), the Resource Job is marked as Completed, and both the Resource and Batch Materials are Unloaded.
```mermaid
graph TD
A1[Created] --> |Release
Batch| A2[Queued]
A1 --> |Cancel
Batch| C1[Canceled]
A2 --> |Unrelease
Batch| A1
A2 --> |Track-In
Batch| A4[In Process]
A4 --> |Abort
Batch| A2
A4 --> |Track-Out
Batch| A5[Processed]
A5 --> A6[Closed]
A2 --> |Cancel
Batch| C1
subgraph F1[" "]
F5[Edit Batch]
F2[Change Batch Resource]
F3[Manage Batch Materials]
F4[Manage Batch Containers]
end
A1 --> F1
F1 --> A1
classDef mermaid_title fill:#fafafa, stroke:#fafafa, stroke-width:0x, font-size:100%, font-weight:200;
classDef mermaid_start fill:#fafafa, stroke:#fafafa, color:#fafafa, stroke-width:0x, font-size:100%, visibility: hidden;
classDef mermaid_initial_state fill:#274b76, stroke-width:0px, color:#fafafa, font-size:100%;
classDef mermaid_final_state fill:#3ba192, stroke-width:0px, color:#fafafa, font-size:100%;
classDef mermaid_canceled_state fill:#b64234, stroke-width:0px, color:#fafafa, font-size:100%;
classDef mermaid_grey_state fill:#e1e3e6, stroke-width:0px, color:#fafafa, font-size:100%;
classDef mermaid_grey_s stroke-width:0px, color:#fafafa, font-size:100%;
class Title mermaid_title
class Start mermaid_start
class A4,A5 mermaid_initial_state
class A6 mermaid_final_state
class A2,F2,F3,F4,A1,C1,F5 mermaid_grey_state
class F1 mermaid_grey_s
linkStyle 0,1,2,3,4,7,8,9 color:#c3c5c7, stroke-width:1.5px, opacity:0.2;
```
Watch the video below for a detailed walkthrough.
{% set video_id = '4e4de71be6d07711dc74a3daeb0d0f66' %}
{% include-markdown 'includes/cloudflare_stream.md' %}
## Change Batch Resource
If the Batch is in the Created state, its associated Resource can be changed. Before proceeding, ensure another Resource with Scheduling Type `Batch` is available in the system. If the **Batch** has **Containers** assigned, confirm that the **new Resource** is configured with the **same Container Type** in the Manage Resource Scheduling wizard. Additionally, add the necessary **Resource Capacity** as detailed in [[tutorials-creating-batch-from-entity#step-2-define-the-resource-capacity|Define the Resource Capacity]] section.
Once these requirements are met, select the [[user-guide-change-batch-resource|Change Resource]] button on the top ribbon to select a different Resource. Watch the video below for more details.
{% set video_id = 'c70da4227cff02be0dc9354259a0f8be' %}
{% include-markdown 'includes/cloudflare_stream.md' %}
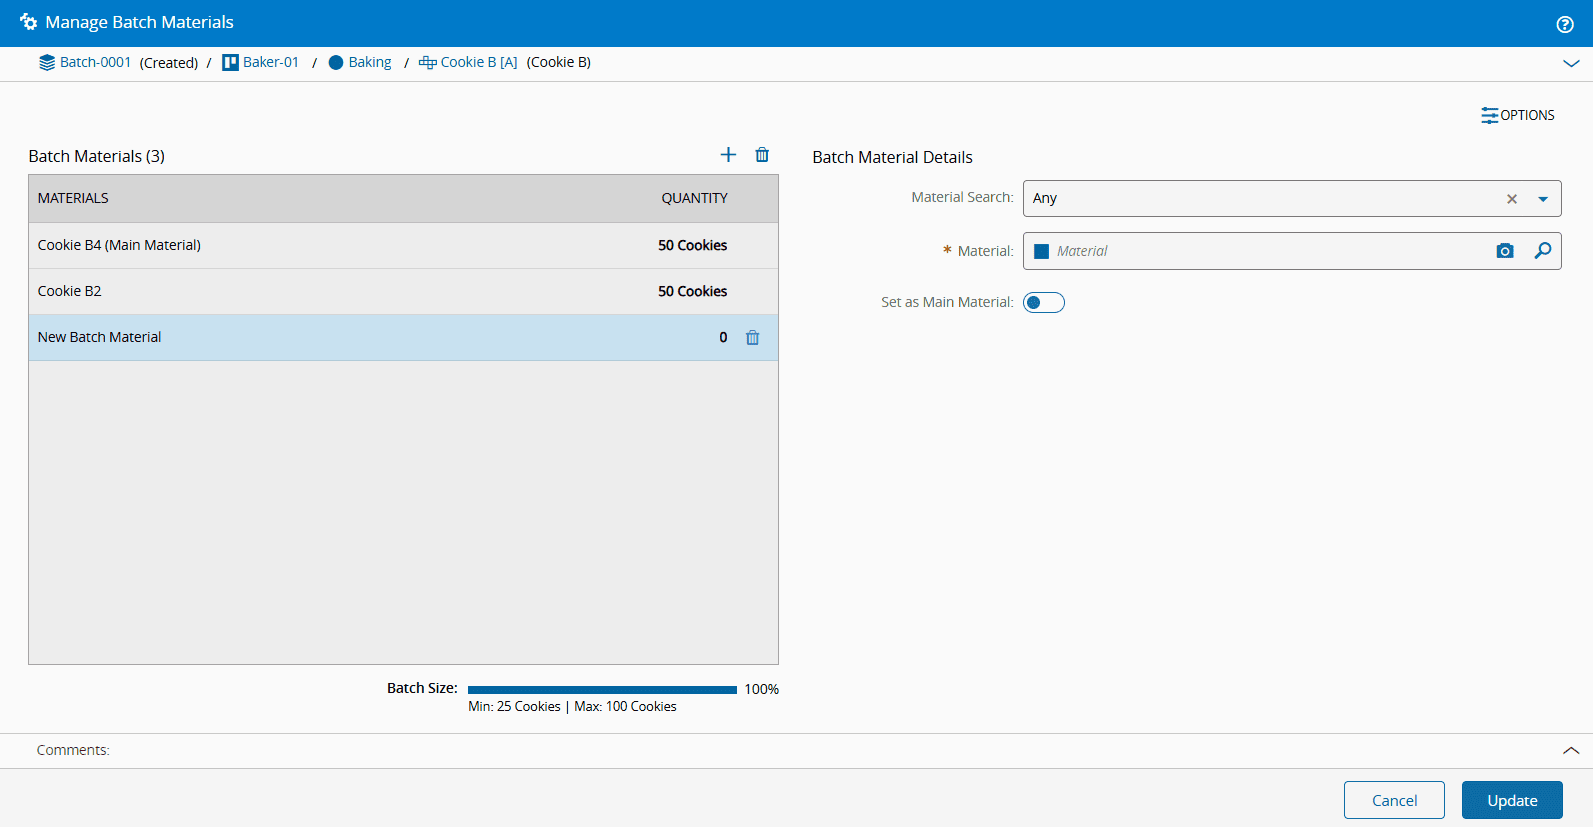
## Manage Batch Materials
When a Batch is in a Created state, you can also manage the Batch Materials. To do so, navigate to the Materials section within the Batch page and select the **Manage** button. This will open the [[user-guide-manage-batch-materials]] wizard where you can add or remove Materials using the :material-plus: and :material-trash-can: icons, respectively. Additionally, you choose another Material as Main Material by enabling the **Set as Main Material** toggle button.
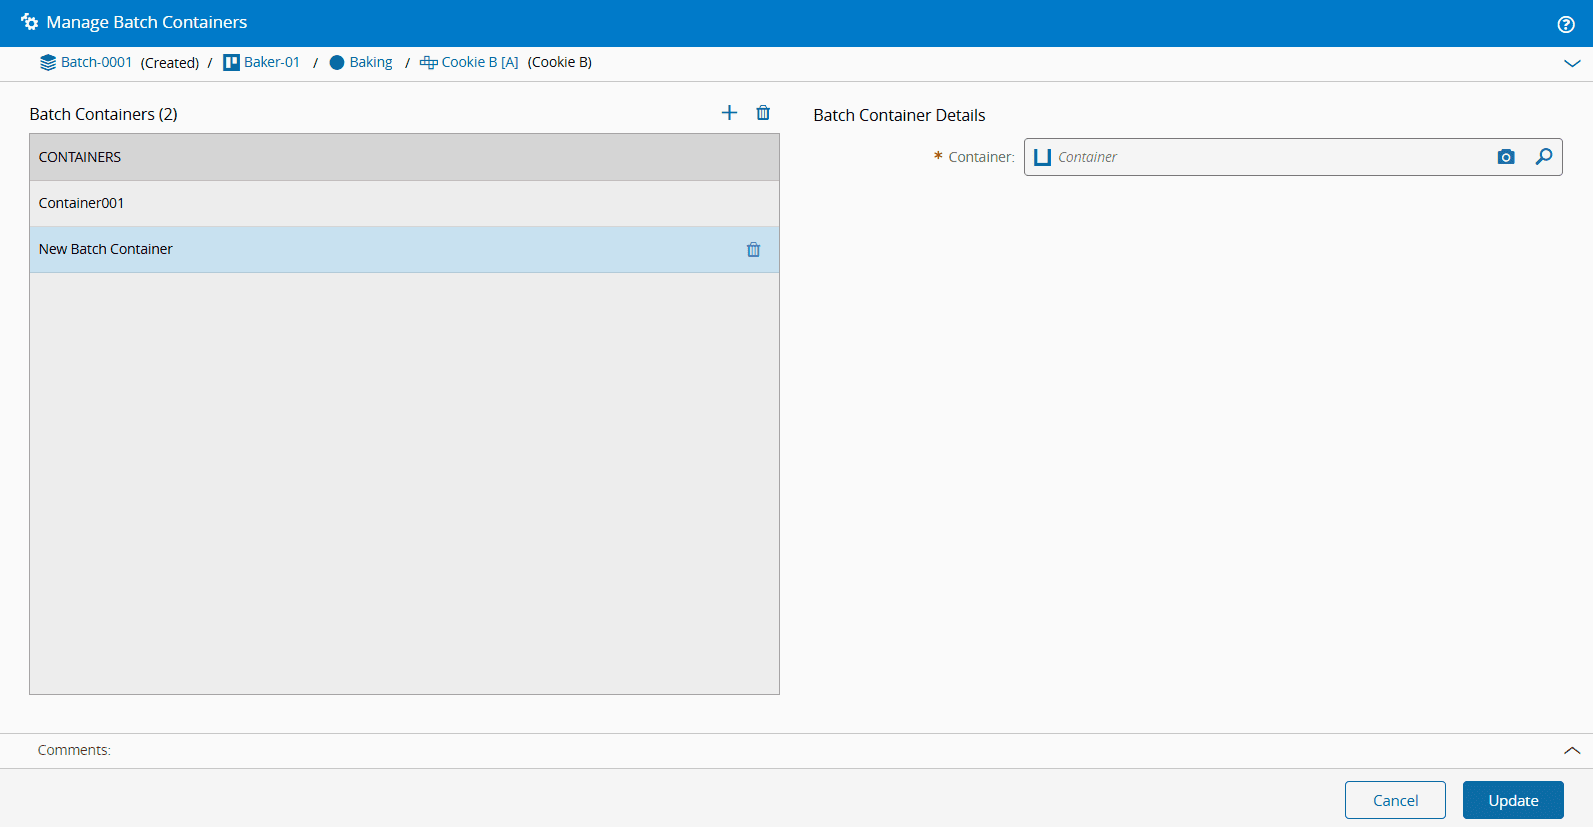
## Manage Batch Containers
Similar to Batch Materials, Containers can be managed when the Batch is in the Created state. Navigate to the Containers section and select the **Manage** button to open the [[user-guide-manage-batch-containers]] wizard. Containers can be added or removed using the :material-plus: and :material-trash-can: icons.
!!! tip
To take full advantage of the Batch management feature, see [[tutorials-managing-batch-resource-view]].