Material Defects#
Estimated time to read: 11 minutes
Material Defects in manufacturing occur when a Product is improperly manufactured and departs from its intended design. It is something or a lack of something that results in incompleteness, inadequacy, or imperfection (example: a flaw in a Product that creates an unreasonable risk of harm in its normal use).
A Material Defect in any item, whether tangible or intangible, is something that substantially prevents the item from operating or functioning according to its specifications.
Material Defects can result from the manipulation and fabrication processes of Materials, and in manufacturing, a defect, is one that the manufacturer did not intend.
Defects in Materials are known to have a negative effect on the device performance. Removing or decreasing the number of such defects is a common challenge for every industry.
Moreover, if you consider Product Policy, which ensures consistency and alignment across all stages of the lifecycle of the Product, it is important to mention that in some industries, such as the Medical Industry, some defects for specific critical Products are not acceptable, so even the possibility of managing these defects is not doable.
This document will guide you through the required configurations for the Material Defects functionality.
Overview#
The Material Defects functionality is intended to support the inspection processes in the capture of defects in a Material and by managing the lifecycle of those defects. The defects need to be recorded so that they can later be handled in a rework/repair/classification station. The concepts and functionalities of the Critical Manufacturing Material Defects functionalities will be described in more detail over the next sections.
Defect Lifecycle#
The defect lifecycle depends on the value of the system configuration entry: /Cmf/System/Configuration/MaterialTracking/Defects/ConfirmationRequired. The diagrams below illustrate how the lifecycle differs depending on whether repair confirmation is required.

When repair confirmation is required, a defect can be handled as follows:

When repair confirmation is not required, a defect can be handled as follows:
- Marked as False;
- Marked as Accepted;
- Fixed by performing a repair action (for example, replacing a part);
- Marked as Not Fixable, in which case the Material is scrapped.
Info
The handling of defects and their reclassification can have an impact on the First Pass Yield. For example, for a Product with 100 Materials of one unit each, if one Material is marked as having a defect, is then classified as repaired, and is in fact repaired, the Yield outcome of this Product is 100%, but the First Pass Yield is only 99%.
Setting up Material Defects-Related Entities#
To enable the Material Defects functionalities, you have to set up specific Critical Manufacturing MES entities.
Follow the steps as described in the table below to set up the needed Material Defects entities:
| Step Number | Step | Description |
|---|---|---|
| 1 | Create the necessary Reasons and Repair Actions | Create the necessary Defect Reasons and Repair Actions. |
| 2 | Configure the Reasons in the Steps | Configure the Defect Reasons in the Steps. |
| 3 | Configure the Products' drawings, if applicable | Configure the drawings in the Products. |
| 4 | Configure the Product Repair Policy | Define the Repair Policy of the Product if required. |
Table: Steps to set up the Material Defects-related Entities
The MES object model is displayed in the figure below:
graph LR
    A1[Step] --- N1[Defect Reason]
    A3[Product] --- N1
    N1 --- N2[Repair Action]
    A1 --- A2[Material]
    A2 --- A3
    A2 --- L1[Material Defect] --- N2
    A1 --- L2[Part Number] --- L1

classDef mermaid_title color:#000, fill:#fafafa, stroke:#fafafa, stroke-width:0x, font-size:100%, font-weight:200;
classDef mermaid_start color:#000, fill:#fafafa, stroke:#fafafa, color:#fafafa, stroke-width:0x, font-size:100%, visibility: hidden;
classDef mermaid_businessdata color:#000, fill:#65CDE8, stroke:#65CDE8, stroke-width:0px, font-size:100%;
classDef mermaid_nonbusinessdata color:#000, fill:#B7DEE8, stroke:#B7DEE8, stroke-width:0px, font-size:100%;
classDef mermaid_entity color:#000, fill:#FB9F53, stroke:#FB9F53, stroke-width:0px, font-size:100%;
classDef mermaid_entitylinked color:#000, fill:#FCD5B5, stroke:#FCD5B5, stroke-width:0px, font-size:100%;
classDef mermaid_context color:#000, fill:#B9CDE5, stroke:#B9CDE5, stroke-width:0px, font-size:100%;
classDef mermaid_optional color:#000, fill:#B7DEE8, stroke:#65CDE8, stroke-width:1px, font-size:100%, stroke-dasharray: 5 5;
class Main mermaid_entity
class A1,A2,A3,A4,A5,A6,A7,A8,A9,A10,A11,A12,A13,A14 mermaid_businessdata
class L1,L2,L3,L4,L5,L6,L7 mermaid_entitylinked
class C1,C2,C3,C4,C5,C6 mermaid_context
class N1,N2,N3,N4,N5,N6 mermaid_nonbusinessdata
Tip
It may also be helpful to look at Import Product Information and Product Page.
The next sub-sections will cover the required configuration steps in more detail.
1 - Reason#
The classification of a defect in a Material is registered under the Entity Type Reason having the Type defined as Defect.
You can define a set of Repair Actions for a Reason that are operations which can be performed in the Material in order to fix a defect. For each Repair Action, you can also define if a replacement of a part can take place, as displayed in the image below:

As can be seen, the following Part Replacement Modes are available:
- Not Allowed: you cannot select a Material to replace the defective part.
- Allowed: you are allowed to select a Material to replace the defective part.
- Required: you must select a Material to replace the defective part.
2 - Step#
After the creation of the Defect Reasons, these can be configured in the Step through the Manage Reasons wizard available in the Reasons section of the Step page, as displayed in the image below:

3 - Product#
When recording a defect it is possible to indicate the location of the defect in a CAD snapshot or a drawing. To enable this, you can configure a CAD (ECAD or MCAD) File and/or a Drawing and Schematic for the Product. Alternatively, a picture can also be provided at the time of recording the defect.
Furthermore, if a Default BOM is defined for the Product, it will be possible to replace defective parts.
Using Material Defects#
After setting up the required configurations mentioned in the previous sections, the Material Defects functionalities can be used, as described in the next sections.
Record Defect#
 MaterialDefect.Record
If a Material is in a Step with Defect Reasons defined, it is possible to record a defect through the Record Material Defects wizard available in the Defects view of the Material.
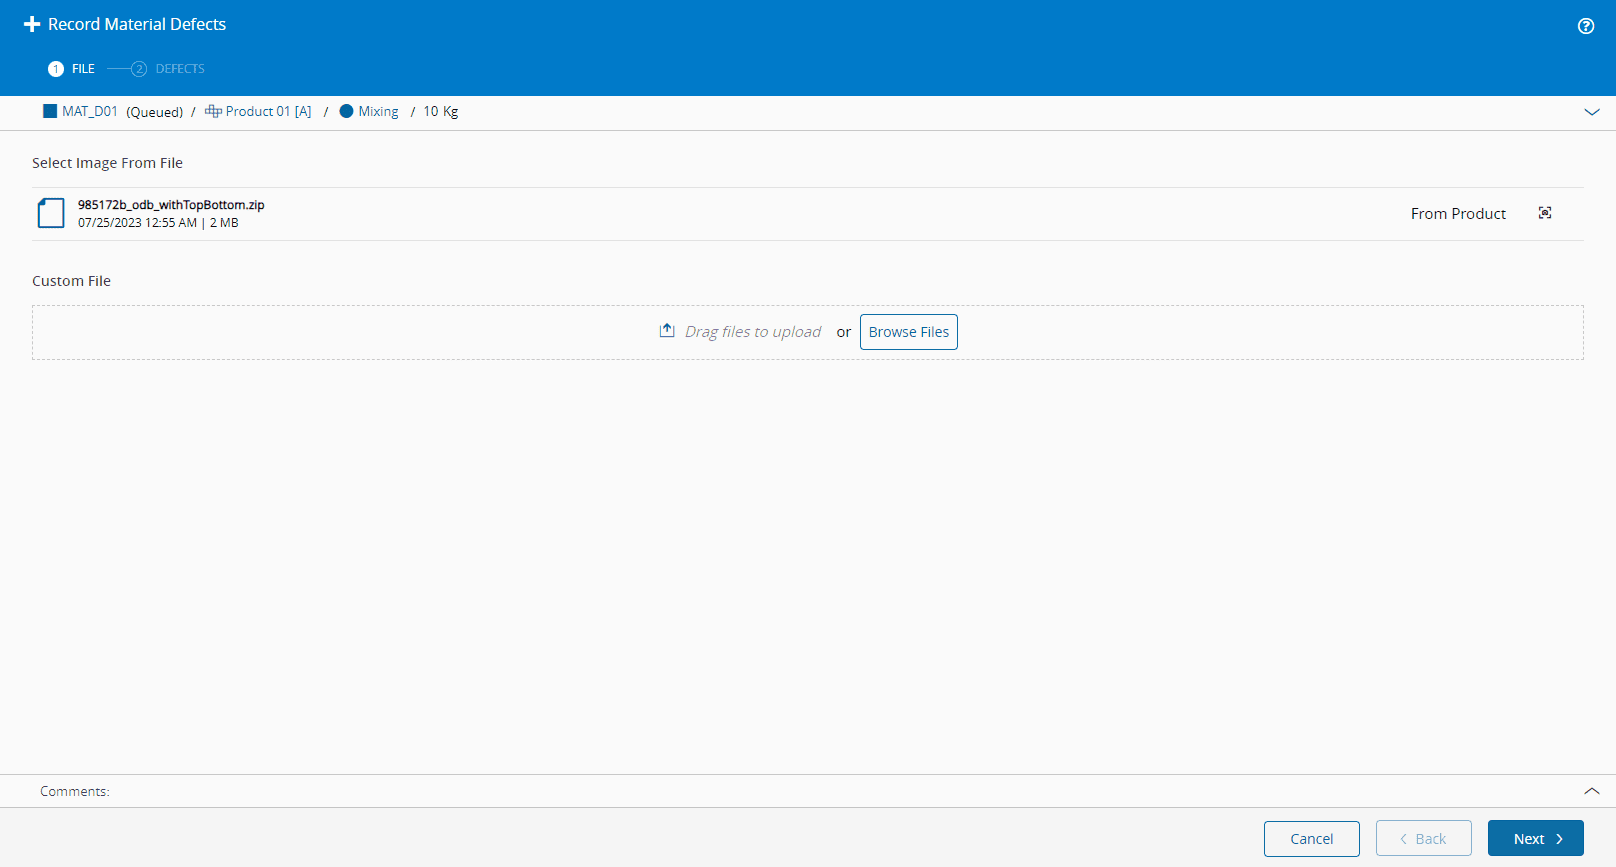
There are three options to record a defect:
-
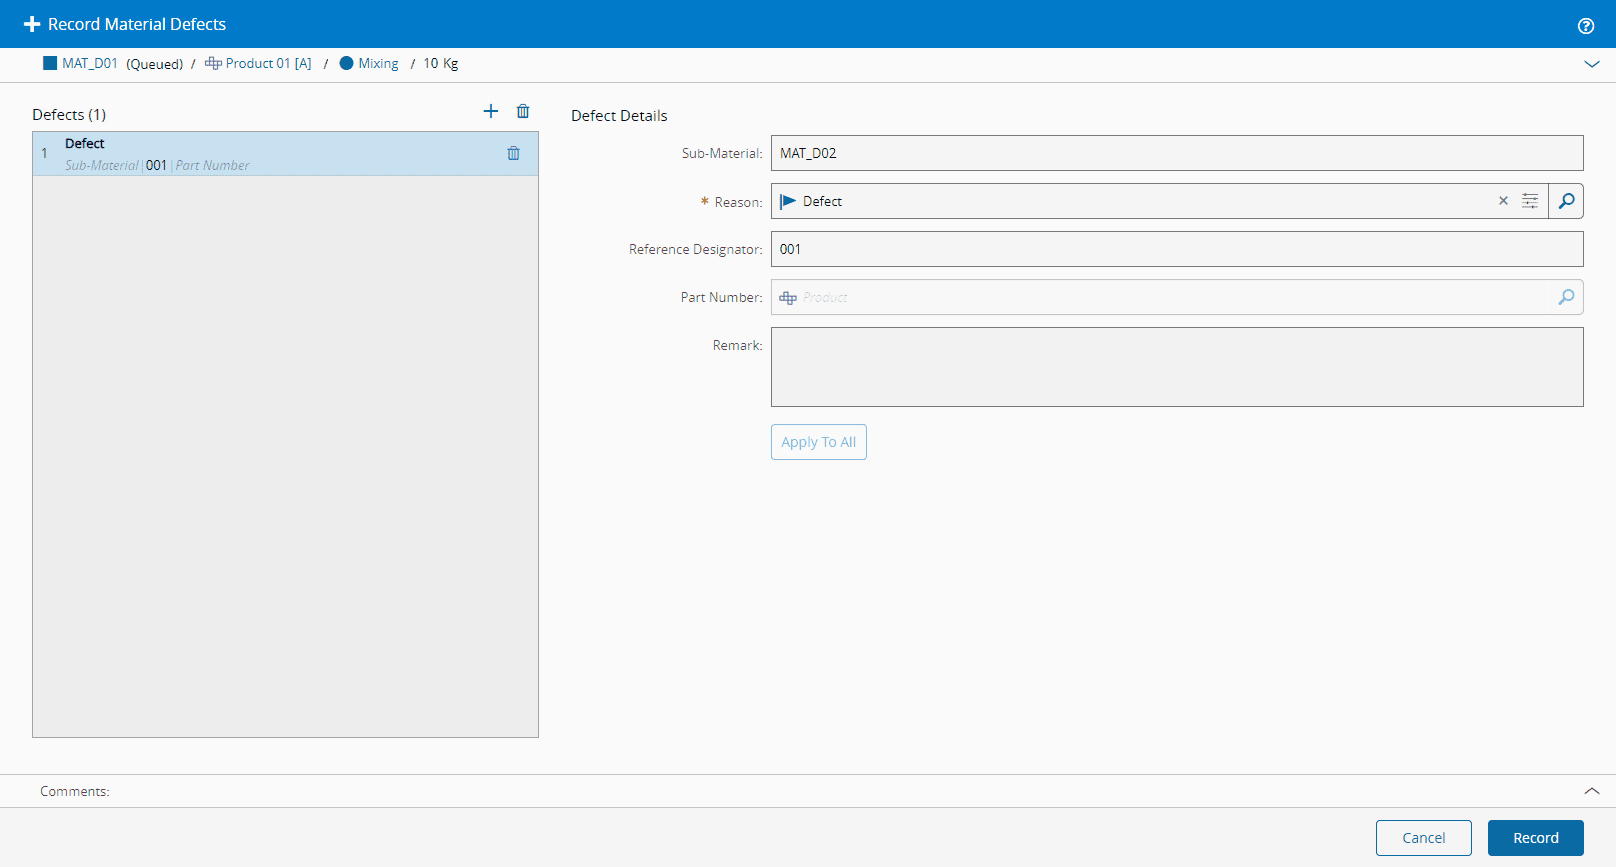
Record Using no Drawing: you specify a Sub-Material (optional), a Reason (mandatory), Reference Designator (optional), Part Number (optional), and a Remark (optional) as shown in the image below:
-
Record Using CAD - depending on the CAD Content Type (ODB++ or STEP) of the Product, the following is possible:
ECAD: you specify a Sub-Material (optional), a Reason (mandatory), Reference Designator (mandatory), Part Number (displayed upon selection of Reference Designator), Pin (optional), and a Remark (optional) as shown in the image below:

Alternatively, when the ECAD file is open, and only if it has defined Product Components, you can select the defective component, as displayed in the image below:

MCAD: you search or select a component, select on the component, specify a Reason (mandatory), Remark (optional), and a Sub-Material (optional) as shown in the image below:
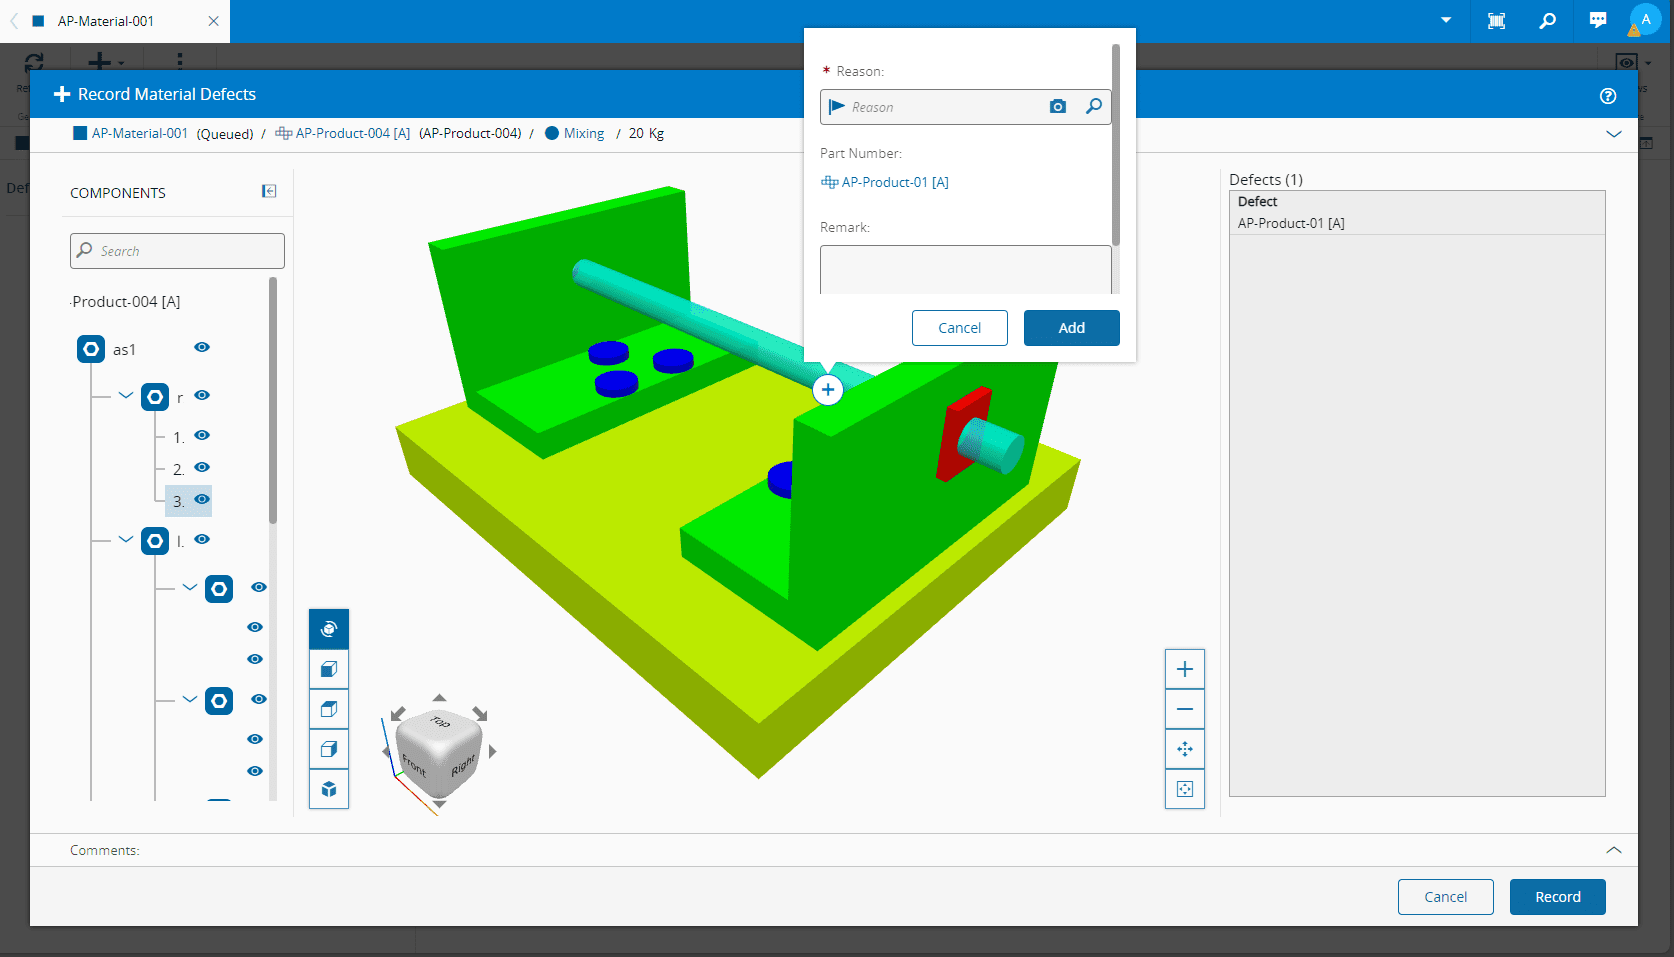
When you select Add, the defect will appear in the Defects panel on the right.
-
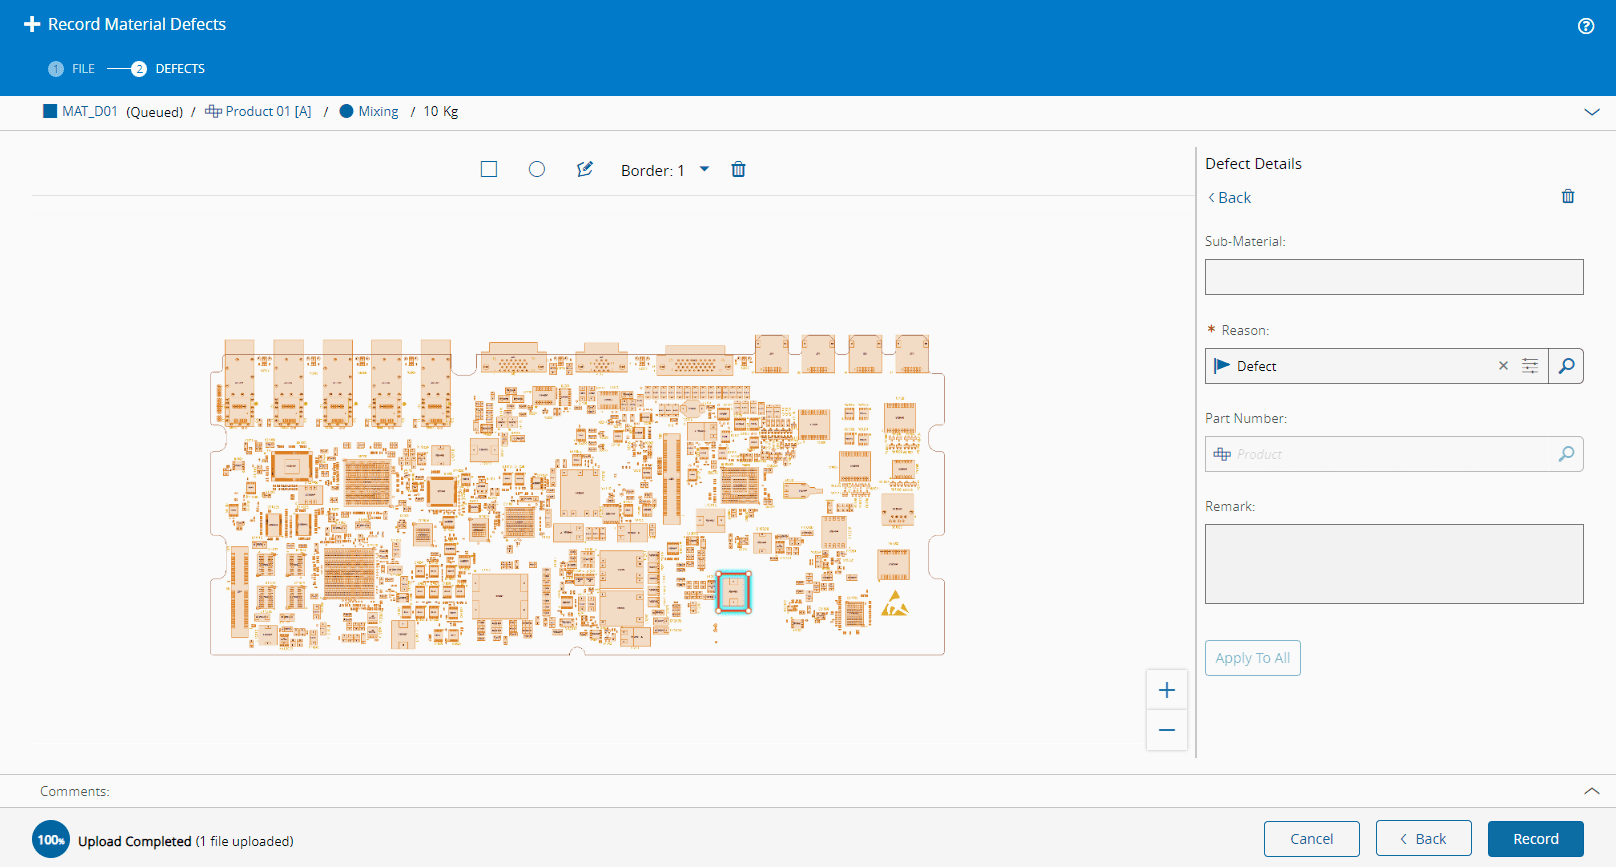
Record Using Picture: you specify a Defect Reason in a Drawing, either in a snapshot of the CAD file or in an image. The image can either be provided by the Drawings linked to the Product of the Material or provided when recording the defect, as displayed in the image below:
In the Drawing, it is possible to select where the defect is found by using either a pre-defined shape, such as a square or circle, or you can draw a specific shape, as displayed in the image below:
Info
Depending on the Record Defect option, you may need to have the Default BOM set as well as the Product Components.
For more information, see Record Material Defect.
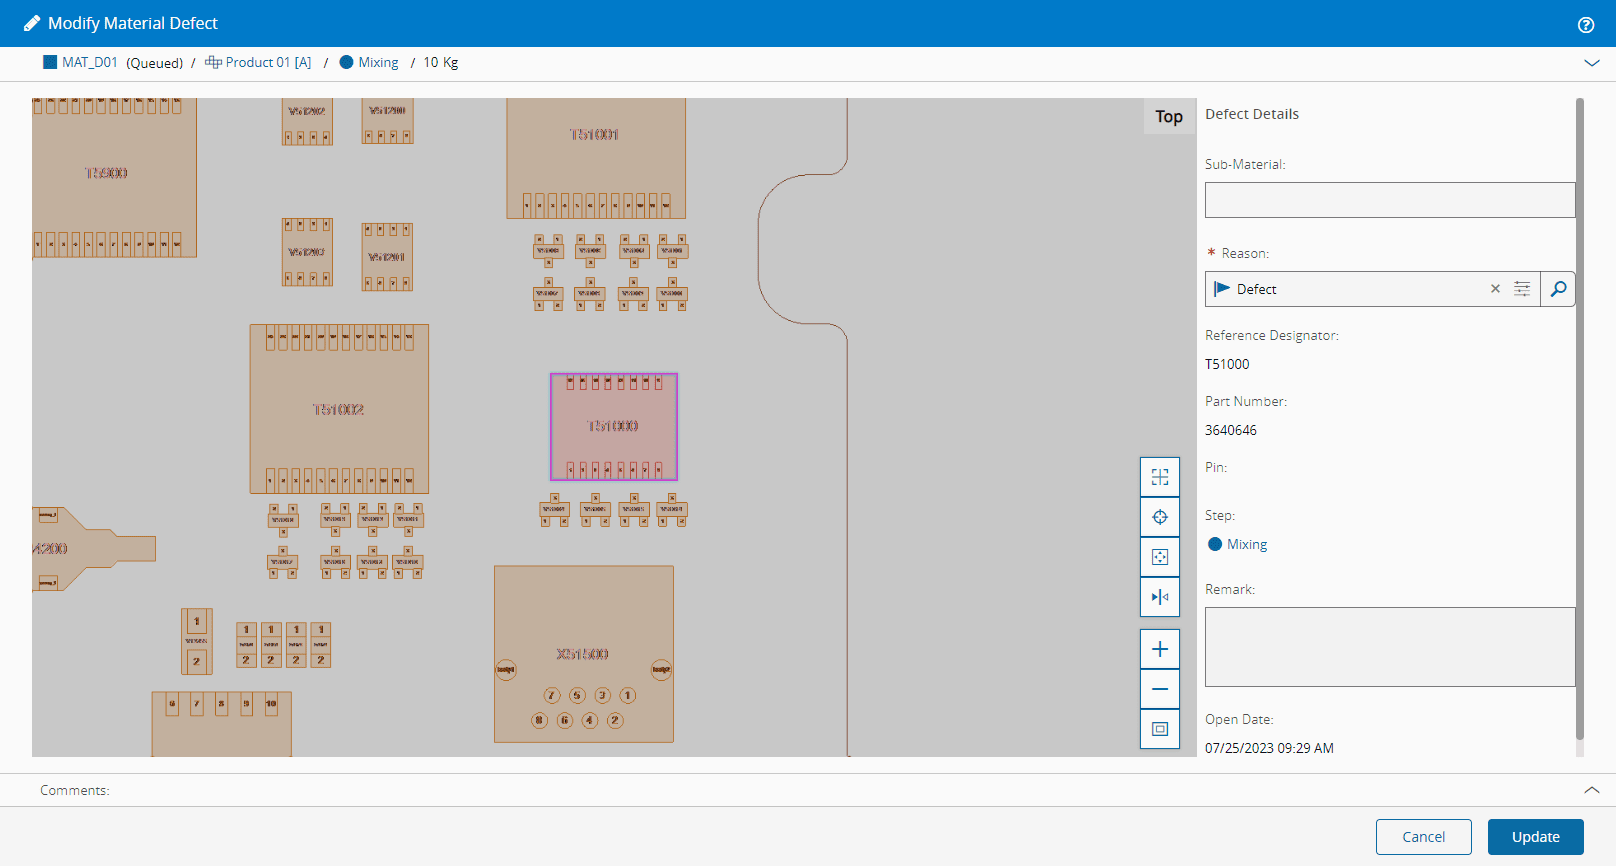
Modify Defect#
MaterialDefect.Edit
If you want to change the information of the defect, it can be done through the Modify Material Defect wizard as displayed in the image below:
Mark as Confirmed#
MaterialDefect.MarkAsConfirmed
This operation is available only when the /Cmf/System/Configuration/MaterialTracking/Defects/ConfirmationRequired system configuration entry is set to true. If this setting is enabled, you must mark the defect as confirmed before a repair operation can be performed. All other defect-handling operations remain available while the defect is in the Open state.
The defect can be confirmed using the Mark Material Defect as Confirmed wizard, as displayed in the image below:

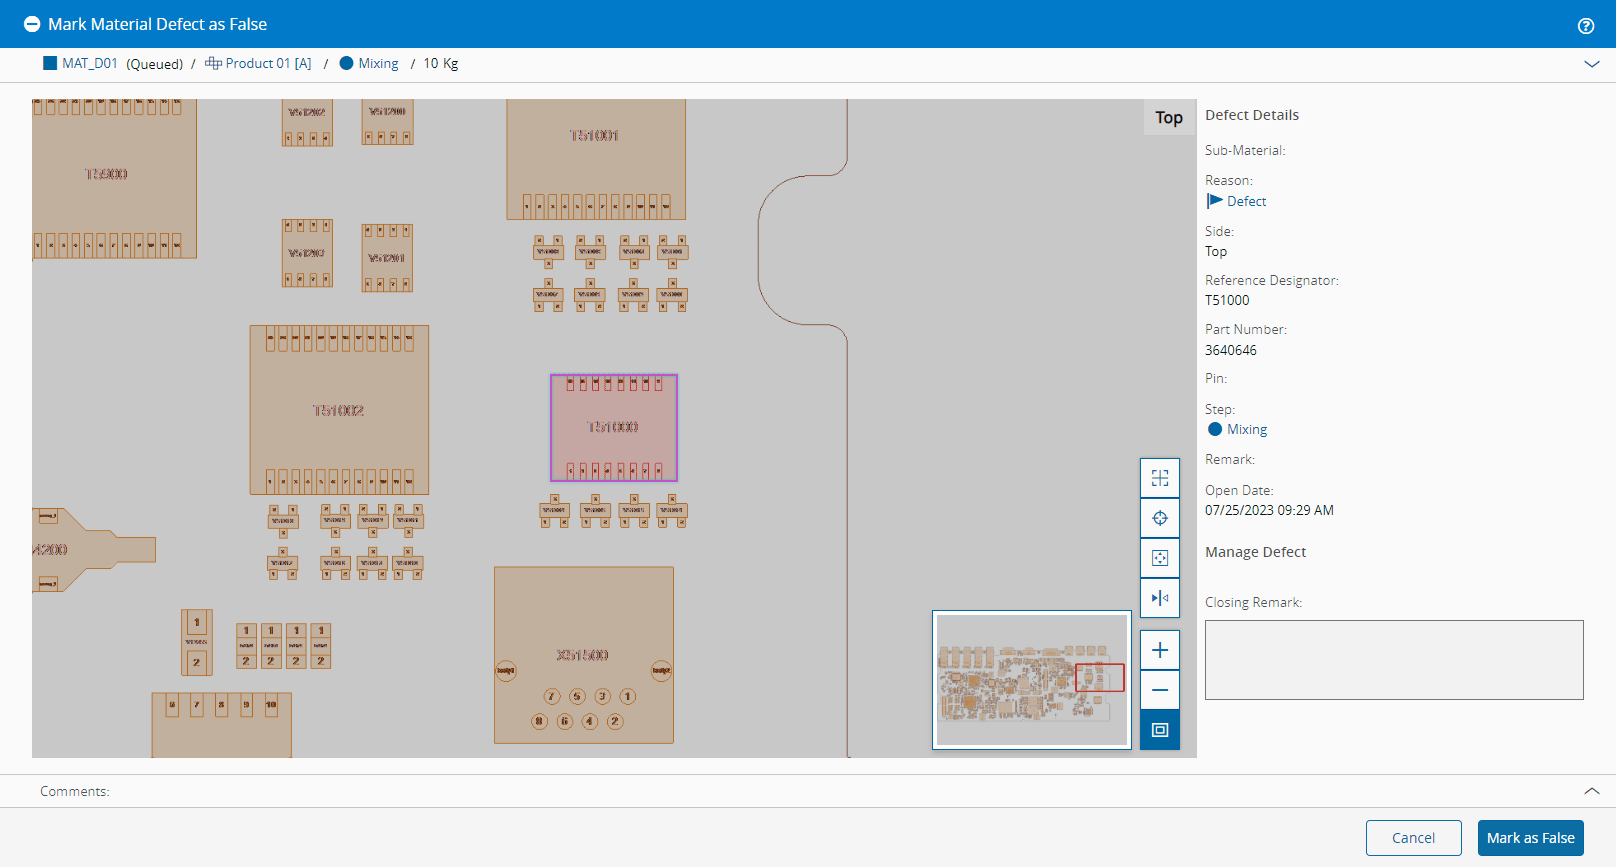
Mark as False#
MaterialDefect.MarkAsFalse
If a defect is identified as a false defect - that is, it has been opened in error, it can be closed through the Mark Material Defect as False wizard, as displayed in the image below:
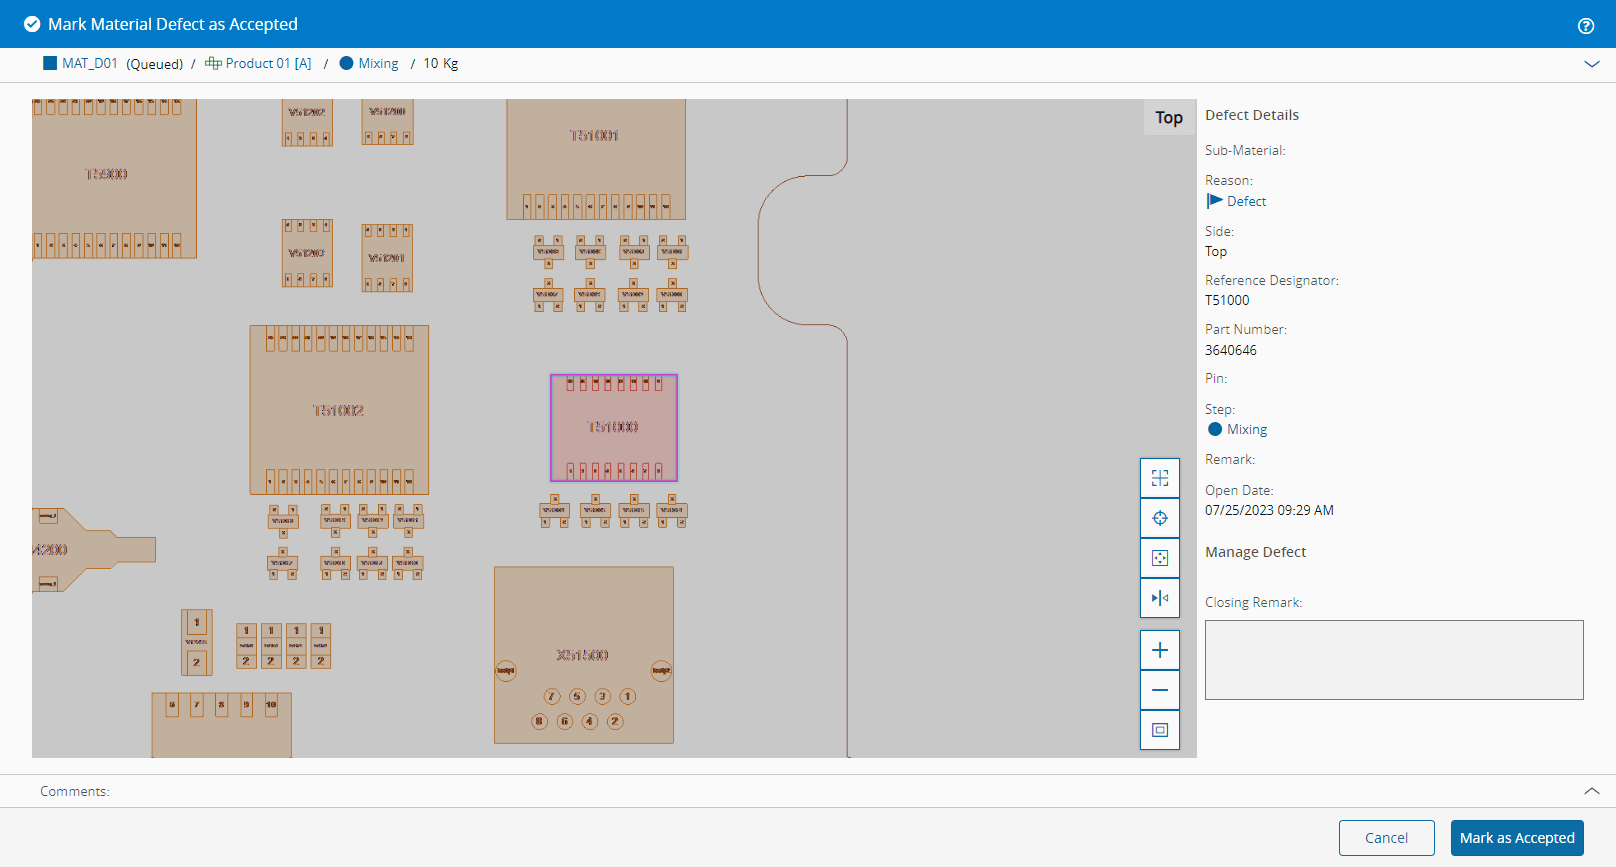
Mark as Accepted#
MaterialDefect.MarkAsAccepted
If you want to acknowledge and accept the defect as-is, it can be accepted using the Mark Material Defect as Accepted wizard, as displayed in the image below:
Repair Defect#
MaterialDefect.Repair
If the /Cmf/System/Configuration/MaterialTracking/Defects/ConfirmationRequired system configuration entry is set to true, the defect must be marked as confirmed.
To fix a defect, you can access the Repair Material Defect wizard and select a Repair Action, as displayed in the image below:
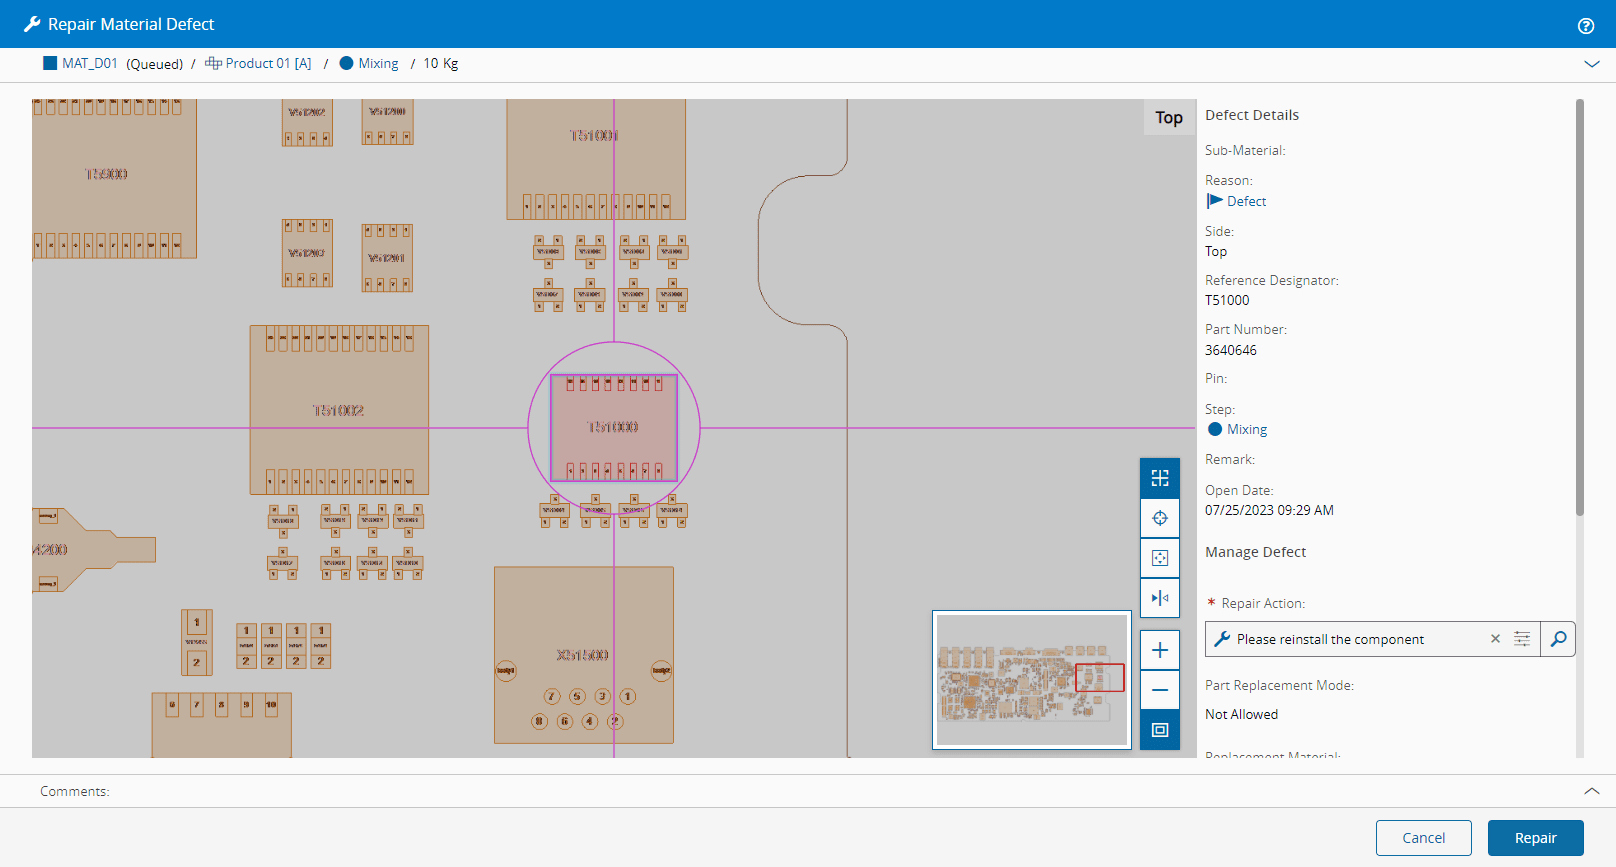
Depending on the Parts Replacement Mode of the Repair Action, you can (or must) select a Replacement Material. The Materials available for selection must have the same Product as the Material Defect Part Number and they must be in the same Facility as the Material being fixed.
Info
The Repair Actions available for selection are the ones defined in the Defect Reason of the defect.
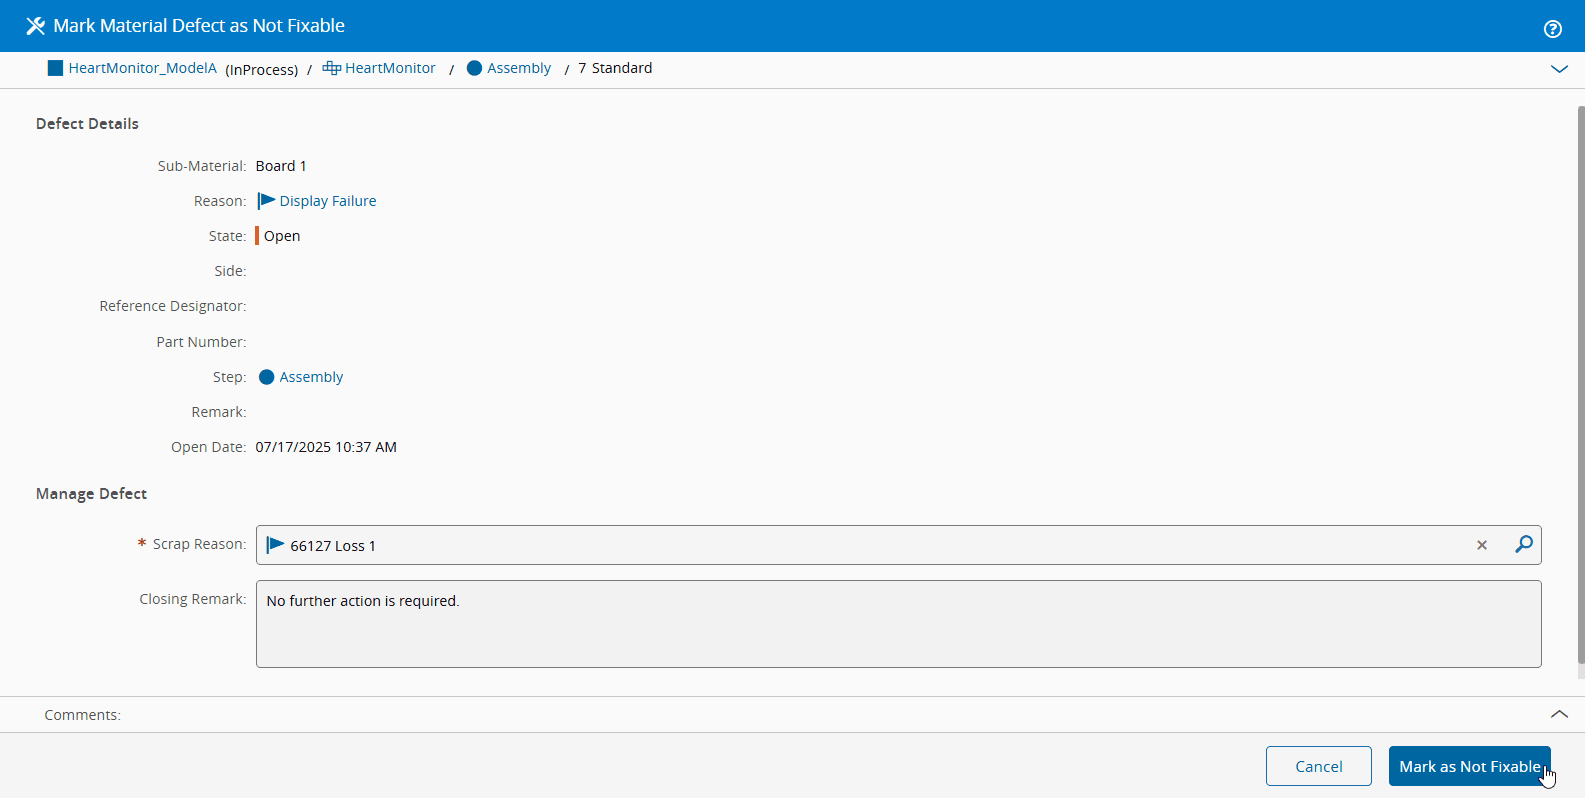
Mark as Not Fixable#
MaterialDefect.MarkAsNotFixable
If the defect cannot be fixed, it can be marked as non-fixable using the Mark Material Defect as Not Fixable wizard, as displayed in the image below.
Info
If the defect applies to an existing Sub-Material Id, the loss will be applied to the Sub-Material only, and the Sub-Material will be terminated. If the defect applies to a virtual Sub-Material, a loss of one unit will be recorded on the Parent Material. For more information, see Mark Material Defect as Not Fixable.
Warning
A Material with active defects can continue to be processed, but it cannot be shipped until all the defects have been duly reclassified.