New Product Introduction (NPI)#
Estimated time to read: 14 minutes
New Product Introduction (NPI) is one of the fundamental concepts of manufacturing because it is the process of establishing a clear plan to take your product from its conceptualization to its final form. This process involves various stages, that may be different from project to project, but the end results are to reduce waste, avoid miscommunication, speed up production, and save time.
The Critical Manufacturing MES NPI module helps you achieve this by supporting the loading, association and visualization of an ECAD file of type ODB++ with a Product, and by supporting the loading of a Product BOM file with the component information.
Info
NPI is a separately licensed module.
This document will guide you through the required configurations for the NPI functionalities.
Overview#
While manufacturing a product, it is a common practice to display technical drawings and schematics to assist the operator throughout the production process. Critical Manufacturing MES can help to associate the drawings to the products and to display these drawings when assembling the product. The concepts and functionalities of the Critical Manufacturing MES NPI module will be described in more detail over the next sections.
Concepts#
The table below describes the main concepts related to New Product Introduction.
| Concept | Description |
|---|---|
| ECAD | ECAD (electronic computer-aided design) software is used to design and create electronic structures. Typically consists of multiple 2D layers. Some CAD files are very basic and only contain the drawings - in this case, separate additional files (centroid and BOM File) are required. Some CAD files are more advanced and they contain the layout, the list of components as well as the component placement information, Pin, and Net information. |
| MCAD | MCAD (mechanical computer-aided design) is used to design and create mechanical systems. MCAD can be used for previewing various design iterations, including assessing form factors and the fitment of certain physical elements. |
| Schematic | A schematic is a representation of the elements of a system using abstract, graphic symbols rather than realistic pictures. A schematic usually omits all details that are not relevant to the key information the schematic is intended to convey and may include oversimplified elements in order to make this essential meaning easier to grasp. |
| Drawing | A drawing (technical drawing) is used to convey information about an object. A common use is to specify the geometry necessary for the construction of a component and is called a detailed drawing. |
| Layer | There are multiple layers in an ECAD, some refer to the top side and others to the bottom side. |
| Component | A part used in an MCAD model, that is part of the BOM for a higher-level part. |
| Reference Designator | A Reference Designator identifies a component within an electrical schematic or on a printed circuit board. The Reference Designator usually consists of one or two letters followed by a number (accepts numbers, letters, underscores or dots, but not spaces). |
Table: New Product Introduction main concepts
Setting up New Product Introduction Related Entities#
To enable the New Product Introduction functionalities, it is necessary to set up the Critical Manufacturing MES entities.
Note
Take the following example: you aim to set-up a new Product for manufacturing, Product A. To manufacture Product A, you have to create the required Products, BOMs and Checklists.
The CAD and BOM files should already be available.
In order to set up the NPI-related Entities it's necessary to follow the steps as described in the Table below.
| Step Number | Step | Description |
|---|---|---|
| 1 | Create the necessary Products | Create the necessary Products and define their CAD, BOM, Schematic, and Drawing files. |
| 2 | Create the necessary BOMs | Create the necessary BOMs. |
| 3 | Create the necessary Checklists | Create the necessary Checklists for the manufacturing steps. |
Table: Steps to setup the NPI-related Entities
The MES object model is displayed in the figure below.
graph LR
    L1[Checklist Item] --- A1[Checklist]
    A1 --- A2[BOM]
    A2 --- A3[Product]
    A2 --- A4[BOM Product]
    A3 --- N1[Product Component]
    N1 --- N2[Product Component Location]
    A3 --- N2

classDef mermaid_title color:#000, fill:#fafafa, stroke:#fafafa, stroke-width:0x, font-size:100%, font-weight:200;
classDef mermaid_start color:#000, fill:#fafafa, stroke:#fafafa, color:#fafafa, stroke-width:0x, font-size:100%, visibility: hidden;
classDef mermaid_businessdata color:#000, fill:#65CDE8, stroke:#65CDE8, stroke-width:0px, font-size:100%;
classDef mermaid_nonbusinessdata color:#000, fill:#B7DEE8, stroke:#B7DEE8, stroke-width:0px, font-size:100%;
classDef mermaid_entity color:#000, fill:#FB9F53, stroke:#FB9F53, stroke-width:0px, font-size:100%;
classDef mermaid_entitylinked color:#000, fill:#FCD5B5, stroke:#FCD5B5, stroke-width:0px, font-size:100%;
classDef mermaid_context color:#000, fill:#B9CDE5, stroke:#B9CDE5, stroke-width:0px, font-size:100%;
classDef mermaid_optional color:#000, fill:#B7DEE8, stroke:#65CDE8, stroke-width:1px, font-size:100%, stroke-dasharray: 5 5;
class Main mermaid_entity
class A1,A2,A3,A4,A5,A6,A7,A8,A9,A10,A11,A12,A13,A14 mermaid_businessdata
class L1,L2,L3,L4,L5,L6,L7 mermaid_entitylinked
class C1,C2,C3,C4,C5,C6 mermaid_context
class N1,N2,N3,N4,N5,N6 mermaid_nonbusinessdata
The next sub-sections will cover the required configuration steps in more detail.
1 - Product#
When preparing a Product for production, you can define a Default BOM and it will be used to display the complete Product BOM tree structure by linking the different Product Default BOMs.
Note
For the above-mentioned example, you should create Product A and the Parts required for assembling it.
CAD File Support#
Drawings and Schematics are key for the manufacturing of a product in many assembly and electronics industries. To achieve this, you can upload ODB ++ ECAD files in MES. Currently, the system only supports this file type, however, in the future, further file types will be supported.
The CADFileInformation Generic Table will be used to maintain general information of imported CAD files. The structure of this table is described in the Table below.
| Property | Description | Data Type |
|---|---|---|
| File Type | The name of the File Type | String, Mandatory |
| File Extensions | A semi-colon separate list of possible file extensions for the given File Type | String, Mandatory |
| Content Type | Content of the FileType | Enumeration, Mandatory: - MCAD - ECAD |
| Includes BOM Information | Specifies whether the File Type contains BOM Information embedded within it | Boolean, Mandatory |
| Includes Reference Designator Information | Specifies whether the File Type contains Reference Designator information embedded in it Note: this applies to ECAD files only | Boolean, Mandatory |
| Includes Component Location | Specifies whether the File Type contains Component Location information embedded in it Note: this applies to ECAD files only | Boolean, Mandatory |
Table: Generic Table CAD File Information properties
Import Product Information#
You can link to the Product ECAD, BOM, Drawings, and Schematics files. Thus, on the creation of a Product, you can access the Import Product Information wizard, displayed in the Figure below, and define the properties listed in the Table below.
| Property | Description |
|---|---|
| CAD Type | The Product CAD file type. Currently, only the ODB ++ format is supported. |
| CAD File | To store the Product CAD file. |
| Panel Type | The Panel Type can be set for ECAD only and it defines whether the Product is single-sided or double-sided. This information is only for reference. |
| Import BOM Information | Whether the BOM information will be imported from the CAD file. |
| Import Component Location Information | Whether the Component Location information will be imported from the CAD file. |
| BOM File | To store the Product BOM file, in case it’s not included in the CAD file. The BOM File is parsed according to the File Import Template Generic Table definition. |
| List Separator | The Separator used within the BOM file (Comma or Semicolon). |
| Schematic | A Schematic is a representation of the elements of a system. |
| Drawing | A Drawing is a type of technical drawing that is used to convey information about a Product. |
Table: Import Product Information properties

If you select a BOM file, the Product Components can be previewed by selecting the Preview button, as displayed in the Figure below. For the required structure of the BOM File please check the BOM File Support sub-section below.

The Product Components are listed under the Components section available in the Product Details view, as displayed in the Figure below.

Note
For the given example, you should upload for Product A and for the Products of the Parts required for assembling it: the CAD file, the BOM file, and any relevant Drawings and Schematics.
To perform automatic column mapping of specific file headers and standard system properties, the system uses the FileImportInformation, FileImportPropertyInformation, and FileImportColumnInformation Generic Tables as described in the Tables below.
| Property | Description | Data Type |
|---|---|---|
| Entity Type | Describes for which Entity this information applies to | Reference to an Entity Type - mandatory |
| Type | Describes the information type to import | Enumeration, Mandatory: - BOM - Centroid - CAD |
| Is Enabled | Defines whether the import is enabled for this information type | Boolean, Mandatory |
Table: Generic Table File Import Information properties
| Property | Description | Data Type |
|---|---|---|
| Entity Type | Describes to which Entity Type this information applies | Entity Type, Mandatory |
| Type | Describes the information to be imported | Enumeration, Mandatory: - BOM - Centroid This must be a list of known types |
| Property | The name of the system property | String, Mandatory |
| Data Type | The property data type | Enumeration, Mandatory |
| Enumeration Name | The enumeration name | Boolean, Optional |
| Is List | Whether the property is a list or not | Boolean, Mandatory |
| Is Mandatory | Whether the property is mandatory or not | Boolean, Mandatory |
Table: Generic Table File Import Property Information properties
| Property | Description | Data Type |
|---|---|---|
| Entity Type | Describes for which Entity this information applies to | Reference to an Entity Type - mandatory |
| Type | Describes the information type to import | Enumeration, Mandatory: - BOM - Centroid This must be a list of known types, same as File Import System Properties |
| Header | Name of the file column header | String, Mandatory |
| System Property | Name of the system property | String, Mandatory |
Table: Generic Table File Import Column Information properties
BOM File Support#
Currently, Critical Manufacturing MES provides support for BOMs in CSV format.
The CSV file has to meet some structure requirements, as described in the Table below. Those are defined for the BOM entity, under the FileImportPropertyInformation Generic Table.
Info
In the CSV file, the headers must be set and defined in the first row. You can set any order for the columns and there is no culture when importing the CSV file.
| Property | Description | Data Type |
|---|---|---|
| Item Number | The BOM item number | Number, Mandatory |
| Reference Designator | A list of reference designators, mandatory for ECAD files. Separate by “spaces” or “,” and use “-” for ranges. | String, Optional |
| Description | The description of the component | String, Optional |
| Quantity | The BOM item quantity | Long, Mandatory |
| Internal Part Number | The internal part number of the component | String, Optional |
| Manufacturer | The manufacturer | String, Optional |
| Manufacturer Part Number | The manufacturer part number | String, Optional |
| Footprint | The geometry of pads for soldering certain electronic components SMT Specific | String, Optional |
Table: BOM CSV file properties
Note
For the given example, the BOM file for Product A would have the following information:
| Item Number | Internal Part Number | Description | ReferenceDesignator | Quantity | Manufacturer | Manufacturer Part Number | Footprint |
|---|---|---|---|---|---|---|---|
| 1 | CS-2412 | Part A top | C28 C30 C36 C44 C53 C82 | 6 | Manufacturer A | Manufacturer A C0603C0G1E100D030BA | footprint 1 |
| 2 | CS-2482 | Part B bottom | C32,C33,C34 | 3 | Manufacturer B | Manufacturer B GRM0335C1H470JA01D | - |
| 3 | CS-2408 | Part C side | C1-6 Z1 R102 | 8 | Manufacturer A | Manufacturer A C0603X5R1C104K030BC | footprint 1 |
Table: BOM file example
2 - BOM#
When creating a BOM with Scope Materials or Weigh & Dispense it is possible to define the properties listed in the Table below.
| Property | Description |
|---|---|
| Product | The selected Product will allow to link the BOM to that specific Product and to re-use the Product CAD, Drawing, and Schematic files. |
| Drawing File | You can add a Drawing file. |
Table: BOM properties
For each BOM Item of a BOM with Scope Materials it is possible to define a Reference Designator. This only applies to BOMs that reference a Product that contains an ECAD file.
Note
For the given example, you should create the BOMs required for assembling Product A and for assembling the Parts of Product A.
3 - Checklist#
When processing a Material at a certain Step, you might require some visual aid in order to guide him/her throughout the operation's steps. This can be attained by having an instruction displayed when performing a Checklist. The properties to be configured are detailed in the Table below.
| Property | Description |
|---|---|
| Scope | The Scope must be defined as Material Tracking. |
| Execution Mode | The Execution Mode must be defined as Long Running. |
| BOM | The BOMs available for selection have the Type defined as Materials or Weigh & Dispense. |
Table: Checklist properties
Note
For the given example, you should create the Checklists to guide yourself when assembling Product A and when assembling the Parts of Product A.
Diagram#
It is possible to define a Diagram for a Checklist Item, example, a file that provides instruction with some sort of visual aid for you when performing the Checklist.
The BOM property Drawing File and the Product properties CAD File, Schematic, and Drawing are available for selection if a BOM is defined for the Checklist and this BOM as a Product defined, as displayed in the Figure below.

For dynamic files (example: CAD), you needs to take a snapshot from the CAD viewer to use as a static image and to be able to add annotations, as displayed in the Figure below.

It is also possible to configure annotations and add ../../images for files or snapshots through the Add Annotations wizard available in the Diagram tab of the Checklist Item, as displayed in the Figures below.


Using New Product Introduction#
After setting up the required configurations mentioned in the previous sections, the NPI functionalities can be used, as described in the next sections.
CAD Visualization#
If a Product has a CAD file defined, the CAD view will become available, as displayed in the Figure below.
On the right-hand side of the screen it possible to show/hide layers. On the left-hand side of the screen, it is displayed the Product tree, with the Product Components and Reference Designators and it is also possible to select a Reference Designator that will be highlighted in the CAD drawing. By double-clicking on a Reference Designator in the CAD drawing, the Reference Designator name will be highlighted in the Product tree.

Product BOM Structure Visualization#
If a Product has a Default BOM defined, the BOM Structure view will become available, as displayed in the Figure below. If the BOM Items of the Product also have a Default BOM defined, their BOM Items will be displayed as well.

Perform Checklist#
When performing a Checklist, if a Diagram is defined, it will appear together with the defined annotations, as displayed in the Figure below.

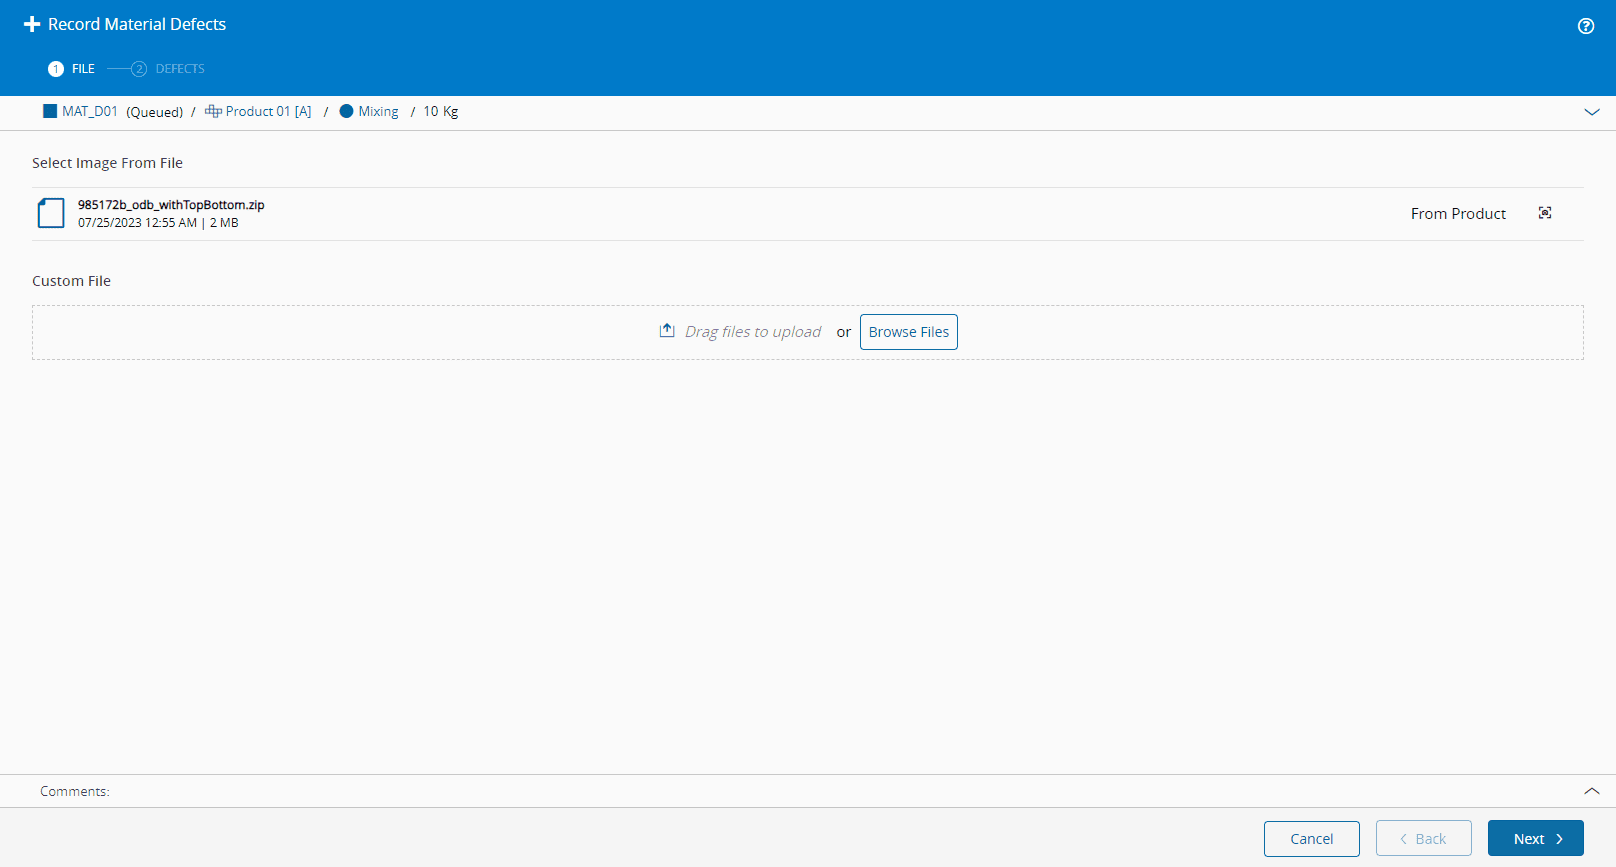
Record Material Defect using Picture#
When recording a Defect for a Material, you can specify a Defect Reason in a Drawing, either in a snapshot of the Product CAD file or in an image. The image can either be provided by the Drawings linked to the Product of the Material or provided when recording the Defect, as displayed in the Figure below.
Info
For further information, see the Material Defects Tutorial.