Transaction#
The Transaction Tasks can be categorized as Execution Action, Message Bus, or Service Call. Each type is further explained in the sections below.
Execution Action#
The Execution Action Task provides a simple way to execute a DEE Action. To configure an Execution Action, you need to provide a name and, optionally, a description. Additionally, you can customize its behavior by adjusting the following settings:
- Auto Refresh - When enabled, the page will automatically update its data at defined intervals. You can set the specific interval according to your needs. The default setting is
false. - Retrieve Data on Start - When enabled, the system will fetch and display relevant data as soon as the page loads. The default setting is
true. - Retrieve Data on Changes - When enabled, the system will update the data displayed whenever there are changes. The default setting is
true. - DEE Action - Specifies which DEE Action in the MES system to use.

For some DEE Actions, you will need to specify inputs, outputs, or both. The fields you need to configure are:
- Name - This field must be unique to each input or output.
- Friendly Name - You can provide a more user-friendly name for the input or output. This name will be displayed in place of the technical name, making it easier for users to understand its purpose.
- Type - Choose the appropriate data type for the input or output. There are several available types, including Boolean, DataGroup, EntityType, Integer, JSON, StateModel, String, among others.
- Collection type - Specify the collection type if the input or output is not a single value. The options are: Array, Map, or None.
- Default value - You can define a default value that will be used if no specific value is provided, ensuring the correct execution of the DEE Action.


If the input or output Type is ReferenceType, and it is one of the following: EntityType, File, Lookup Table, Lookup Value, Query, Role, State Model, or User, you have the option to create a new instance of this value using the New instance toggle button.

It is possible to pass DEE Inputs and Outputs directly as a dictionary. However, any input defined by the user overrides the values defined in the Input map.
For example, if you provide an input whose name matches a key in the Input map, that value will replace the existing one in the map - even if the provided value is null.

Message Bus#
The Message Bus Task operates over the Message Bus communication layer, allowing you to publish messages, send messages with a request for a reply, and subscribe to specific subjects. To configure a Message Bus Task, provide a name and, optionally, a description. You can also customize its behavior by adjusting the following settings:
- Auto Refresh - When enabled, the page will automatically update its data at defined intervals. You can set the specific interval according to your needs. The default setting is
false. - Retrieve Data on Start - When enabled, the system will fetch and display relevant data as soon as the page loads. The default setting is
true. - Subject - Define the subject to subscribe to or publish messages.

Service Call#
The Service Call Task can be used to execute a Service Call, providing input and gathering the output. To configure this task, you need to provide a name and, optionally, a description. Additionally, you can customize its behavior by adjusting the following settings:
- Auto Refresh - When enabled, the page will automatically update its data at defined intervals. You can set the specific interval according to your needs. The default setting is
false. - Retrieve Data on Start - When enabled, the system will fetch and display relevant data as soon as the page loads. The default setting is
true. - Retrieve Data on Changes - When enabled, the system will update the data displayed whenever there are changes. The default setting is
true. - Show Feedback Messages - Provides user feedback about the data retrieval process. The default setting is
false. - Show Error Feedback Messages - Alerts users to errors encountered during data retrieval. The default setting is
false.

The Service Call task includes a Setup tab, where you can select from existing services. Services are organized into categories, and within each category, you will find all related services. Each service has a Details page with general information, inputs it receives, and outputs it sends.

Real Use Cases#
Execute Action on a UI Wizard#
This example demonstrates how to execute a custom DEE Action, using the Execute Action Task, from a UI Wizard.
-
Create a custom DEE Action, that will retrieve two input parameters - a string and an integer - from the UI, and return them as output values in a dictionary.
Example DEE Action:
-
Create a UI Page. Choose a clear name and set the UI Type to
Wizard.
-
Add a Task to the UI Page. Choose the Settings button on the top ribbon, navigate to the Tasks tab, select the icon to add a new Task, and provide the following details:
- Name -
Transaction Service Call - Type -
Execute Action - DEE Action -
ExecuteActionExample

- Name -
-
Add a Form widget and, in the Fields tab, select the icon and define:
- Name -
String - Value Type -
String

- Name -
-
In the same Form widget, add another field:
- Name -
Integer - Value Type -
Integer

- Name -
-
Connect the Form and the Task by dragging the Form widget and the Transaction Service Call to the Links diagram.
-
Configure the Task Inputs by going to the Settings of the Transaction Service Call, and in the Inputs tab, select the icon, and define:
- Name -
Integer - Type -
Integer

- Name -
-
Then, navigate to the Links tab, select the dropdown, choose Link, and define:
- Source -
Form - Output -
String Change - Target -
Transaction Service Call - Input -
Input

- Source -
-
In the link you just configured, add a new Converter by selecting dropdown, choose Converter, and define:
- Converter -
Set Value in Map - Key (Static) -
String

- Converter -
-
Add another link, with the following parameters:
- Source -
Form - Output -
Integer Change - Target -
Transaction Service Call - Input -
Integer

- Source -
-
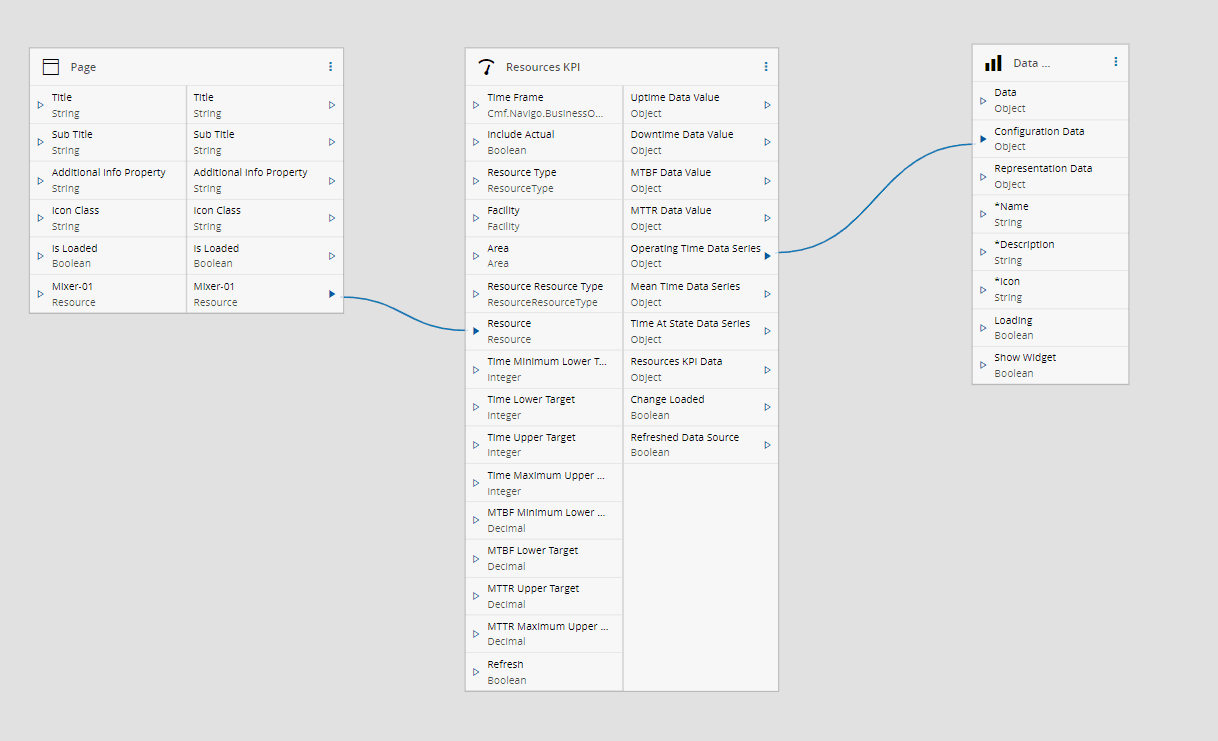
In the end, your Links diagram should resemble the image below.

-
Finally, test the UI Wizard. Save the UI Page and open the browser DevTools network tab.
- Enter a string in the first field (for example,
test). - Enter a number in the second field (for example,
12). - Select Finish to trigger the wizard action.
You will see the ExecuteAction task in the network requests. Inspect the response payload to confirm the data was processed as expected.
Watch the video below to see this use case in action.
<iframe src="https://customer-40kvzg4z7gkyofrp.cloudflarestream.com/9dde18ea05b7105e0365ea4c1f578ea6/iframe?poster=https%3A%2F%2Fcustomer-40kvzg4z7gkyofrp.cloudflarestream.com%2F9dde18ea05b7105e0365ea4c1f578ea6%2Fthumbnails%2Fthumbnail.jpg%3Ftime%3D%26height%3D600" loading="lazy" style="border: none; position: absolute; top: 0; left: 0; height: 100%; width: 100%;" allow="accelerometer; gyroscope; autoplay; encrypted-media; picture-in-picture;" allowfullscreen="true" - Enter a string in the first field (for example,
Download Example
You can download the complete UI Page of this example and import it directly into your environment here. For more information, see Import/Export UI Page.
Execute Action on a UI Page#
This example shows how to execute a System DEE Action (CalculateMaterialQuantity) in a standard UI Page.
-
Create a UI Page, choose a clear name, and set the UI Type to
Page.
-
Add a Task to the UI Page. Choose the Settings button on the top ribbon, navigate to the Tasks tab, select the icon to add a new Task, and provide the following details:
- Name -
Execute Action - Type -
Execute Action - DEE Action -
CalculateMaterialQuantity(System DEE Action)

- Name -
-
Add a Form widget and, in the General tab, add a descriptive Name (for example,
Material Selection).
-
Next, navigate to the Field tab, select the icon, and define:
- Name -
Material Selection - Value Type -
ReferenceType - Value Reference Type -
Entity Type - Value Reference Type Name -
Material

- Name -
-
Then, navigate to the Links tab, select the dropdown, choose Link, and provide:
- Source -
Material Selection - Output -
Material Change - Target -
Execute Action - Input -
Material

- Source -
-
In the link you just configured, add a new Converter by selecting dropdown, choose Converter, and set it to
Load Entity.
-
Add another Form widget and, in the General tab, add a descriptive Name (for example,
Material Quantity).
-
Next, navigate to the Field tab, select the icon, and define:
- Name -
Material Selection - Value Type -
ReferenceType - Value Reference Type -
Entity Type - Value Reference Type Name -
Material

- Name -
-
Then, navigate to the Links tab, select the dropdown, choose Link, and provide:
- Source -
Material Selection - Output -
Material Change - Target -
Execute Action - Input -
Material

- Source -
-
In the end, your Links diagram should resemble the image below.

-
And your UI Page should look like this:

-
Finally, test the UI Wizard. Save the UI Page and open the browser DevTools network tab.
- Enter a material in the first field (for example,
Cookie01) - The material quantity will be displayed automatically in the result field (in this example,
20).
At the same time, you will see the ExecuteAction task in the network requests. Open the response to verify the payload.
Watch the video below to see this use case in action.
<iframe src="https://customer-40kvzg4z7gkyofrp.cloudflarestream.com/f3bf97c40bc32e717a3fb0c509eef17d/iframe?poster=https%3A%2F%2Fcustomer-40kvzg4z7gkyofrp.cloudflarestream.com%2Ff3bf97c40bc32e717a3fb0c509eef17d%2Fthumbnails%2Fthumbnail.jpg%3Ftime%3D%26height%3D600" loading="lazy" style="border: none; position: absolute; top: 0; left: 0; height: 100%; width: 100%;" allow="accelerometer; gyroscope; autoplay; encrypted-media; picture-in-picture;" allowfullscreen="true" - Enter a material in the first field (for example,
Download Example
You can download the complete UI Page of this example and import it directly into your environment here. For more information, see Import/Export UI Page.