Industrial Equipment Model - Master Data Guide#
Overview#
A sample Master Data specifically designed to cover Industrial Equipment Industry use-cases is available for download for each Industrial Equipment release in the Industrial Equipment Template Releases ⧉.
This modelling guide intends to guide the user on:
- How to setup and upload the Master Data into a CM MES environment.
- Explain the business context included in the Master Data.
- Which MES features are included in the Master Data, and which processes - both Base and Engineering - are covered by these features.
By providing a sample Master Data set that users can upload directly into the MES and start using immediately, we intend to:
- Illustrate how the MES standard functionalities work: Show users concrete examples of Products, Flows, Resources, BOMs and other entities so they can understand how the out-of-the-box MES features are meant to be used, particularly in Industrial Equipment business scenarios.
- Showcase best-practice usage patterns for Industrial Equipment use-cases: Showcase recommended patterns for Flows, Products, Resources, Material Tracking, and overall model, that align with MES best practices for common Industrial Equipment business scenarios.
- Provide a ready-to-use baseline: Give customers a starting point they can upload "as-is" or adapt, so they don't have to build all master data from scratch before using core MES capabilities.
- Accelerate training and configuration: Help users get up and running faster by showing what a minimal, working master data set looks like, shortening the learning curve for new instances.
- Provide a quick Setup data for MES Demos: Provide a sample master data that can be used to quickly configure and run MES demonstrations in an industrial equipment business context.
Master Data Setup#
Master Data is organized in two model blocks: the Base Model and the Engineering Model. The Base Model is mandatory and must always be loaded first. The Engineering Model is loaded on top of the Base Model and requires choosing one of two mutually exclusive options depending on whether the Industrial Equipment Template is installed in the environment.
Important: Option A and Option B are mutually exclusive. Load only one of them. Loading both will result in conflicts.
How to load Master Data files into CM MES:
Each file (.zip or .xlsx) must be loaded individually using the MES Master Data Package tool. Repeat the following steps for each file in the order specified in the sections below:
- Navigate to Administration > Master Data Packages > New.
- Enter a Name, select the Type, and upload the file using Browse File (accepted formats:
.zip,.xlsx,.xml,.json). - Click Create. The package record opens automatically.
- Click Run > Load. A dialog titled "Load Master Data Package" opens, listing all objects available in the package. Click Select All Items to select all, then click Load. The MES processes each object type sequentially and displays a detailed result log (objects created, updated, or skipped) with a status indicator per object type upon completion.
Note: If any error occurs during loading, the entire operation is rolled back and no data is loaded into the system.
Within each Excel file, objects are loaded in the order defined by the worksheet sequence.
See also: Master Data Packages ⧉ in the CM MES Documentation.
Base Model#
By using the provided Base Model, users will be able to perform the core operations of the MES, such as running a Material through a Production Flow. The main Production Flows are enriched to simulate activities commonly found in a real industrial equipment manufacturing facility, giving users the opportunity to explore MES capabilities in a realistic environment. By moving a Material through the Flow, users can experience functionalities such as automatic and manual material consumption based on BOM, Rework Flows, Time Constraints, Material Logistics, Kanban Replenishment, Production Orders, Notifications and other core features.
-
Load the file masterdata_indeq_base.zip ⧉ from the folder 1_base using the Master Data Package tool (see loading instructions above).
-
Navigate to Administration > Entity Types, search for Material, open it, and click Generate in the top action bar. Confirm by clicking Generate in the dialog.
See also: Entity Types ⧉ in the CM MES Documentation.
- Future actions “Send e-mail” were set for the Step SHIPPING FINAL CUSTOMER. Please change the e-mail defined in the Distribution List by:
- Navigate to Business Data > Step, search for STEP SHIPPING FINAL CUSTOMER, open it, and click Future Actions in the right panel. Then click Special Manage, under Manage in the Future Action tab. Change the e-mail defined in the Distribution List. Confirm by clicking Update in the Special Manage Future Actions wizard.
See also: Manage Future Actions ⧉ in the CM MES Documentation.
- Three Business Workflows were loaded as part of the Base Model. To activate them, navigate to Low Code > Business Workflows, open each of the following workflows, and click Request Approval in the top action bar:
- Automatic Track-in for Rework InduTech
- Shipping to Facility Warehouse InduTech
- Store Raw Material in Warehouse InduTech
See also: Business Workflows ⧉ in the CM MES Documentation.
- NameGenerator for manual Split: navigate to Administration > DEE Actions, search for ResolveNameGenerator, and open it.
- In the Action Code, locate the case
SplitMaterialInputand change the value ofNameGeneratorNamefrom"MaterialNameGenerator"to"SplitLotNameGenerator". - Click Validate to confirm there are no errors, then click Save. In the Save new version dialog, ensure Set this version effective is checked, then click Save.
See also: DEE Actions and Name Generators ⧉ in the CM MES Documentation.
- To use the Material Logistics Module, store all Raw Materials in the Warehouse. Navigate to Business Data > Step, search for Store InduTech Warehouse, and open it. Click Views (top right) and select Step View. Select all 17 materials using the header checkbox, then click Store in the top action bar. A two-step wizard opens:
- Step 1 - Resource: select Store InduTech Warehouse and click Next.
- Step 2 - Materials: confirm the list of materials to store and click Store.
A green confirmation message - "Material(s) was/were stored successfully" - confirms the operation. All materials will appear with state Queued in the Step View.
- To test automatic Replenishment within the Storage Resources, store some components in the Kanban resources. Navigate to Business Data > Resource, search for Kanban Fabrication, and open it. Click Views (top right) and select Resource View. Select some materials from the grid - only materials whose products are listed in the Resource Replenishment Context Smart Table for that resource - then click Store in the top action bar and follow the wizard (same flow as step 5 above). Repeat the same steps for Kanban Final Assembly.
Important: Only select materials whose products are configured in the Resource Replenishment Context for the specific Kanban resource. To verify which products are configured, navigate to Administration > Tables, search for the Smart Table ResolveReplenishmentContext, and check the entries for the relevant resource. Selecting materials from products not listed in this table will result in the following error during the Store wizard: "There is a configuration mismatch (ResolveReplenishmentContext) for the data sent to Product [product name]."
- If you are not using a User from the Master Data, create a new User and Employee. Navigate to Business Data > Employee > New. A two-step wizard opens:
- Step 1 - User: select an existing User, or click Create to open the Create New User form. Fill in the required fields (Account, Name) and define a PIN. Click Create - the wizard returns automatically to step 1 with the new User selected. Click Next.
- Step 2 - General Data: fill in the required fields: Name, Type, Number, and Calendar. Click Create.
Note: The PIN is required to perform certain operations in the MES Shop Floor interface.
Engineering Model#
By adding the Engineering Model on top of the Base Model, users will be able to perform Checklists and Data Collections, consult relevant Documents for a given operation (such as assembly procedures and equipment manuals), review the Recipe to be used in a specific Resource, ensure that Employees have the required Certifications to operate a Resource and/or Process Activity or to perform a given operation, and carry out Setup and Line Clearance when needed, among other functionalities.
Choose one of the following options based on your environment.
Option A - Base MES Only#
Use this option if the Industrial Equipment Template package is not installed in your environment.
- The file
masterdata_indeq_engineering.xlsxis included inside masterdata_indeq_engineering_1.zip ⧉. Open it and check the following tabs for outdated dates: - EmployeeQualification tab: check the QualificationDate and ValidTo columns.
- EmployeeCertification tab: check the CertificationTargetDate, CertificationDate, and ValidTo columns.
If any dates need to be updated, edit the file, and repackage it into the zip before proceeding to step 2.
-
Load the file masterdata_indeq_engineering_1.zip ⧉ from the folder 2a_engineering using the Master Data Package tool (see loading instructions above).
-
Navigate to Business Data > Change Set and open CS-Label IE. Verify that the Labels are listed under the Items tab, then click Request Approval in the top action bar. The Labels included in the Change Set will automatically become Effective.
-
Load the file masterdata_indeq_engineering_2.xlsx ⧉ from the folder 2a_engineering using the Master Data Package tool (see loading instructions above).
-
The User you are using may need an Employee, Qualification and Certification assigned to process Material in some Steps and Resources.
Option B - Industrial Equipment Template Installed#
Use this option if the Industrial Equipment Template package is installed in your environment.
- The file
masterdata_indeq_engineering_template.xlsxis included inside masterdata_indeq_engineering_template_1.zip ⧉. Open it and check the following tabs for outdated dates: - EmployeeQualification tab: check the QualificationDate and ValidTo columns.
- EmployeeCertification tab: check the CertificationTargetDate, CertificationDate, and ValidTo columns.
If any dates need to be updated, edit the file, and repackage it into the zip before proceeding to step 3.
-
Navigate to Administration > Tables > Smart Tables, search for BOMContext, and open it. Remove the following entries before proceeding:
-
Filter by Step = MAIN BOARD, select the row where the BOM column shows BOM Fabrication_VFD-10HP, and click Remove in the top action bar.
- Clear the Step filter, then identify all rows where the BOM column shows BOM Final Assembly HVAC RTU or BOM Final Assembly TBG-LM. Select all those rows and click Remove.
A green confirmation message - "Operation completed successfully" - confirms each removal. Verify the entries are no longer present before proceeding.
-
Load the file masterdata_indeq_engineering_template_1.zip ⧉ from the folder 2b_engineering_template using the Master Data Package tool (see loading instructions above).
-
Navigate to Business Data > Flow, search for Fabrication_Electric, and open it. Switch to the last version in Created state using the version dropdown. Click Views (top right) and select Process Activities to confirm the flow has activities assigned (as per picture below).
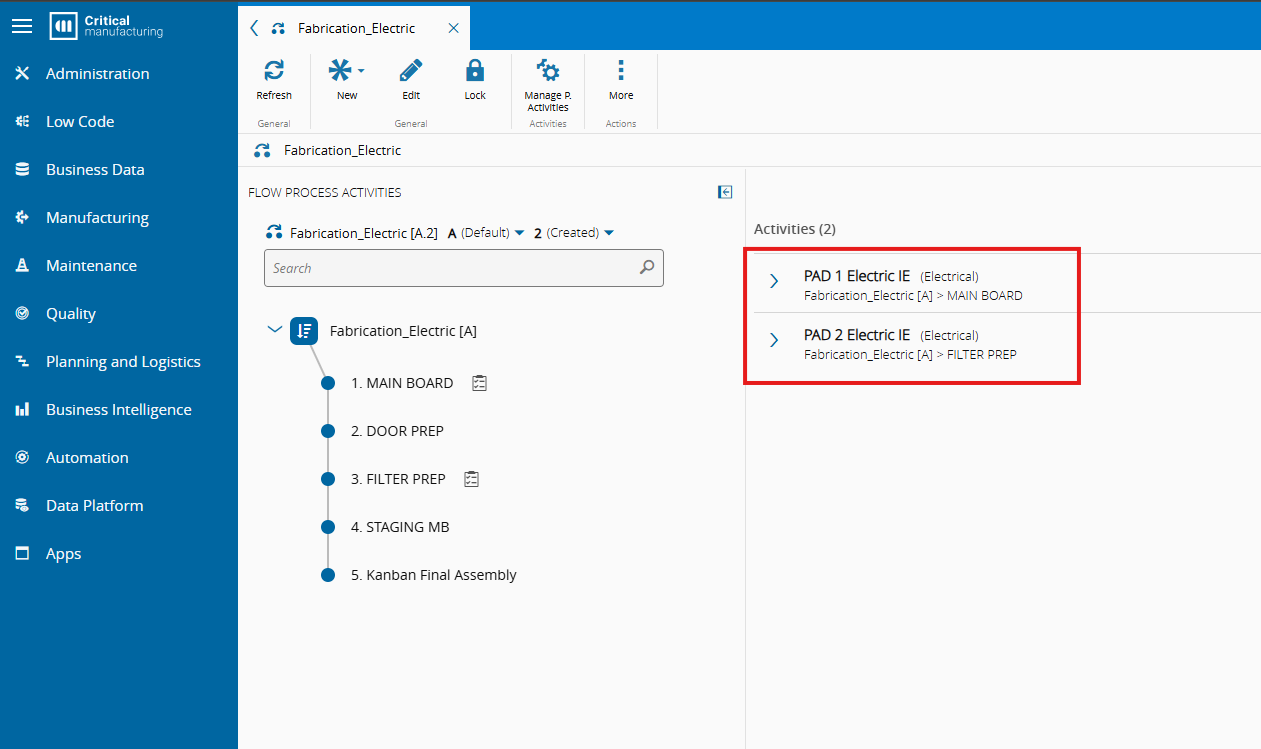
Then click More > Change Change Set, select Change Set PAD Electric as the Destination Change Set, and click Change. A green confirmation message - "The Change Set was successfully changed." - confirms the operation. Finally, click Request Approval in the top action bar.
-
Navigate to Business Data > Flow, search for Final Assembly, and open it. Switch to the last version in Created state. Click Views > Process Activities to confirm activities are present. Then click More > Change Change Set, select Change Set PAD Assemble, and click Change. Click Request Approval in the top action bar.
-
Navigate to Business Data > Flow, search for Final Assembly TBG, and open it. Switch to the last version in Created state. Click Views > Process Activities to confirm activities are present. Then click More > Change Change Set, select Change Set PAD Assemble TBG, and click Change. Click Request Approval in the top action bar.
-
Navigate to Business Data > Change Set and open CS-Label IE. Verify that the Labels are listed under the Items tab, then click Request Approval in the top action bar. The Labels included in the Change Set will automatically become Effective.
-
Load the file masterdata_indeq_engineering_template_2.xlsx ⧉ from the folder 2b_engineering_template using the Master Data Package tool (see loading instructions above).
-
The User you are using may need an Employee, Qualification and Certification assigned to process Material in some Steps and Resources.
See also: Employee, Qualification and Certification ⧉ in the CM MES Documentation.
Business Case Context#
The sample Master Data portrays a fictional company, InduTech, a global leader in industrial equipment, deploying CM MES across its new European RTU factory in a single, coordinated rollout.
The site produces two Finished Good products. The RTU size and color of each Finished Good are defined by characteristics when the Production Order is sent from ERP to MES. At the end of the process, the RTU unit is shipped to the customer. The site has a production facility and a warehouse where consumables are controlled, managed, and sent to production when stocks run low or whenever requested by the production team.
Production Process:

Site Overview:
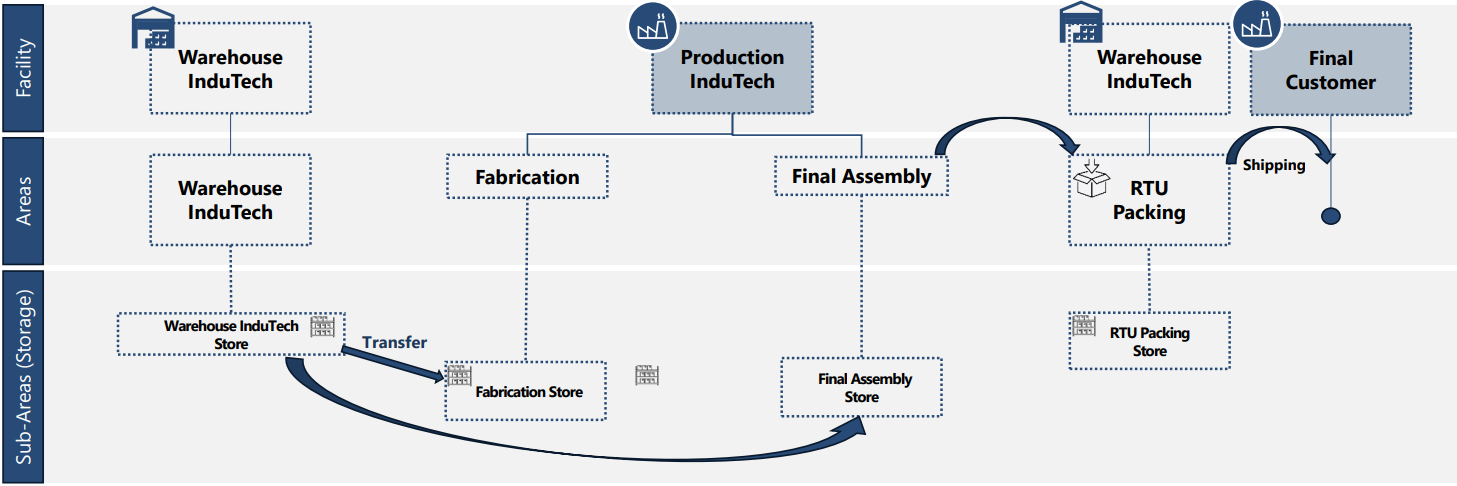
The InduTech site is structured across three levels:
| Level | Entities |
|---|---|
| Facility | Warehouse InduTech, Production InduTech, Final Customer |
| Areas | Warehouse InduTech, Fabrication, Final Assembly, RTU Packing, Shipping |
| Sub-Areas (Storage) | Warehouse InduTech Store, Fabrication Store, Final Assembly Store, RTU Packing Store |
Materials flow from the Warehouse InduTech Store into Fabrication and Final Assembly via Transfer Requirements (Kanban), and from Final Assembly into RTU Packing and then to Shipping.
Products and Flows Structure#
The InduTech model is built around two Finished Good products, each produced in its own dedicated Final Assembly flow. The components consumed during Final Assembly are Semi-Finished Goods (SFGs), each produced in independent Fabrication flows. All Fabrication flows share the same last step, Kanban Final Assembly, which acts as the stock source for the Final Assembly flows.
 Finished Goods:
| Product | Flow |
|---|---|
| Rooftop Unit - HVAC RTU | Final Assembly |
| Rooftop Unit - TBG-LM | Final Assembly TBG |
Both Final Assembly flows share the same steps. The SFGs consumed at each step are determined by Product Characteristics (Size and Color) defined on the material being produced.
Semi-Finished Goods and their Fabrication Flows:
| Flow | SFGs Produced |
|---|---|
| Fabrication_Metal Plate | RTU-LATERAL W, RTU-FRONT W, RTU-FRAME W, RTU-LATERAL C, RTU-FRONT C, RTU-FRAME C |
| Fabrication_Coil - Copper | ALU-COIL-4ROW, COP-COIL-4ROW |
| Fabrication_Electric | VFD-10HP |
| Fabrication_Foam | FOAM-XR435 |
| Kanban Final Assembly | Roof 10T HVAC, Roof 20T HVAC, Roof 30T HVAC, Roof 10T TBG, Roof 20T TBG, Roof 30T TBG |
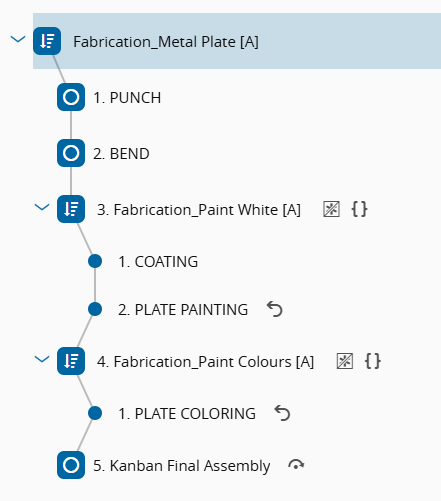
Within the Fabrication_Metal Plate flow, the material follows one of two alternate sub-flows depending on the product color:
| Sub-Flow | Products |
|---|---|
| Fabrication_Paint White | RTU-LATERAL W, RTU-FRONT W, RTU-FRAME W |
| Fabrication_Paint Colors | RTU-LATERAL C, RTU-FRONT C, RTU-FRAME C |
All Fabrication flows share the same last step, Kanban Final Assembly. After production, all SFGs are stocked at this step and consumed from there into the respective Finished Good materials in the Final Assembly flows, according to the Product Characteristic conditions (Size and Color) defined on each BOM.
Base Model - Functionalities#
The following sections describe which MES functionalities are available in each Flow and Step of the Base Model. Tables are organized by Flow, with columns indicating whether the functionality belongs to the Base, Engineering, or Quality layer.
Note: Quality functionalities are not yet available in this release. The Quality column is included for reference only.
Fabrication Flows#
Flow: Fabrication_Metal Plate#
| Step | Base | Engineering | Quality |
|---|---|---|---|
| PUNCH | Automatic Consumption BOM with By-Product & Shared Feeder Durables | Recipe with Running Mode | - |
| BEND | Durables | Recipe Line Clearance on Changeover | - |
| (Alternate Flow - Product Group = "Fabrication_Paint White") | |||
| COATING | Automatic Consumption Minimum Time Constraint | - | - |
| PLATE PAINTING | Automatic Consumption Shared Feeder Rework (Limit by Step) | Recipe with Sub-Recipe Step Certification (Qualification) | - |
| (Alternate Flow - Product Group = "Fabrication_Paint Colours") | |||
| PLATE COLORING | Automatic Consumption Shared Feeder Rework (Limit by Reason) | Recipe Step Certification (Qualification) | - |
| Kanban Final Assembly | Materials stored in this step to be consumed in the Final Assembly Flow | - | - |
Note: Line Clearance on Changeover at BEND requires Setup Characteristic = Recipe. A known product issue means this feature is not fully operational in this step at this time.
Flow: Fabrication_Coil - Copper#
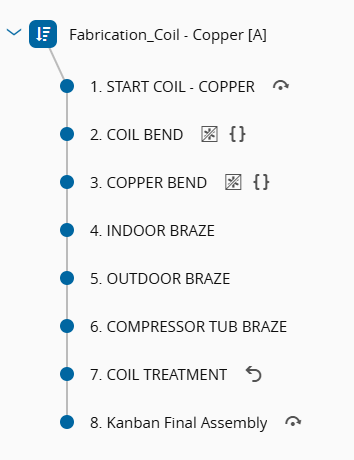
| Step | Base | Engineering | Quality |
|---|---|---|---|
| START COIL - COPPER | - | Printable Document | - |
| COIL BEND | Step with Conditions Durables Manual Consumption (Retrieve RM) | Checklist linked with DC and BOM | - |
| COPPER BEND | Step with Conditions Durables Manual Consumption (Retrieve RM) | Checklist linked with DC and BOM | SPC |
| INDOOR BRAZE | Manual Consumption (Retrieve RM) Resource Check-in | Line Clearance Always Checklist linked with BOM Resource Check-in with Certification (Trainer and Trainee) | - |
| OUTDOOR BRAZE | Manual Consumption with Tolerance | Checklist linked with DC and BOM Calculated DC Parameter | - |
| COMPRESSOR TUBE BRAZE | Split and Track-out | Document Calculated DC Parameter | - |
| COIL TREATMENT | Batch Management Minimum Time Constraint Rework (Global Limit) | Recipe | Inspection Plan |
| Kanban Final Assembly | Materials stored in this step to be consumed in the Final Assembly Flow | - | - |
Flow: Fabrication_Electric#
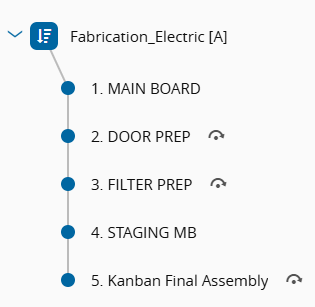
| Step | Base | Engineering | Quality |
|---|---|---|---|
| MAIN BOARD | Manual Consumption with Substitute (Retrieve RM) | - | - |
| DOOR PREP | Manual Consumption (Retrieve RM) Resource Check-in | Document Resource Check-in with Certification | - |
| FILTER PREP | Manual Consumption (Retrieve RM) | Checklist linked with DC and BOM | SPC |
| STAGING MB | Manual Consumption (Retrieve RM) Maximum Time Constraint | Printable Document | - |
| Kanban Final Assembly | Materials stored in this step to be consumed in the Final Assembly Flow | - | - |
Flow: Fabrication_Foam#

| Step | Base | Engineering | Quality |
|---|---|---|---|
| FOAM PREP | Future Note | Document | - |
| FOAM | Manual Consumption (Retrieve RM) | Data Collection Document | SPC (Attribute) |
| Kanban Final Assembly | Materials stored in this step to be consumed in the Final Assembly Flow | - | - |
Flow: Final Assembly#
PCR = Product Characteristic Rule
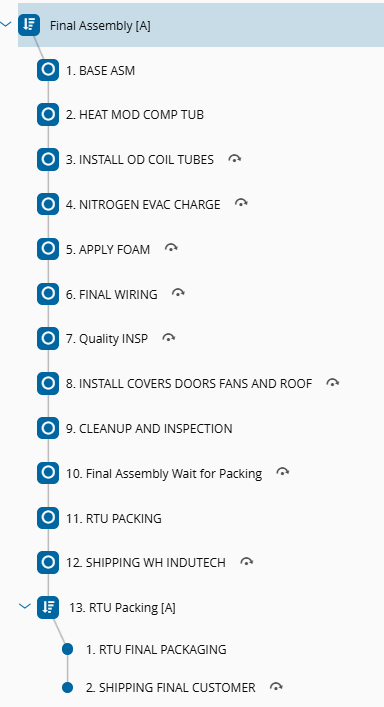
| Step | Base | Engineering | Quality |
|---|---|---|---|
| BASE ASM | Manual Consumption - BOM Variant (Retrieve RM) | Line Clearance on Changeover Line Verification → PCR Checklist linked with BOM Document → PCR | - |
| HEAT MOD COMP TUB | - | Step Certification Document → PCR | - |
| INSTALL OD COIL TUBES | Manual Consumption - BOM Variant (Retrieve RM) | Step Certification Document → PCR Checklist linked with BOM and DC | - |
| NITROGEN EVAC CHARGE | Manual Consumption - BOM Variant (Retrieve RM) | Step Certification Document → PCR Checklist linked with BOM | - |
| APPLY FOAM | Manual Consumption - BOM Variant & Tolerance (Retrieve RM) | Step Certification Document → PCR Checklist linked with BOM | - |
| FINAL WIRING | Mixed Assemble - BOM Variant & Information Capture (Retrieve RM) | Step Certification Document → PCR Checklist linked with BOM | - |
| Quality INSP | Step with Conditions Future Hold | Data Collection with Calculated Parameters | SPC |
| INSTALL COVERS FANS AND ROOF | Mixed Assemble - BOM Variant & Fixed Quantity | Step Certification Document → PCR Checklist linked with BOM | - |
| CLEAN UP INSPECTION | - | Printable Document Data Collection → PCR | Sampling Plan |
| Final Assembly Wait for Packing | - | - | - |
| RTU PACKING | Packing Level 1 | Printable Document Data Collection | - |
| SHIPPING WH INDUTECH | Automatic Shipping (Low Code) | - | - |
| Sub-Flow: RTU PACKING (final packaging and shipping) | |||
| RTU FINAL PACKAGING | Packing Level 2 | Printable Document | - |
| SHIPPING FINAL CUSTOMER | Future Action: Send e-mail with Notification Shipping | - |
Rework Flows#
Rework Flow: RW_Metal Plate#
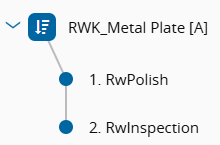
Linked to Steps: - PLATE COLORING → Return Step: PLATE COLORING - PLATE PAINTING → Return Step: COATING
| Step | Base | Engineering | Quality |
|---|---|---|---|
| RwPolish | Automatic Track-in (Low Code) | - | - |
| RwInspection | - | Checklist | - |
Rework Flow: RW_Coil#

Linked to Steps: - COIL TREATMENT → Return Step: COIL TREATMENT
| Step | Base | Engineering | Quality |
|---|---|---|---|
| RwPolish | Automatic Track-in (Low Code) | - | - |
| RwInspection | - | Checklist | - |
Material Logistics#
Flow: Store InduTech Warehouse#
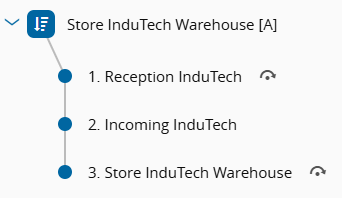
| Step | Base | Engineering | Quality |
|---|---|---|---|
| Reception InduTech | - | Printable Document | - |
| Incoming InduTech | - | - | Inspection Plan |
| Store InduTech Warehouse | Automatic Store (Low Code) | - | - |
From the Store InduTech Warehouse step, Materials are moved via Transfer Requirements to specific Storage Resources in the production areas, based on Material Logistics configurations:
| Flow | Step |
|---|---|
| Kanban Fabrication | Kanban Fabrication |
| Kanban Final Assembly | Kanban Final Assembly |
| Kanban RTU Packing | Kanban RTU PACKING |
Other Functionalities - Base Model#
Security - Roles, Users, Employees, Features, DataGroup, Report Folder
See also: Security ⧉ in the CM MES Documentation.
Attributes - Material Attributes
See also: Attributes ⧉ in the CM MES Documentation.
State Model - SEMI E58 - Custom Resource State Model
See also: State Models ⧉ in the CM MES Documentation.
Name Generators - A set of Name Generators for Material, Split, and Expand operations
See also: Name Generators ⧉ in the CM MES Documentation.
DEEs & Rules - DEEs and Rules for Steps with Conditions
See also: DEE Actions and Rules ⧉ in the CM MES Documentation.
Sorter Rules - Sorter Rules for Resources, Materials and Material Logistics
See also: Sort Rule Set ⧉ in the CM MES Documentation.
Alarm Management - Notification triggered through Event Rules when a Material is put on Hold - Notifications in Business Rules - Notification when a Material reaches or leaves a Step - Notification when a Material is sent to Rework
See also: Event Rules ⧉ in the CM MES Documentation.
Business Rules - Material is automatically stored in the Warehouse - Material is automatically shipped to Facility "Warehouse InduTech" + Notification - When sent to Rework, Material is automatically tracked-in to the Rework Station
See also: Business Workflows ⧉ in the CM MES Documentation.
Calendar & Scheduling - CalendarDay with holidays removed - ShiftLogBook
See also: Calendar and Shift Logbook ⧉ in the CM MES Documentation.
Material Logistics - Material Logistics with Resource Automatic Replenishment
See also: Material Logistics ⧉ in the CM MES Documentation.
Partners & Compliance - Business Partner - Moisture Sensitive Level for Raw Materials - Product Manufacturers
See also: Business Partner, Moisture Sensitive Level and Product Manufacturers ⧉ in the CM MES Documentation.
Reasons - Reasons for Rework, Loss, Hold, Bonus, Defect - Reason Repair Actions - Global Rework Limit for Products
See also: Reason ⧉ in the CM MES Documentation.
Cost - Cost context for Products, Steps, Resources, Employees and Calendar
See also: Material Costing ⧉ in the CM MES Documentaion.
Other - Material Defect (see also: Material Defects ⧉ in the CM MES Documentation) - Product Characteristics (see also: Product Characteristics ⧉ in the CM MES Documentation) - Storage Resources with and without Binning, with and without Floor Life Save - Instruments with Capability Set (see also: Data Collection with Instruments ⧉ in the CM MES Documentation) - Resource Group - Production Orders (see also: Production Orders ⧉ in the CM MES Documentation) - Keyboard Shortcuts (see also: Keyboard Shortcuts ⧉ in the CM MES Documentation) - Layout for Step View and Resource View - ResourceIdealCycleTime - StepProductYieldAndCycleTimeContext - Containers with Restrictions (MaterialContainerTypeContext)
Engineering Model - Functionalities#
The Engineering Model adds a layer of process control and traceability on top of the Base Model. The functionalities available per Step and Flow are the same regardless of whether Option A or Option B was used during setup. The difference between the two options lies exclusively in the setup process and in the Smart Table configurations that are pre-loaded: Option B includes additional Smart Table contexts that automatically associate Checklists, Data Collections, Documents and Durables to Materials by product, flow and step.
The Engineering column in all tables above reflects the Engineering Model content applicable to both options.
Additional Engineering Model entities loaded across all Flows:
- Checklists
See also: Checklist ⧉ in the CM MES Documentation.
- Data Collections and Data Collection Limit Sets (DCLS)
See also: Data Collection ⧉ in the CM MES Documentation.
- Documents
See also: Document ⧉ in the CM MES Documentation.
- Recipes and Sub-Recipes
See also: Recipe ⧉ in the CM MES Documentation.
- Employee Qualifications and Certifications
See also: Qualification and Certification ⧉ in the CM MES Documentation.
- Setup Matrix for Line Clearance configurations
See also: Setup and Line Clearance ⧉ in the CM MES Documentation.
- Qualification Checks
See also: Qualification Check ⧉ in the CM MES Documentation.
- Label Specifications and Printable Documents
See also: Printable Document ⧉ in the CM MES Documentation.